Sizzling Kung Pao Chicken: A Weeklong Flavor Fiesta! 🌶️🍗
Introduction
Embarking on a culinary journey that celebrates the vibrant flavors of Chinese cuisine, this Kung Pao Chicken recipe is crafted for those who crave a dish that is both savory and nourishing. Love With Recipes, a platform dedicated to bringing you authentic and innovative recipes, presents this comprehensive guide to mastering Kung Pao Chicken that can be prepared once and enjoyed throughout the week. This dish combines tender, juicy chicken with crunchy peanuts, aromatic garlic, and a perfectly balanced sauce that delivers a harmonious blend of spicy, sweet, and savory notes. Whether you’re a seasoned home cook or a beginner exploring Asian flavors, this recipe offers a delightful experience with step-by-step instructions, useful tips, and nutritional insights to make your cooking both enjoyable and health-conscious.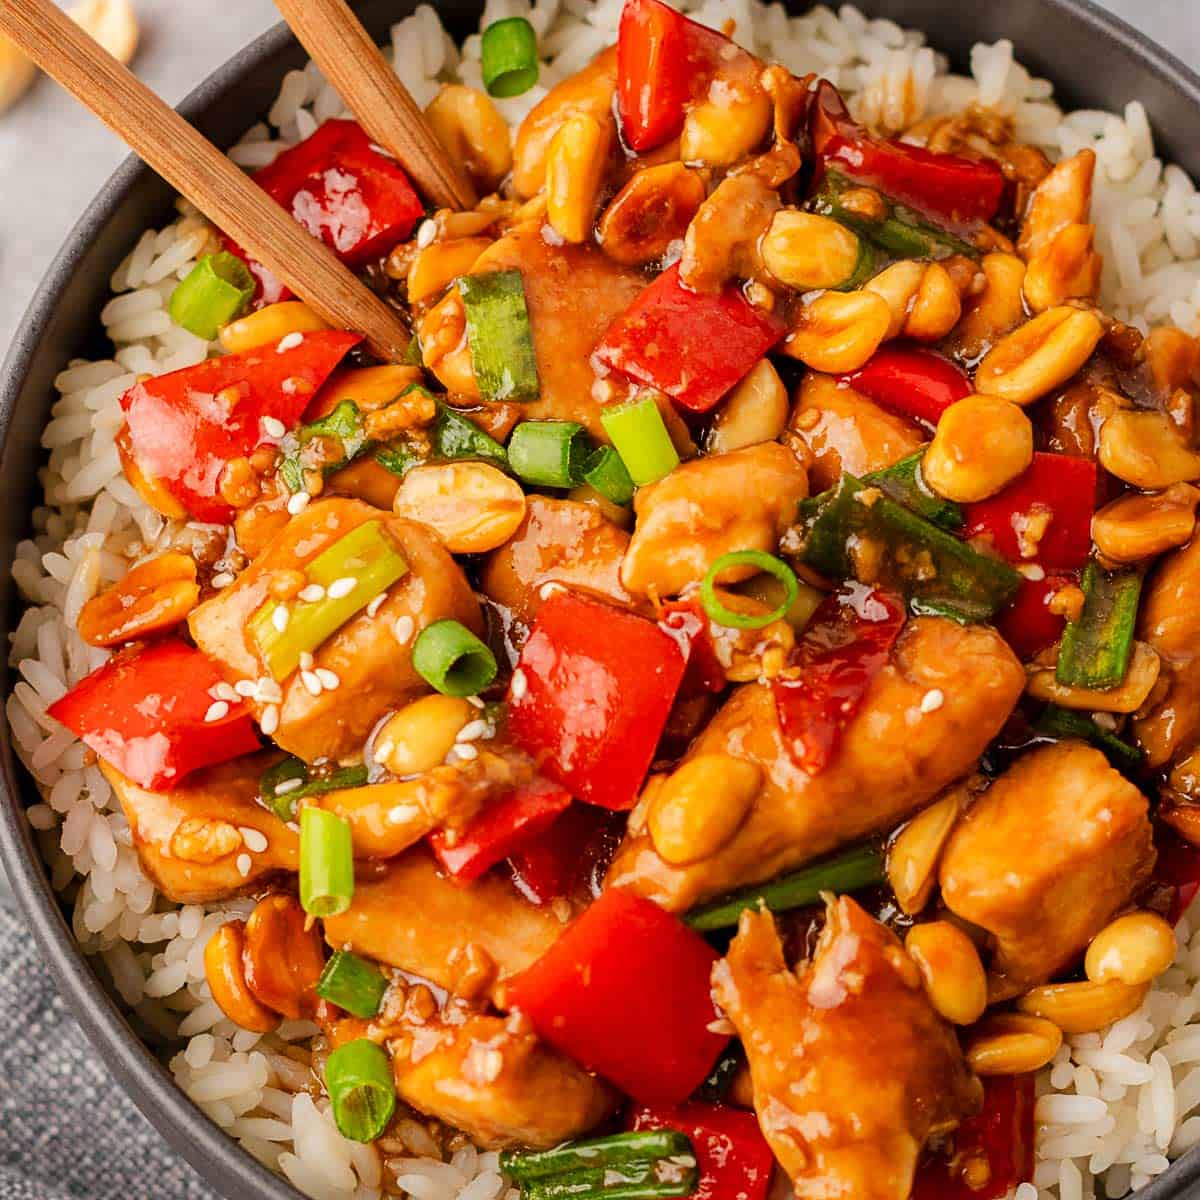
Time
The total duration for preparing this flavorful Kung Pao Chicken is approximately 40 minutes. This includes 20 minutes of prep time, during which you gather ingredients, slice the chicken, and prepare the sauce, and 20 minutes of active cooking. This timeframe is ideal for a quick weeknight meal or meal prep for the upcoming days, ensuring you can enjoy a homemade, restaurant-quality dish with minimal effort.
Needed Equipment
- Stainless steel or ceramic mixing bowls
- Wok or large deep skillet
- Measuring cups and spoons
- Sharp chef’s knife
- Cutting board
- Whisk or fork for mixing
- Slotted spoon or tongs
- Rice cooker or saucepan for cooking rice
- Grater or garlic press (optional, for garlic prep)
- Serving spatula or spoon
- Food storage containers for leftovers
Tags
Asian, Chinese Cuisine, Low Cholesterol, Healthy, Meal Prep, Weeknight Dinner, Spicy, Nutty, Gluten-Free (if using gluten-free soy sauce), High Protein, Quick & Easy, Family-Friendly
Serving Size
This recipe yields approximately 10 generous servings, making it ideal for family dinners or meal prepping for the week. Each serving provides a hearty portion of protein, vegetables, and rice, ensuring a balanced intake of nutrients.
Difficulty Level
Intermediate. While the steps are straightforward, mastering the timing to achieve perfectly cooked chicken and crisp-tender broccoli requires attention. However, with clear instructions and preparation, even home cooks with moderate experience can excel at this dish.
Allergen Information
- Contains soy (soy sauce)
- Contains tree nuts (peanuts)
- Contains gluten (unless gluten-free soy sauce is used)
- Contains alcohol (dry sherry)
Dietary Preference
Gluten-Free, Dairy-Free, Nutty (can be modified for nut allergies), High Protein, Low Cholesterol (when using lean chicken and minimal oil)
Course
Main Course
Cuisine
Chinese
Ingredients
| Quantity | Ingredient |
|---|---|
| 36 oz | Water |
| 24 tbsp | Soy Sauce (preferably low sodium for health) |
| 4 tbsp | Cornstarch |
| 12 tbsp | Dry Sherry (or substitute with rice vinegar for a non-alcoholic version) |
| 10 | Boneless Skinless Chicken Breast Halves |
| 4 tsp | Dried Red Pepper Flakes (adjust based on spice preference) |
| 1 1/4 | Green Onions, sliced |
| 5 cloves | Garlic, minced |
| 5 cups | Broccoli Florets |
| 5 oz | Salted Peanuts |
| 15 cups | Brown Rice (uncooked) |
Instructions
Step 1: Prepare the Sauce
Begin by creating the savory sauce that will envelop your chicken and vegetables in rich, flavorful goodness. In a mixing bowl, combine 24 tablespoons of soy sauce with 36 ounces of water. Whisk thoroughly to achieve a uniform liquid. Next, add 4 tablespoons of cornstarch to the mixture, whisking vigorously to prevent lumps. The cornstarch acts as a thickening agent that will give the sauce its glossy, saucy consistency once cooked. Incorporate 12 tablespoons of dry sherry, which adds depth and a subtle sweetness to the sauce, or substitute with an equal amount of rice vinegar if you prefer an alcohol-free version. To balance the flavors, add a teaspoon of sugar or honey if desired, to enhance the sweetness and round out the taste profile. Set this mixture aside while you prepare the other ingredients.
Step 2: Prepare the Chicken
Using a sharp chef’s knife, slice the chicken breasts into bite-sized cubes or thin strips, approximately 1-inch in size. Uniform pieces ensure even cooking and a pleasing presentation. Place the chicken pieces in a medium bowl and season lightly with a pinch of salt and pepper if desired. To help the chicken absorb flavors and remain tender during cooking, marinate the pieces in a small amount of the prepared sauce for 10-15 minutes, though this step is optional for quick cooking. Meanwhile, preheat your wok or large skillet over medium-high heat. Once hot, add 1 tablespoon of oil (preferably vegetable or peanut oil for high smoke point). When the oil shimmers, add the dried red pepper flakes. Let them cook for approximately 2 minutes until they darken slightly and release their aroma, imparting a delicate spicy undertone to the dish. Add the chicken to the wok, spreading the pieces out evenly. Cook for 2-3 minutes, stirring frequently, until they develop a light golden-brown color. Do not overcook at this stage; they will finish cooking when added back later.
Step 3: Prepare the Aromatics and Vegetables
Once the chicken is browned, use a slotted spoon or tongs to transfer it to a plate, leaving behind any excess oil in the wok. Add another tablespoon of oil if needed, then toss in the sliced green onions and minced garlic. Stir-fry for about 1 minute until fragrant, ensuring the garlic does not burn. For added flavor, you can grate fresh ginger (about 1 teaspoon) and add it at this stage, stir-frying for another 30 seconds. Next, incorporate the broccoli florets into the wok. Stir-fry the vegetables for roughly 2 minutes, just enough to keep them crisp-tender and vibrant green. This preserves their crunch and nutritional value while ensuring they are cooked through. If you prefer softer broccoli, extend the cooking time by a minute. Keep stirring to prevent sticking or burning, maintaining high heat to facilitate quick cooking.
Step 4: Incorporate the Sauce and Simmer
Give the sauce a quick stir to ensure the cornstarch remains evenly distributed, then pour it into the wok over the vegetables. Use a spatula or spoon to stir everything together, coating the broccoli and aromatics thoroughly. Cover the wok with a lid and reduce the heat slightly to medium. Allow the mixture to simmer for about 3 minutes. During this time, the sauce will thicken, forming a glossy coating that clings to the chicken and vegetables. The broccoli will become tender yet retain some crunch, and the flavors will meld beautifully. Stir occasionally to prevent sticking, and check the consistency of the sauce. If it’s too thick, add a splash of water or stock; if too thin, cook uncovered for an additional minute to thicken further.
Step 5: Finish the Dish
Return the cooked chicken to the wok, along with salted peanuts, which add a nutty crunch and richness. Stir everything together, ensuring the chicken is coated with the sauce and the peanuts are evenly distributed. Heat through for another 2-3 minutes, allowing the flavors to meld and the chicken to reach an internal temperature of at least 165°F (74°C). Taste and adjust seasoning if necessary — a splash more soy sauce or a pinch of sugar can be added to balance flavors. For extra heat, sprinkle additional red pepper flakes or sliced fresh chili peppers. Garnish with additional sliced green onions and crushed peanuts for presentation and texture. Serve hot over a bed of steamed brown rice or your preferred grain.
Preparation Tips
- Marinate the chicken: For extra flavor and tenderness, marinate the chicken in a little soy sauce and cornstarch for 10-15 minutes before cooking.
- Adjust spice level: Customize the heat by varying the amount of dried red pepper flakes or adding fresh chili slices.
- Use fresh ingredients: Fresh garlic, ginger, and green onions significantly enhance the dish’s aroma and flavor.
- Cooking in batches: If your wok isn’t large enough, cook the chicken and vegetables separately in batches to prevent overcrowding, which can cause steaming instead of stir-frying.
- Vegetable options: Feel free to substitute or add other vegetables such as bell peppers, snap peas, or carrots for variety.
Nutritional Information
| Nutrient | Per Serving |
|---|---|
| Calories | 1,159.4 kcal |
| Fat | 24.1 g |
| Saturated Fat | 4 g |
| Cholesterol | 68.4 mg |
| Sodium | 2731.7 mg |
| Carbohydrates | 166.2 g |
| Fiber | 10.3 g |
| Sugar | 5.4 g |
| Protein | 56.3 g |
Tips and Tricks
- Use high heat: Stir-frying requires high heat to quickly cook ingredients and preserve their texture and flavor.
- Prepare ingredients beforehand: Chop garlic, slice green onions, and prepare the sauce before starting to cook to streamline the process.
- Control oil usage: Use just enough oil for stir-frying to keep the dish healthier but ensure ingredients do not stick.
- Customize spice levels: For milder flavor, reduce red pepper flakes; for more heat, add sliced fresh chilies or more flakes.
- Adding nuts: Salted peanuts add crunch but can be replaced with cashews or omitted for allergy considerations.
Add-ons
- Chili oil drizzle for extra spice
- Fresh sliced red chilies or jalapeños
- Sesame seeds for garnish
- Fresh cilantro for a herbal touch
- Additional vegetables like bell peppers or snow peas
Side Dishes
- Steamed jasmine or brown rice
- Vegetable spring rolls
- Egg drop soup or hot and sour soup
- Stir-fried bok choy or Chinese broccoli
- Sweet and sour cucumber salad
Improvements
For a healthier twist, consider reducing the amount of soy sauce or substituting with low-sodium options. Incorporate more vegetables or swap chicken for tofu or shrimp for variety. To enhance flavor complexity, add a splash of rice vinegar or a dash of five-spice powder. Experimenting with different nuts like cashews or almonds can add new textures. For a gluten-free version, ensure soy sauce is replaced with tamari or a certified gluten-free alternative.
Save and Store
Leftovers can be stored in airtight containers in the refrigerator for up to 3 days. Reheat gently in a wok or microwave, adding a splash of water or broth to loosen the sauce. For meal prepping, divide into portions and freeze in zip-top bags or containers for up to 2 months. To maintain freshness, reheat in small batches rather than all at once, preventing overcooking and sogginess.
FAQ
Can I use chicken thighs instead of breasts?
Yes, chicken thighs can be used for a more tender and flavorful dish. Adjust cooking time accordingly, as thighs may take slightly longer to cook through.
Can I make this dish vegetarian?
Absolutely. Substitute chicken with firm tofu or tempeh, and ensure the sauce is plant-based if avoiding animal products. Use vegetable broth or water instead of sherry, and add extra vegetables for variety.
Is this dish spicy?
The level of spiciness depends on the amount of red pepper flakes used. Adjust to your preference, and add fresh chili slices if you desire more heat.
How can I reduce sodium content?
Use low-sodium soy sauce and limit added salt. You can also dilute the soy sauce slightly or balance flavors with more vinegar or a touch of honey.
Conclusion
Creating authentic Kung Pao Chicken at home is both rewarding and deliciously satisfying. This recipe combines simple ingredients with straightforward techniques to deliver a dish that impresses family and friends alike. Perfect for weekly meal prep or a quick dinner, it pairs beautifully with brown rice or other grains, making it a wholesome and flavorful addition to your culinary repertoire. Remember, the key to perfection lies in high heat stir-frying, timely ingredient addition, and balancing flavors to suit your palate. Enjoy the process, experiment with variations, and relish the delightful taste of homemade Kung Pao Chicken, courtesy of Love With Recipes!
References
- Li, Y. (2018). The Essential Wok Cookbook: A Simple Guide to Authentic Chinese Cooking. Tuttle Publishing.
- Chen, G. (2015). Chinese Stir-Fry Recipes: Classic and Modern. Asian Food Network.