Divine Kentucky Cream Candy: A Sweet Symphony of Tradition and Flavor 🍬
Introduction
Delving into the rich tradition of Southern confectionery, Kentucky Cream Candy stands out as a timeless treat that embodies the essence of homemade sweetness. Brought to life through simple ingredients and meticulous technique, this candy offers a delicate balance of creamy texture and luscious flavor that melts effortlessly on the tongue. Originating from the heart of Kentucky, this recipe has been cherished across generations, embodying the comfort and nostalgia of classic Southern desserts. At Love With Recipes, we are committed to preserving and sharing recipes like Kentucky Cream Candy, which not only satisfy the sweet tooth but also connect us to culinary history and family traditions. Whether you are an experienced candy maker or a home cook eager to explore traditional confections, this recipe provides detailed guidance to help you craft perfect, melt-in-your-mouth Kentucky Cream Candy every time.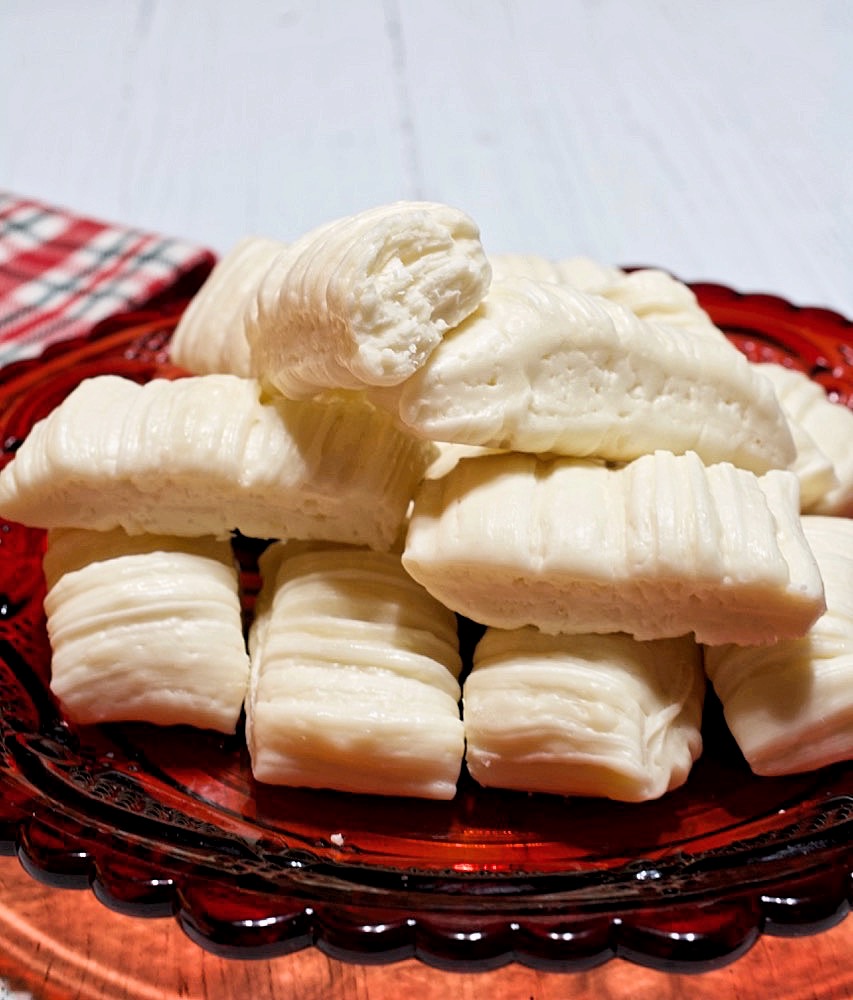
Time
Preparation and cooking time for Kentucky Cream Candy typically ranges from 20 to 30 minutes. This includes the time needed to prepare ingredients, monitor temperature, and shape the candy. Precise timing ensures the perfect texture, so patience and attention to detail are essential. Here’s a breakdown:
- Preparation: 5 minutes
- Cooking: 10–15 minutes
- Cooling and shaping: 10 minutes
Overall, plan for approximately 20–30 minutes from start to finish, making this an ideal quick homemade sweet for last-minute gatherings or spontaneous indulgence.
Needed Equipment
Essential Tools for Perfect Kentucky Cream Candy
- Heavy-bottomed saucepan: Ensures even heat distribution, preventing scorching or uneven cooking.
- Candy thermometer: Critical for monitoring temperature precisely to achieve the correct candy consistency.
- Marble slab or cool, hard surface: Facilitates proper cooling, shaping, and pulling of the candy.
- Wooden spoon or silicone spatula: For stirring ingredients without scratching your cookware.
- Butter or non-stick spray: To prepare surfaces and hands for shaping.
- Scissors or sharp knife: To cut the cooled candy into individual pieces.
- Damp cloth or cool hands: For handling and pulling candy without sticking or burning.
- Measuring cups and spoons: For precise measurement of ingredients.
- Heat-resistant gloves (optional): For added safety during hot syrup handling.
Tags
Sweet, Homemade, Classic, Traditional, Southern Cuisine, Candy-Making, No-Bake, Quick, Family-Friendly, Nostalgic, Dessert, Easy, Childhood Memories, Retro Confectionery
Serving Size
Yield: approximately 30 pieces of Kentucky Cream Candy. The size of each piece is roughly 1 inch by 1 inch, resembling a half-twist shape, making it perfect for gifting, sharing, or enjoying as a small sweet snack.
Difficulty Level
This recipe is classified as easy to moderate. It requires attention to detail, especially temperature control, but involves straightforward steps that are suitable for home cooks with basic candy-making experience. Patience and careful handling will produce the best results.
Allergen Information
This Kentucky Cream Candy contains:
- Dairy: Butter (derived from milk)
- Sugar: No common allergens, but high sugar content.
It is free from nuts, gluten, and soy, but always verify ingredients if you have allergies or sensitivities, especially if using processed or store-bought components.
Dietary Preference
This confection is suitable for a vegetarian diet. It is not vegan due to the presence of butter. It is low in protein and sugar but should be consumed in moderation, particularly by those managing carbohydrate intake.
Course
Dessert / Confectionery
Cuisine
Southern United States / American Classics
Ingredients
Detailed Ingredient List
| Quantity | Ingredient |
|---|---|
| 3 cups | Sugar |
| 1 cup | Water |
| 1/2 cup | Butter (unsalted preferred) |
Instructions
Step 1: Combining Ingredients
Begin your candy-making process by preparing your workspace and ingredients. Use a heavy-bottomed saucepan to combine 3 cups of granulated sugar, 1 cup of water, and 1/2 cup of butter. The choice of a heavy-bottomed pan is critical as it ensures even heat distribution, preventing the sugar from scorching or sticking to the bottom during boiling. Measure out each ingredient carefully to maintain consistency and accuracy, which are key to achieving the perfect candy texture.
Step 2: Heating and Boiling
Place the saucepan over medium heat and turn on your stove. Gently stir the mixture with a wooden spoon or silicone spatula until the sugar dissolves completely into the water, and the butter melts uniformly. Once the sugar is fully dissolved, refrain from stirring further to avoid crystallization. Allow the mixture to come to a gentle boil, watching for vigorous bubbling. This process normally takes about 5–7 minutes, but monitor closely. The goal is to reach a temperature of 265°F (129°C) on your candy thermometer, which is known as the “hard ball” stage. This precise temperature ensures the candy will set with the ideal firmness and smoothness. Use a reliable thermometer and avoid rushing the process, as temperature control directly influences texture and consistency.
Step 3: Preparing the Cooling Surface
While the mixture is boiling, prepare a marble slab, silicone baking mat, or any cool, smooth, hard surface suitable for pouring hot syrup. Lightly butter or spray the surface with non-stick spray to prevent sticking. If you do not have a marble slab, a well-oiled silicone mat or a large, cool granite countertop works well. The key is to have a surface that will cool the candy evenly and allow for easy handling during shaping.
Step 4: Pouring and Cooling
Once the candy mixture reaches 265°F, swiftly and carefully pour it onto your prepared cooling surface. Be cautious, as the syrup will be extremely hot—use oven mitts or heat-resistant gloves if necessary. Spread the mixture gently to a uniform thickness, around 1 to 1.5 inches thick, to facilitate even cooling. Allow the candy to cool slightly around the edges, about 2–3 minutes, until it is firm enough to handle but still pliable. This step is crucial for shaping and pulling the candy without it becoming too hard or sticky.
Step 5: Shaping and Pulling the Candy
Once the edges have cooled sufficiently, butter your hands or use a damp cloth to prevent sticking. Carefully lift the cooled candy and begin to pull it towards the center. Stretch and fold the candy repeatedly, which introduces air and creates a smooth, glossy texture characteristic of Kentucky Cream Candy. For a traditional half-twist shape, pull the candy into a long rope, then fold it over itself, twisting gently. Continue this process until the candy becomes opaque and slightly shiny. This aeration process is essential for achieving the soft, melt-in-your-mouth consistency that defines Kentucky Cream Candy.
Step 6: Cutting and Serving
When the candy has cooled enough to handle comfortably, use scissors or a sharp knife to cut it into pieces approximately 1 inch square or a half-twist shape, depending on your preference. If the candy becomes too hard during shaping, briefly rewarm it over low heat to regain pliability. Arrange the pieces on parchment paper or a cooling rack. This candy is best enjoyed fresh but can also be stored for later consumption.
Preparation Tips
- Temperature precision: Always use a reliable candy thermometer and calibrate it if necessary to ensure accuracy.
- Consistent stirring: Stir only until the sugar dissolves; avoid stirring during boiling to prevent crystallization.
- Cooling surface: Use a marble slab or cool countertop to facilitate even cooling and shaping.
- Handling hot syrup: Always handle with care; hot syrup can cause severe burns. Use heat-resistant gloves if needed.
- Pulling technique: Be patient and gentle during pulling to achieve the desired smoothness and aeration.
- Storage: Store in an airtight container at room temperature to maintain freshness and prevent moisture absorption.
Nutritional Information
| Nutrient | Per Serving (1 piece) |
|---|---|
| Calories | 104.5 kcal |
| Fat Content | 3.1 g |
| Saturated Fat | 1.9 g |
| Cholesterol | 8.1 mg |
| Sodium | 27.4 mg |
| Carbohydrates | 20 g |
| Fiber | 0 g |
| Sugar | 20 g |
| Protein | 0 g |
Tips and Tricks
- Use high-quality ingredients: Fresh butter and pure sugar yield the best flavor and texture.
- Double-check temperature: Inconsistent temperatures lead to candies that are either too soft or too hard.
- Work quickly: The syrup cools rapidly once poured; have your surface prepared beforehand.
- Practice pulling: The pulling process is crucial for aeration; start with small batches if you’re new.
- Flavor variations: For an extra twist, add vanilla extract or a dash of bourbon during the initial mixing stage.
Add-ons and Variations
- Flavor infusions: Incorporate vanilla, bourbon, or other extracts for personalized flavors.
- Decorations: Roll the finished candy in crushed nuts, sprinkles, or cocoa powder for added texture and visual appeal.
- Coloring: Add a few drops of food coloring to the syrup before pouring for vibrant, festive candies.
Side Dishes
While Kentucky Cream Candy is a standalone treat, it pairs wonderfully with other Southern desserts, such as:
- Buttermilk Pie
- Sweet Potato Casserole
- Peach Cobbler
- Banana Pudding
Complement these with a glass of cold milk, hot coffee, or sweet tea for a complete indulgent experience.
Improvements and Variations
For those seeking to elevate or customize their Kentucky Cream Candy, consider these options:
- Adding a touch of salt: A pinch of sea salt can enhance sweetness and depth of flavor.
- Using brown sugar: Substituting part of the granulated sugar with brown sugar imparts a richer, caramel-like flavor.
- Incorporating cream: For an even creamier texture, replace part of the water with heavy cream in the initial mixture.
- Creating layered candies: Pour different flavored syrups in layers for a colorful, multi-flavored treat.
Save and Store
Proper storage is essential to maintain freshness and texture. Once cooled and cut, store Kentucky Cream Candy in an airtight container at room temperature. To prolong shelf life, place a piece of wax paper or parchment between layers to prevent sticking. Keep away from humid environments, as moisture can cause the candies to become sticky or develop mold. For longer storage, you can refrigerate the candies, but bring them back to room temperature before serving to retain their optimal mouthfeel.
FAQ
Can I make Kentucky Cream Candy without a candy thermometer?
While it is technically possible, using a candy thermometer ensures precise temperature control, which is critical for achieving the ideal texture. Without it, you risk under- or over-cooking the syrup, resulting in candies that are too soft or too hard.
How long does Kentucky Cream Candy last?
Stored properly in an airtight container at room temperature, the candy remains fresh for up to 2 weeks. For longer storage, refrigerate, but note that refrigeration may alter the texture slightly.
Can I add flavorings or colorings?
Yes! Incorporate vanilla, bourbon, or other flavor extracts during the initial mixing process. Add food coloring to the syrup before pouring onto the cooling surface for colorful variations.
Is Kentucky Cream Candy suitable for vegans?
No, due to the use of butter, this candy is not vegan. You can experiment with plant-based butter substitutes if desired, but results may vary.
Conclusion
Crafting Kentucky Cream Candy at home offers an opportunity to connect with a cherished Southern tradition while indulging in a sweet, creamy delight. Its straightforward ingredients and clear steps make it accessible to home cooks eager to try their hand at classic candy-making. The process of boiling, cooling, and pulling not only results in a delectable treat but also provides a satisfying culinary experience rooted in history and craftsmanship. Whether served during holidays, special gatherings, or as a personal indulgence, Kentucky Cream Candy embodies comfort and nostalgia, making it a timeless addition to your homemade confectionery collection. Remember, patience and attention to detail are your best tools for success. We at Love With Recipes hope this comprehensive guide helps you create perfect, melt-in-your-mouth Kentucky Cream Candy that will impress friends and family alike.
References
- “Southern Candy Classics,” Kentucky Heritage Cookbook.
- “Candy Making Techniques,” The Art of Candy, by Linda Stradley.