Tropical Guava Delight: Easy Homemade Jelly Recipe 🌴🍯
Introduction
Welcome to the comprehensive guide for crafting a luscious, tangy guava jelly that captures the vibrant essence of Caribbean fruit flavors. This recipe, featured on Love With Recipes, is designed to be both accessible for home canners and rich in authentic taste. Guava, a tropical fruit known for its fragrant aroma and unique flavor profile, lends itself beautifully to jelly-making, offering a delightful balance of sweetness and tartness. The process involves careful preparation of fresh guavas, precise cooking techniques, and proper sealing methods to ensure your jelly not only tastes exquisite but also preserves well for months to come. Whether you’re a seasoned canner or a beginner eager to explore tropical flavors, this guide will walk you through every step, providing tips, nutritional insights, and serving ideas to make your homemade guava jelly a treasured addition to your pantry.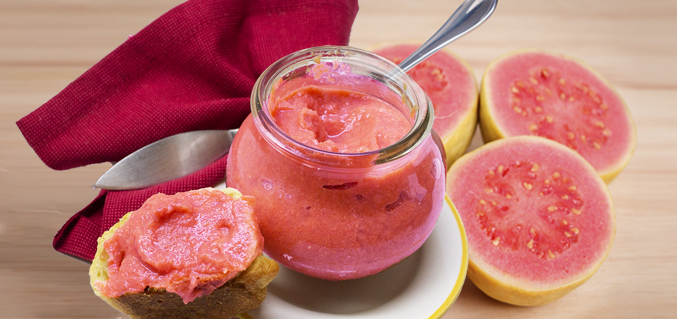
Time
Preparation and Cooking Duration
- Prep Time: 5 minutes
- Cooking Time: 5 minutes
- Total Time: Approximately 10 minutes
While the actual cooking process is swift, it’s important to allocate additional time for preparing the guavas and sterilizing jars, especially if you’re new to canning. The total active effort spans roughly 15-20 minutes, but the preservation process extends beyond this for optimal results.
Needed Equipment
Essential Tools for Perfect Guava Jelly
- Large Heavy-Bottomed Pot: To simmer the guavas and cook the jelly evenly without scorching.
- Jelly Bag or Fine Mesh Strainer: For straining the juice from the cooked guavas, ensuring a clear, pulp-free liquid.
- Kitchen Knife and Cutting Board: For preparing the guavas.
- Measuring Cups and Spoons: To accurately measure ingredients.
- Stainless Steel or Non-Reactive Cooking Utensils: Such as a wooden spoon or silicone spatula, to stir and prevent reactions with acids.
- Candy or Jelly Thermometer (Optional but Recommended): For precise temperature control during cooking.
- Sterilized Glass Jars with Lids and Rings: For storing the finished jelly, preferably with 1/4 inch headspace.
- Jar Lifter and Tongs: To handle hot jars safely during processing.
- Water Bath Canner or Large Stockpot with Lid: For boiling water bath processing to ensure proper sealing and preservation.
- Clean Towels or Dishcloths: For wiping jar rims and cooling.
- Funnel: To neatly ladle hot jelly into jars without spillage.
- Labels and Permanent Marker: For dating and identifying your jars.
Tags
Fruit, Caribbean, Canning, Easy, Homemade, Tropical, Jelly, Preserves, Natural Sweetness, Pectin, Quick Recipe, Food Preservation, Summer Recipe, DIY, Healthy, Gluten-Free
Serving Size
One serving of this guava jelly is approximately 1 tablespoon (about 15 grams). This amount provides a delightful burst of flavor suitable for spreading or garnishing various dishes.
Difficulty Level
This recipe falls within the beginner to intermediate range. While it involves standard canning procedures, understanding the importance of sterilization and proper sealing elevates the process. With careful attention to detail, even novice cooks can achieve professional-quality results.
Allergen Information
This recipe is free from common allergens such as nuts, dairy, and gluten. However, always ensure the equipment used is thoroughly cleaned to prevent cross-contamination. If serving to individuals with specific allergies, verify that all ingredients and processing methods comply with dietary restrictions.
Dietary Preference
Vegan, Vegetarian, Gluten-Free, Dairy-Free, Nut-Free, No Added Preservatives (when stored properly). This jelly is naturally plant-based and free from animal-derived ingredients, making it suitable for a wide range of dietary needs.
Course
Preserve, Snack, Breakfast, Condiment, Dessert Topping
Cuisine
Caribbean, Tropical, Homemade, Fusion
Ingredients
| Ingredient | Quantity | Notes |
|---|---|---|
| Fresh Guavas | 2 quarts (about 2 pounds) | Ripe, fragrant, and firm |
| Water | As needed for boiling | To cook the guavas |
| Sugar | 4.5 cups (900 grams) | Adjust based on sweetness preference |
| Lime Juice | 1/4 cup (60 ml) | Freshly squeezed for best flavor |
| Pectin (Commercial Fruit Pectin) | 1 packet (about 1.75 oz) | Ensure compatibility with your recipe |
Instructions
Step 1: Preparing the Guava Juice
Begin by selecting ripe, fragrant guavas. Ripe guavas are typically slightly soft to the touch and emit a sweet, floral aroma. Rinsing the fruit thoroughly under cold running water is essential to remove any dirt, pesticides, or residual pesticides that may be present on the surface. Use a gentle scrub brush if necessary, especially if the guavas are farm-fresh and have a thicker skin.
Next, on a sturdy cutting board, cut off the blossom end of each guava—this is the small, often slightly protruding tip where the flower once connected. Removing this part helps improve juice extraction and prevents bitterness that can sometimes come from the flower scar. Slice the guavas into quarters or sixths, depending on their size, ensuring uniform pieces for even cooking.
Transfer the cut guavas into a large, heavy-bottomed pot, adding enough water to cover the fruit completely. This initial water helps to soften the fruit and facilitates juice extraction. Place the pot over medium-high heat, and bring to a gentle boil. Once boiling, reduce the heat to maintain a gentle simmer. Cover the pot with a lid, leaving a small gap for steam to escape, and simmer for approximately 15 minutes. During this period, the guavas will soften, and their flavors will meld into the water, creating a fragrant infusion.
After simmering, remove the pot from heat. Allow the mixture to cool slightly before handling. Prepare your jelly bag or fine mesh strainer over a large bowl or another pot. Carefully ladle the hot guava mixture into the bag or strainer, allowing the juice to drain naturally without pressing or squeezing excessively, which can introduce cloudiness. Let the juice drain completely—this may take 15-20 minutes. For a clearer jelly, avoid squeezing the bag, but if you prefer a slightly thicker consistency, gently press the bag to extract more juice.
Once the juice is fully strained, measure to confirm you have approximately 4 cups of guava liquid. If you have slightly more, you can measure and use accordingly; if less, consider adding a small amount of water or adjusting the sugar proportionally in subsequent steps.
Step 2: Cooking the Guava Jelly
Pour the strained guava juice into a large, heavy-bottomed stainless steel pot. It is crucial to use non-reactive cookware, as acids in the fruit can react with aluminum or cast iron, affecting flavor and color. Add the packet of pectin to the juice, stirring well to prevent clumping. Pectin acts as a gelling agent, ensuring your jelly sets properly.
Place the pot over medium-high heat and bring the mixture to a rapid boil. If you are using a candy or jelly thermometer, monitor the temperature, aiming for a boil that reaches approximately 220°F (104°C). This temperature ensures proper activation of the pectin and setting of the jelly. Stir constantly with a silicone spatula or wooden spoon to prevent sticking or scorching, especially around the edges.
Once the mixture reaches a vigorous boil, add the 4 cups of sugar gradually, stirring continuously. The sugar will cause the mixture to foam and bubble intensely. Return the mixture to a rolling boil, ensuring that it is boiling hard (steady bubbles across the surface) and maintaining the temperature. Continue boiling for exactly 1 minute, stirring constantly. This step is critical for achieving the desired consistency and proper gelling.
After boiling, remove the pot from heat. Skim off any foam or bubbles that have accumulated on the surface with a metal spoon or small ladle. This improves the clarity and appearance of your jelly.
Before bottling, prepare your sterilized jars and lids. Ladle the hot jelly carefully into the jars using a funnel, leaving about 1/4 inch (0.6 cm) of headspace at the top. Wipe the rims of the jars with a damp, clean cloth to remove any residue that could interfere with sealing. Apply the lids and screw on the rings just until fingertip tight, ensuring a secure seal but not overly tight.
Process the jars in a boiling water bath for 5 minutes. This step ensures sterilization and creates a vacuum seal, which preserves the jelly for long-term storage. Use jar lifters to transfer the jars safely into the water bath, and ensure they are fully submerged. After processing, carefully remove the jars and set them on a clean towel or cooling rack. Allow them to cool completely at room temperature.
Once cooled, check the seals by pressing gently in the center of each lid. A properly sealed jar will not flex or pop back. Any jars that did not seal properly should be refrigerated and consumed within a month. Properly sealed jars can be stored in a cool, dark place for up to 1 year.
Preparation Tips
- Use ripe, fragrant guavas for the most vibrant flavor and aroma.
- Ensure all equipment is thoroughly sterilized to prevent contamination and spoilage.
- Adjust sugar levels based on the sweetness of your guavas; taste the juice before adding sugar.
- If you prefer a less tangy jelly, reduce the lime juice slightly, but maintain the balance for flavor integrity.
- Stir continuously during boiling to prevent sticking and ensure even heat distribution.
- Label jars with date and contents for easy tracking of freshness.
- Store in a cool, dark pantry for maximum shelf life; refrigerate after opening.
Nutritional Information
| Nutrient | Per Serving (1 tbsp) | Percentage of Daily Value |
|---|---|---|
| Calories | 20.6 kcal | – |
| Fat | 0 g | 0% |
| Saturated Fat | 0 g | 0% |
| Cholesterol | 0 mg | 0% |
| Sodium | 0.01 mg | 0% |
| Carbohydrates | 5.4 g | 2% |
| Sugar | 5.1 g | – |
| Fiber | 0 g | 0% |
| Protein | 0 g | 0% |
Tips and Tricks
- For clearer jelly, strain the juice multiple times through a fine mesh or cheesecloth.
- If you prefer a softer set, reduce the boiling time slightly, but be aware it may affect preservation.
- Experiment with adding a splash of tropical spices such as cinnamon or ginger for personalized flavor twists.
- Use high-quality pectin to ensure reliable gelling, especially if your guavas are less sweet or less ripe.
- Test the set of your jelly before processing jars by placing a small spoonful on a chilled plate; if it wrinkles when pushed, it’s ready.
- For an extra glossy appearance, finish with a quick stir after boiling and before jar filling.
Add-ons
- Fresh herbs like mint or basil can be infused into the jelly during cooling for a fragrant variation.
- Mix in chopped nuts or dried fruit for a textured spread or topping.
- Use the jelly as a glaze for grilled meats or as a filling in pastries.
Side Dishes
- Serve alongside cheese platters, especially with mild cheeses like cream cheese or goat cheese.
- Spread on warm toast, croissants, or scones for a tropical breakfast.
- Pair with grilled seafood or chicken for a sweet-tangy complement.
- Use as a topping for desserts such as panna cotta, cheesecake, or ice cream.
Improvements
- Incorporate natural sweeteners like honey or agave for a different flavor profile.
- Add a hint of chili or cayenne pepper to create a spicy-tangy variation.
- Use organic guavas and sugar to enhance the health profile of your jelly.
- Experiment with different citrus juices, such as orange or grapefruit, for unique twists.
Save and Store
Proper storage is key to maintaining the quality and safety of your homemade guava jelly. Ensure jars are sealed correctly after processing. Keep sealed jars in a cool, dark, and dry place such as a pantry or cellar. Once opened, refrigerate and consume within 4 weeks for optimal freshness. Label each jar with the date of preparation and contents for easy identification. For long-term storage, consider freezing the jelly in airtight containers, leaving room for expansion.
FAQ
Can I use bottled or store-bought guava juice instead of fresh?
Yes, but opt for high-quality, unsweetened, and 100% pure guava juice to replicate the fresh flavor. Freshly prepared juice yields the best aroma and taste.
How do I know if my jelly has set properly?
Perform a cold plate test: Place a small spoonful on a chilled plate, let it sit for a minute, then push with your finger. If it wrinkles and holds its shape, it’s ready. Otherwise, cook for a few more seconds and test again.
Is it necessary to process jars in a water bath?
Yes, for safety and preservation, especially if storing at room temperature. The boiling water bath creates a vacuum seal that prevents bacterial growth and spoilage.
Can I reduce the sugar content?
While reducing sugar is possible, it may affect the jelly’s set. Use low-sugar pectin options if available, and test the gelling process beforehand.
How long can I keep the jelly?
Properly sealed and stored in a cool, dark place, your guava jelly can last up to 1 year. Once opened, refrigerate and consume within a month.
Conclusion
This tangy guava jelly is a celebration of tropical flavors, combining the sweet, fragrant essence of ripe guavas with a zesty lime kick. Its quick preparation and excellent shelf stability make it an ideal project for food preservation enthusiasts. Whether spread on breakfast toast, used as a filling, or presented as a gift, this homemade jelly embodies the vibrant spirit of Caribbean cuisine, bringing sunshine to your table all year round. At Love With Recipes, we believe in elevating everyday ingredients into extraordinary culinary experiences, and this recipe exemplifies that philosophy. Enjoy the process, savor the flavors, and share the tropical joy with friends and family.
References
1. Ball Canning’s Guide to Fruit Preserves. (n.d.). https://www.freshpreserving.com
2. Caribbean Fruit and Vegetable Guide. (2020). University of the West Indies Press.