Savory Italian Crescione with Three Delicious Fillings
Introduction
Crescione stands as a quintessential expression of Italian culinary tradition, embodying rustic charm and diverse flavor profiles. Originating from the regions of Northern Italy, particularly Emilia-Romagna and Liguria, this savory flatbread has been cherished for generations as a versatile snack, street food, or comfort meal. Its appeal lies in the harmonious blend of a tender, flaky dough enveloping rich, seasonally inspired fillings—ranging from hearty potatoes and savory sausage to fresh greens and melty cheeses. This dish exemplifies the Italian knack for transforming simple ingredients into extraordinary culinary delights, emphasizing freshness, balance, and regional authenticity.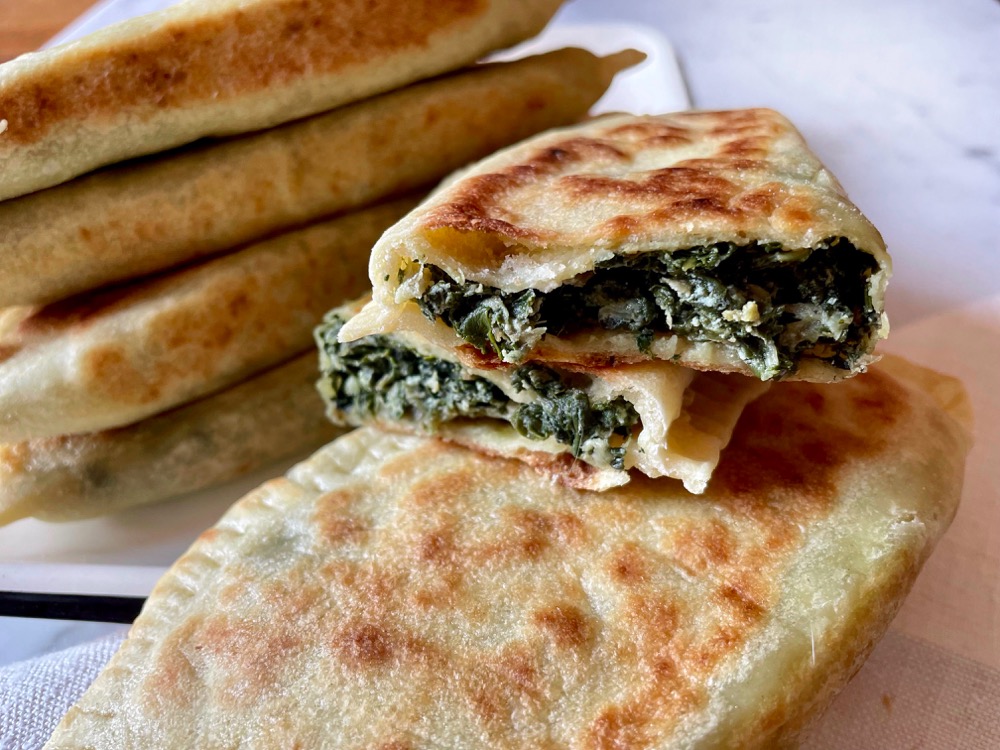
At Love With Recipes, we explore the art of crafting traditional Italian Crescione, emphasizing the importance of quality ingredients, precise technique, and creative variations. Whether you are a seasoned home cook or a passionate beginner, this comprehensive guide aims to equip you with everything needed to produce a perfect crescione—crispy on the outside, flavorful on the inside, and imbued with comforting, familiar tastes. From preparing the perfect dough to assembling the fillings with finesse, each step is designed to elevate your cooking experience and ensure a gratifying result.
Time
Preparation and cooking of this recipe are estimated to require approximately 2 hours and 30 minutes. This includes active cooking time, resting periods for the dough, and assembly. Breaking down the timeline:
- Active prep time: 1 hour
- Resting time for dough: 30 minutes
- Cooking time: 30 minutes
The overall time can vary depending on your familiarity with the techniques and the efficiency of your workspace. For beginner cooks, allocating extra time for preparation and troubleshooting is advisable to ensure quality results.
Needed Equipment
Preparing authentic Italian crescione calls for specific tools and equipment that facilitate kneading, rolling, sealing, and cooking the pastry to perfection. Here is a detailed list:
Essential Equipment
- Mixing bowls: Large, non-reactive bowls for dough and fillings.
- Measuring cups and spoons: For precise measurement of ingredients.
- Kitchen scale: Highly recommended for dividing dough and fillings accurately.
- Sieve or fine-mesh strainer: For sifting flour and dusting surfaces.
- Rolling pin: To flatten dough discs evenly.
- Bench scraper or dough cutter: For dividing dough portions cleanly.
- Kitchen towel or plastic wrap: To cover dough during resting periods.
- Chef’s knife or chopping board: For chopping herbs and vegetables.
- Cooking pan/skillet: Non-stick or cast iron, suitable for frying crescione.
- Spatula or tongs: For turning and removing cooked crescione.
- Paper towels or absorbent cloths: To drain excess moisture from cheese and cooked greens.
- Thermometer (optional): To monitor oil or pan temperature for consistent cooking.
- Food processor (optional): For finely chopping herbs or greens if preferred.
Tags
Traditional Italian, Savory Pastry, Street Food, Homemade Flatbread, Filled Pastry, Seasonal Ingredients, Family Recipe, Italian Cuisine, Comfort Food, Baked or Fried, Party Snack
Serving Size
This recipe yields approximately 12 crescione, each serving being one individual pastry. The portion size is ideal for sharing among family or friends, either as an appetizer or a main course with sides.
Difficulty Level
Intermediate — While the dough preparation is straightforward, care must be taken during rolling, filling, sealing, and cooking to achieve optimal texture and flavor. Familiarity with basic kneading and folding techniques is helpful but not mandatory; patience and attention to detail will ultimately ensure success.
Allergen Information
- Gluten: Present in all-purpose flour.
- Dairy: Contains mozzarella cheese.
- Meat: Contains Italian sausage (can be omitted or substituted).
- Eggs: Not used in this recipe.
For allergy-specific substitutions, consult with a nutritionist or adapt the recipe using gluten-free flour blends, dairy-free cheeses, or plant-based proteins as needed.
Dietary Preference
This recipe is suitable for omnivores and can be adapted to vegetarian or vegan diets by substituting meat and dairy ingredients with plant-based alternatives. It is not vegan as originally written, but modifications are straightforward.
Course
Appetizer, Snack, Main Course
Cuisine
Italian
Ingredients
| Ingredient | Quantity | Notes |
|---|---|---|
| Lard (Strutto) | 75g | Alternatively, use unsalted butter or olive oil for a different flavor profile |
| All-purpose flour (Farina 00) | 500g | Preferably Italian or high-quality for authentic texture |
| Baking soda (Bicarbonato) | 2g (about ½ teaspoon) | Leavening aid, optional but recommended for tenderness |
| Fine salt (Sale fino) | 6g (about 1 teaspoon) | Adjust to taste |
| Water (Acqua) | 200ml | Warm, for dissolving salt and activating dough |
| Spinach (Spinaci) | 250g | Fresh, washed thoroughly |
| Swiss chard (Bietole) | 250g | Fresh, stems removed if thick or tough |
| White onions (Cipolle bianche) | 1 medium | Finely chopped for sautéing |
| Extra virgin olive oil (Olio extravergine d’oliva) | 20g | For sautéing greens and frying crescione |
| Fine salt (Sale fino) | Pinch | For greens and seasoning |
| Black pepper (Pepe nero) | To taste | Freshly ground recommended |
| Potatoes (Patate) | 400g | Waxy or starchy, depending on preference |
| Italian sausage (Luganega) | 200g | Mild or spicy based on taste |
| Mozzarella cheese (Mozzarella) | 125g | Fresh, sliced thin |
| Tomato sauce (Passata di pomodoro) | 200ml | Homemade or store-bought |
| Oregano (Origano) | 1 teaspoon | Dried |
Instructions
Step 1: Preparing the Dough
The foundation of an excellent crescione lies in its dough. The process begins with mixing dry ingredients and integrating fat for tenderness. To create a smooth, elastic dough, start by dissolving the fine salt in the warm water. This ensures even distribution of seasoning and activates the baking soda, which contributes to the dough’s lightness.
Sift the all-purpose flour into a large mixing bowl, ensuring there are no lumps and that the flour is aerated. Add the lard or fat of choice into the flour; work it in with your fingers or a pastry cutter until the mixture resembles coarse crumbs. This step creates a flaky texture, reminiscent of pie crust or pastry.
Gradually pour the salted, warm water into the flour mixture, mixing with a spoon or your hands. Add the baking soda at this stage to help with leavening and softness. Knead the mixture in the bowl for about 1-2 minutes until it just begins to come together.
Transfer the dough onto a clean, lightly floured surface. Knead vigorously for 5-7 minutes, pressing, folding, and stretching until the dough becomes smooth, supple, and slightly elastic. Proper kneading develops gluten, which is crucial for a good structure when sealing and cooking.
Shape the dough into a ball, wrap it tightly with plastic wrap or a damp towel, and let it rest at room temperature for 30 minutes. Resting allows gluten to relax, making the dough easier to roll and less prone to shrinking during shaping.
Step 2: Preparing the Fillings
Potato and Sausage Filling
Begin by peeling the potatoes and cutting them into uniform chunks to ensure even cooking. Place the potatoes into a pot of salted boiling water and cook for approximately 15-20 minutes until tender when pierced with a fork.
Drain the potatoes thoroughly and mash them using a potato masher or fork. While still warm, crumble the Italian sausage into the mash, mixing thoroughly to combine. This warm mixture allows the sausage flavor to meld into the potatoes, creating a hearty, flavorful filling.
Season with a pinch of salt and freshly ground black pepper, tasting and adjusting as needed. Keep warm covered with foil or a towel.
Tomato and Mozzarella Filling
Pour the passata di pomodoro into a small saucepan. Add a tablespoon of olive oil and bring to a gentle simmer over low heat. Let it simmer for about 10 minutes to concentrate the flavor and thicken slightly. Stir occasionally to prevent sticking.
While the sauce simmers, slice the mozzarella cheese into thin rounds, about 2-3mm thick. Place the slices on a paper towel to absorb excess moisture, which helps prevent the crescione from becoming soggy.
Once the sauce has reduced and slightly thickened, remove from heat and set aside. Keep the mozzarella ready for assembly.
Herb and Greens Filling
Finely chop the onion and sauté in 1 tablespoon of olive oil over medium heat until translucent and fragrant, about 5 minutes. Add the chopped spinach and Swiss chard, stir, and cook until wilted, approximately 5 minutes more.
Season with a pinch of salt, black pepper, and a sprinkle of dried oregano. Stir well, then remove from heat and allow to cool slightly before using.
Step 3: Assembling the Crescione
Once the dough has rested, divide it into 12 equal portions—each weighing roughly 65 grams. Form each portion into a ball and flatten into a disc using a rolling pin, aiming for about 10 cm in diameter.
Place one of the three fillings on each dough disc, choosing a different filling for variety or repeating favorite ones. For the herb filling, spoon the sautéed greens onto one half of the disc. For the tomato and mozzarella, place a few mozzarella slices and a spoonful of tomato sauce on one side. For the potato-sausage mixture, spoon a generous portion onto one half.
Step 4: Sealing and Cooking
Carefully fold each filled disc over to form a semi-circle, pressing the edges together to seal. Crimp the edges with a fork, pressing firmly to prevent leakage during cooking. This also creates a decorative edge that enhances presentation.
Preheat a non-stick skillet or crepe pan over medium heat. Lightly brush or spray with olive oil. Place the sealed crescione in the hot pan, cooking for approximately 3-4 minutes per side until golden brown and crispy on the outside.
Use tongs or a spatula to turn the crescione gently, ensuring even cooking. The filling should be hot and cooked through, with the exterior crisp and appealingly browned.
Step 5: Serving and Enjoying
Transfer the cooked crescione to a paper towel-lined plate to absorb any excess oil. Allow them to cool slightly before serving to avoid burns and to enhance flavors.
Serve warm, either as an appetizer, snack, or part of a main course. Pair with a simple salad, a drizzle of olive oil, or a dip such as aioli or marinara sauce for added flavor.
Preparation Tips
- Resting the dough: Adequate resting time is crucial for elasticity and ease of rolling. Wrap the dough tightly to prevent it from drying out.
- Filling consistency: Ensure fillings are not too wet, especially the tomato sauce, to prevent soggy crescione.
- Sealing: Press edges firmly and crimp with a fork to ensure fillings stay sealed during cooking.
- Cooking temperature: Moderate heat ensures a golden crust without burning, while fully cooking the filling inside.
Nutritional Information
| Nutrient | Per Crescione (Approximate) | % Daily Value (DV) |
|---|---|---|
| Calories | 340 kcal | 17% |
| Protein | 13 g | 26% |
| Carbohydrates | 34 g | 11% |
| Fiber | 3 g | 12% |
| Sugar | 4 g | |
| Fat | 18 g | 28% |
| Saturated Fat | 6 g | 30% |
| Cholesterol | 25 mg | 8% |
| Sodium | 450 mg | 19% |
| Potassium | 350 mg | 10% |
| Vitamin A | 10% DV | |
| Vitamin C | 20% DV | |
| Calcium | 6% DV | |
| Iron | 15% DV |
Tips and Tricks
- Testing dough elasticity: Press a small piece of dough; it should spring back slowly, indicating proper gluten development.
- Filling variations: Feel free to experiment with roasted peppers, mushrooms, or different cheeses for personalized flavors.
- Cooking method: For a different texture, crescione can be baked in a preheated oven at 200°C (390°F) for 15-20 minutes until golden, instead of frying.
- Freezing: Assemble uncooked crescione, freeze on a baking sheet, then store in an airtight container. Bake or fry directly from frozen.
Add-ons
- Fresh herbs such as basil, parsley, or thyme can be added to fillings for aromatic enhancement.
- Spicy elements like red pepper flakes or hot sauce can add a kick.
- Different cheeses, such as Parmesan or provolone, can be incorporated for varied flavor profiles.
Side Dishes
- Simple green salad: Mixed greens, cherry tomatoes, dressed with olive oil and lemon.
- Marinara dipping sauce: Warm tomato sauce with garlic and herbs.
- Roasted vegetables: Zucchini, peppers, or eggplant for a wholesome accompaniment.
- Light white wine: Such as Pinot Grigio or Verdicchio, to complement the flavors.
Improvements
- Gluten-free version: Use a gluten-free flour blend, adjusting liquids as necessary to achieve the right dough consistency.
- Vegan adaptations: Replace lard with coconut oil or vegan margarine, and mozzarella with plant-based cheese.
- Enhanced fillings: Incorporate caramelized onions, roasted garlic, or sun-dried tomatoes for depth.
Save and Store
Uncooked crescione can be assembled and stored in the refrigerator for up to 24 hours before frying or baking. To store cooked crescione, let them cool completely and keep in an airtight container in the refrigerator for 2-3 days. Reheat in a hot skillet or oven to regain crispiness.
For longer storage, freeze uncooked crescione on a baking sheet, then transfer to a sealed container or zip-top bag. Cook directly from frozen, adding a minute or two to the cooking time.
FAQ
Can I bake crescione instead of frying?
Absolutely. Preheat your oven to 200°C (390°F). Arrange the assembled crescione on a baking sheet lined with parchment paper, brush with a little olive oil, and bake for 15-20 minutes until golden and crispy.
What fillings are most traditional for crescione?
While fillings vary regionally, classic options include potato and sausage, spinach and cheese, or herbs with ricotta. Feel free to adapt based on seasonal ingredients and personal preferences.
Can I make the dough ahead of time?
Yes. Wrap it tightly in plastic wrap and refrigerate for up to 24 hours. Allow it to come to room temperature before rolling out to ensure pliability.
Conclusion
Creating authentic Italian crescione is a rewarding culinary experience that combines simple techniques with bold flavors. By mastering the dough, fillings, and sealing methods, you can produce a versatile dish suited for any occasion—whether as a snack, appetizer, or hearty meal. The beauty of this recipe lies in its adaptability; invite your creativity to shine by experimenting with different fillings and cooking methods. Remember, patience and attention to detail are key to achieving that perfect balance of crispy exterior and flavorful interior. Enjoy crafting this traditional Italian delight, and share the joy with family and friends. For more inspired recipes and culinary tips, visit Love With Recipes, where passion for good food meets practical guidance.
References
- Gianluca Mazzarino, “Authentic Italian Street Food,” 2018.
- Marcella Hazan, “Essentials of Classic Italian Cooking,” 1992.