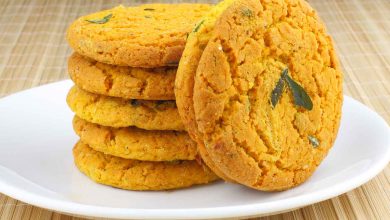
Baked Masala Namak Para Recipe – Carom Seeds Spiced Biscuits
A delightful and crunchy treat, Baked Masala Namak Para is a popular Indian snack typically enjoyed with a steaming cup of chai. While traditionally deep-fried, this healthier version is baked, ensuring minimal oil absorption yet maintaining all the bold flavors. The use of whole wheat flour makes this recipe not only light but also adds a slightly nutty flavor to the crispy biscuits. With a dash of aromatic spices like carom seeds, black pepper, and chaat masala, these biscuits are perfect for tea-time gatherings or as a mid-day snack.
Cuisine: Indian
Course: Snack
Diet: Vegetarian
Ingredients
| Ingredient | Quantity |
|---|---|
| All Purpose Flour (Maida) | 1/2 cup |
| Whole Wheat Flour | 1/2 cup |
| Ajwain (Carom Seeds) | 1/2 tablespoon |
| Black Peppercorns, crushed | 1/2 tablespoon |
| Asafoetida (Hing) | 1 pinch |
| Turmeric Powder (Haldi) | 1 pinch |
| Salt | To taste |
| Ghee | 2 tablespoons |
| Oil | 1 tablespoon + extra for brushing |
| Water | As needed |
| Chaat Masala Powder | 1 teaspoon |
Preparation Time: 10 minutes
Cooking Time: 20 minutes
Total Time: 30 minutes
Instructions
-
Prepare the Dough:
Related Articles- Begin by gathering all the ingredients. In a large mixing bowl, combine both the whole wheat flour and all-purpose flour.
- Add the ajwain (carom seeds), crushed black pepper, asafoetida (hing), turmeric powder, and salt. Mix them together to evenly distribute the spices.
- Add the ghee to the flour mixture. Rub it into the flour until the mixture resembles coarse crumbs. This step will ensure a flaky texture in the final product.
-
Form the Dough:
- Gradually add water, little by little, to form a firm dough. It should be smooth and pliable but stiff enough to hold its shape. If the dough is too crumbly, add a little more ghee to bind it together.
- Once the dough is formed, cover it with a damp cloth or plastic wrap, and let it rest for about 20 minutes.
-
Preheat the Oven:
- While the dough is resting, preheat your oven to 180°C (350°F) to ensure it reaches the right temperature when the Namak Para are ready for baking.
-
Shape the Biscuits:
- After the resting period, divide the dough into two equal portions and roll each into a ball.
- On a clean, flat surface, apply a bit of oil and roll each ball of dough into a thin circle, about 1/2 inch thick.
- Using a sharp knife, cut the rolled dough into strips, about 1 cm apart. Then, cut these strips diagonally to create small diamond shapes, though you can use any shape you prefer.
-
Arrange and Bake:
- Line a baking tray with parchment paper or lightly grease it. Place the cut pieces of dough on the tray, ensuring there’s enough space between each piece for even baking.
- Brush the tops of the Namak Para with a little oil to help them crisp up as they bake.
- Place the tray in the preheated oven and bake for about 10 minutes or until the edges begin to turn golden.
-
Flip and Continue Baking:
- After 10 minutes, carefully flip each Namak Para to the other side to ensure they bake evenly. Bake for an additional 10 minutes, or until they are golden brown and crispy.
-
Finishing Touches:
- Remove the tray from the oven and immediately sprinkle the hot Namak Para with chaat masala for an added zing.
- Let them cool completely on a wire rack before transferring them to an airtight container.
Serving Suggestions:
-
Serve these Baked Masala Namak Para as a savory snack during your tea-time, paired with a warm cup of Masala Chai or a Tea Sandwich featuring ingredients like beets, radish, avocado, and arugula for a refreshing contrast.
-
These crunchy, spiced biscuits are also great to serve at parties or as a simple yet tasty snack for guests who crave a bite with bold flavors.
Tips:
- To make the dough even flakier, consider adding a small amount of cold water at the very end of kneading.
- The Baked Masala Namak Para can be stored in an airtight container for up to a week, making them ideal for meal prep or to have on hand for when you need a quick snack.
Enjoy this healthier twist on a beloved Indian classic!


