Introduction
The Linzer Tart is a classic pastry that embodies the perfect balance between rich, nutty flavors and sweet, fruity preserves. Its origins trace back to Austria in the 18th century, where it was traditionally crafted as a festive holiday treat, but its universal appeal has made it a beloved dessert across many cultures. The hallmark of a traditional Linzer Tart is its crumbly, buttery dough infused with ground nuts—most notably hazelnuts or almonds—and topped with a lattice pattern that lets the vibrant fruit preserves peek through. This intricate yet approachable dessert offers a harmonious blend of textures and flavors, making it a perennial favorite for teatime, celebrations, or simply satisfying a sweet craving. Love With Recipes, a platform dedicated to sharing culinary delights, presents this simplified yet authentic version of the classic Linzer Tart, emphasizing ease of preparation without sacrificing flavor or visual appeal. Whether you’re an experienced baker or a novice eager to try your hand at a charming pastry, this recipe promises a rewarding baking experience with delicious results.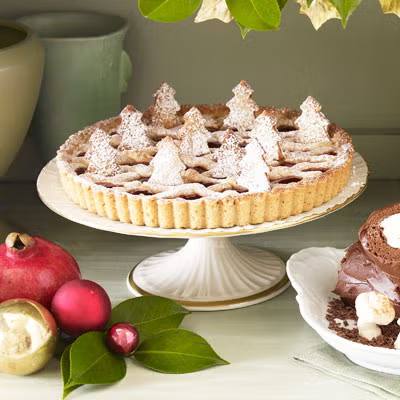
Time
Preparation Time: approximately 10 minutes
Cooking Time: approximately 42 minutes
Total Time: approximately 52 minutes
Note: These times include the mixing, shaping, baking, and cooling processes, with some steps overlapping for efficiency. The short prep time makes this recipe accessible even on busy days, while the baking ensures a perfectly crisp and golden crust with bubbling preserves.
Needed Equipment
- Mixing bowls (preferably large and medium-sized)
- Measuring cups and spoons
- Food processor or spice grinder (for hazelnuts)
- Rolling pin
- 9-inch tart pan with removable bottom
- Silicone spatula or rubber scraper
- Pastry brush (optional, for egg wash or butter application)
- Sharp knife or pizza cutter (for cutting dough ropes)
- Ruler or straight edge (for even lattice pattern)
- Cooling rack
- Oven
- Parchment paper or silicone baking mat
- Cookie cutter or small round cutter (optional, for decorative lattice cutouts)
- Pastry brush or small spoon for spreading preserves
Tags
Sweet, Baked Goods, Pastry, Nutty, Fruity, Easy, Classic, Vegetarian, No Gluten (if gluten-free flour used)
Serving Size
Serves 8-10 slices, depending on portion size
Difficulty Level
Easy to Moderate — suitable for bakers with basic experience, but intricate lattice work can be adjusted for beginners.
Allergen Information
| Allergen | Presence | Notes |
|---|---|---|
| Nuts | Yes (hazelnuts) | Contains tree nuts; can substitute with almonds or walnuts |
| Gluten | Yes (all-purpose flour) | Use gluten-free flour if needed |
| Milk | No | Traditional recipe does not include dairy |
| Eggs | No | Egg-free variations possible |
| Sulfites | No | Preserves may contain sulfites; check labels if sensitive |
Dietary Preference
Vegetarian, Nut-Friendly (with nut substitution options), No refined sugar if using natural preserves
Course
Dessert, Pastry, Snack
Cuisine
European, Austrian-inspired, Classic Pastry
Ingredients
| Ingredient | Quantity |
|---|---|
| Hazelnuts | 13 1/2 oz (approximately 1 3/4 cups, or 150g) |
| All-purpose flour | 3/4 cup (90g) |
| Confectioners’ sugar | 1/4 cup (30g) |
| Preserves (your choice of fruit) | 1 1/3 cups (about 300g) |
Instructions
Step 1: Preparing the Nut Base
Begin by toasting the hazelnuts lightly to enhance their flavor. Spread them on a baking sheet in a single layer and toast in a preheated oven at 350°F (175°C) for about 8-10 minutes, stirring occasionally to prevent burning. Once cooled, place the toasted hazelnuts into a food processor or spice grinder and pulse until finely ground but not pasty. Be cautious not to over-process; you want a fine meal with some texture. This ground hazelnut will give the crust its characteristic flavor and texture, adding richness and depth to the pastry base.
Step 2: Making the Dough
In a large mixing bowl, combine the ground hazelnuts, all-purpose flour, and confectioners’ sugar. Mix thoroughly until evenly distributed. For a more uniform mixture, you can sift the dry ingredients together before combining. If you prefer a more cohesive dough, you can add a small amount of cold butter or margarine (about 2 tablespoons) to enhance the richness and crumbly texture, mixing it in until the dough starts to come together. For vegan or dairy-free versions, use plant-based butter or margarine.
Step 3: Forming the Base Dough
Pour the mixture onto a clean surface or large bowl. Using your hands or a pastry cutter, incorporate the ingredients until the mixture resembles coarse crumbs. If adding butter, cut it in until evenly distributed. Gather the mixture into a ball, kneading gently to form a smooth, cohesive dough. Wrap the dough in plastic wrap and refrigerate for at least 30 minutes. Resting the dough allows the flavors to meld and makes it easier to roll out, preventing cracking or tearing during shaping.
Step 4: Preparing the Tart Base
Once rested, divide the dough roughly into two portions—about 75% and 25%. Take the larger portion (75%) and place it between two sheets of parchment paper. Roll out into a circle approximately 12 inches in diameter, ensuring an even thickness of about 1/8 inch (3mm). Carefully transfer the rolled dough into a 9-inch tart pan by peeling away the parchment paper and gently pressing the dough into the pan, fitting snugly into the corners and up the sides. Trim any excess dough around the edges with a sharp knife or scissors. This forms the base for your Linzer Tart, which will hold the preserves and lattice topping.
Step 5: Filling with Preserves
Spread the preserves evenly over the tart base, leaving a small border around the edges (about half an inch) to prevent overflow during baking. Use a spatula or the back of a spoon to distribute the preserves smoothly, ensuring coverage without disturbing the crust. Choose fruit preserves that complement the nutty flavor—such as raspberry, apricot, cherry, or strawberry. The preserves add moisture and sweetness, balancing the nuttiness of the crust and adding visual appeal with their vibrant color.
Step 6: Creating the Lattice Top
Take the remaining 25% of dough and shape it into a rectangle. Roll out on parchment paper into a 10-inch square or rectangle, about 1/8 inch thick. Using a sharp knife or pizza cutter, cut the dough into 8 (10-inch) long strips. For a traditional look, the strips should be uniform in width—about 3/4 inch to 1 inch. Arrange four of these strips parallel over the preserves, spacing them evenly apart. Then, weave the remaining four strips perpendicularly, creating a lattice pattern. Carefully press the edges of the lattice into the crust to seal. For decorative touches, use small cookie cutters or a small round cutter to cut out shapes or patterns from the remaining dough, placing them on top of the lattice for added visual interest.
Step 7: Baking the Tart
Preheat your oven to 350°F (175°C). Before baking, you can brush the lattice and edges with an egg wash or milk for a shiny, golden finish if desired. Place the assembled tart on a baking sheet lined with parchment paper or a silicone mat to catch any drips. Bake in the preheated oven for approximately 42 minutes, or until the crust is golden brown and the preserves are bubbling around the edges. Keep an eye on the tart during the last 10 minutes; if the edges start to brown too quickly, tent with foil to prevent burning. The baking process melds the crust, lattice, and preserves into a cohesive, irresistible dessert.
Step 8: Cooling and Final Touches
Remove the tart from the oven and allow it to cool in the pan for about 10 minutes. This resting period helps the filling set and prevents the preserves from spilling out when slicing. Carefully transfer the tart to a wire rack and let it cool completely, about 30 minutes. Once cooled, dust the surface lightly with confectioners’ sugar using a fine sieve to add a delicate sweetness and an elegant presentation. Serve slices of the Linzer Tart with accompaniments such as whipped cream, vanilla ice cream, or a dusting of additional powdered sugar for an extra indulgence.
Preparation Tips
- For a richer crust, incorporate cold, diced butter into the dry ingredients before adding the rest of the ingredients.
- If you prefer a gluten-free version, substitute all-purpose flour with a high-quality gluten-free blend, and ensure your preserves are gluten-free.
- Chill the dough thoroughly to prevent cracking and make rolling easier.
- Use a ruler to ensure even lattice strips for a professional appearance.
- Choose preserves with a thick consistency to prevent sogginess and spilling during baking.
- For a more decorative look, cut out shapes from leftover dough and arrange them on top of the lattice before baking.
- Experiment with different nuts—almonds, walnuts, or pecans—for variations in flavor and texture.
Nutritional Information
| Nutrient | Per Serving |
|---|---|
| Calories | 300.1 kcal |
| Fat Content | 11.8 g |
| Saturated Fat | 2.1 g |
| Cholesterol | 9.2 mg |
| Sodium | 146 mg |
| Carbohydrates | 46.6 g |
| Fiber | 1.5 g |
| Sugar | 24.4 g |
| Protein | 3 g |
Tips and Tricks
- To enhance the nut flavor, toast the hazelnuts until fragrant before grinding.
- Use a pastry brush to lightly coat the lattice with an egg wash for a glossy finish.
- Chill the assembled tart before baking to help maintain the lattice pattern and prevent spreading of the preserves.
- Adjust the thickness of the lattice strips based on aesthetic preference; thinner strips create a delicate appearance, while thicker ones are rustic and hearty.
- If the preserves are too runny, simmer them gently with a teaspoon of cornstarch to thicken before spreading.
Add-ons
- Fresh berries or sliced fruits on top for added freshness and visual appeal.
- Drizzle of chocolate or caramel sauce for extra decadence.
- Serving with whipped cream or mascarpone cheese for richness.
- Adding a hint of spice—like cinnamon or cardamom—to the dough for a warm flavor twist.
Side Dishes
- Light vanilla or almond-flavored ice cream complements the rich, nutty crust.
- Fresh fruit salad to balance the sweetness.
- Herbal tea or coffee to enhance the dessert experience.
Improvements
- Incorporate citrus zest (lemon or orange) into the dough for a bright, aromatic note.
- Add a splash of liqueur (like Grand Marnier or Frangelico) to the preserves or dough for an adults-only version.
- Use a textured or patterned lattice cutter for a more intricate design.
- Experiment with different types of preserves, such as fig or mango, for a unique flavor profile.
Save and Store
Leftover Linzer Tart slices should be stored in an airtight container in the refrigerator for up to 3 days. To maintain freshness, place a piece of parchment paper between slices if stacking. For longer storage, wrap individual slices tightly with plastic wrap and freeze for up to 1 month. To serve, thaw in the refrigerator or at room temperature until soft and fragrant. Reheat gently in a low oven if desired to restore crispness.
FAQ
Can I make this tart gluten-free?
Yes, substitute the all-purpose flour with a high-quality gluten-free flour blend. Ensure the preserves are also gluten-free. The texture may vary slightly, but the flavor remains delicious.
Can I use other nuts besides hazelnuts?
Absolutely. Almonds, walnuts, or pecans can be used as substitutes. Toasting the nuts enhances their flavor, and grinding them finely ensures a consistent crust.
Is it possible to make this vegan?
Yes. Replace the butter with plant-based margarine or coconut oil. Use vegan preserves that contain no gelatin or animal-derived ingredients. Check labels carefully to ensure all components are vegan-friendly.
What variations can I try?
Experiment with different preserves, add spices like cinnamon or ginger to the dough, or incorporate chocolate chips or chopped dried fruits for added texture and flavor.
Conclusion
This Easy Linzer Tart recipe offers a delightful combination of nutty, buttery crust and vibrant fruit preserves, all wrapped in a charming lattice pattern. Its straightforward preparation makes it accessible for bakers of all levels, while its rich flavor and elegant presentation make it suitable for special occasions or everyday indulgence. By customizing ingredients and presentation, you can create a unique version tailored to your tastes. Remember, the secret to a perfect Linzer Tart lies in quality ingredients, patience during rolling and assembling, and a keen eye for detail in the lattice pattern. With this comprehensive guide, you are well-equipped to bake a show-stopping dessert that will impress family and friends alike. Happy baking from Love With Recipes!
References
- “The History of the Linzer Tart,” Austrian Food Museum, 2015.
- “Classic Pastry Techniques,” Julia Child’s Mastering the Art of French Cooking, 1961.