
Introduction
Aunt Kay’s Party Cheese Ball has long been embraced as a quintessential appetizer that sparks nostalgia and delight at gatherings, celebrations, and casual get-togethers alike. Celebrated for its creamy texture, savory richness, and eye-catching exterior, this cheese ball epitomizes the art of combining simple ingredients into a sophisticated party treat. Originating from mid-20th century Americana, the cheese ball gained popularity as a communal dish—easy to prepare, versatile in presentation, and adaptable to various flavors and dietary preferences. Over decades, it has cemented its status as a must-have appetizer, especially during festive seasons, holiday parties, and family milestones.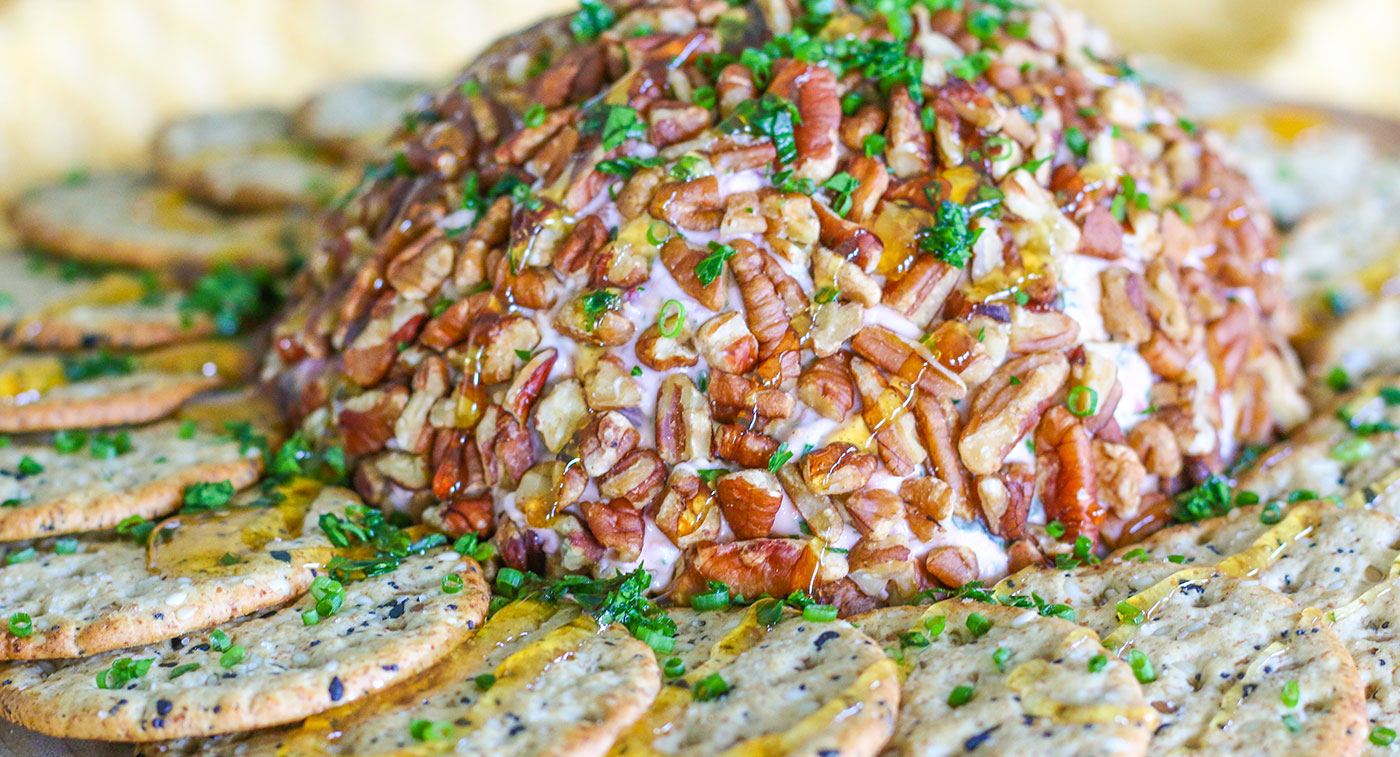
The beauty of Aunt Kay’s Party Cheese Ball lies not just in its flavor profile but also in its presentation. Rolled in a crunchy, nutty mixture of chopped pecans, herbs, and spices, the cheese ball becomes a social centerpiece, inviting guests to indulge in slices or with an assortment of crackers, breadsticks, or vegetable sticks. Its balanced blend of cream cheese, sharp cheddar, fresh herbs, and spices creates a flavor combo that is both familiar and irresistible. Whether you’re planning a modest gathering or a large celebration, mastering this cheese ball recipe ensures your appetizer table is both delicious and memorable.
Time
Preparing Aunt Kay’s Party Cheese Ball involves a multifaceted process that is straightforward but requires some patience to achieve optimal texture and flavor. Overall, the active preparation time takes approximately 15 minutes, including mixing, shaping, and coating. The critical part of the recipe is the chilling phase, which ensures that the cheese ball sets firmly and the flavors meld harmoniously. Chill your assembled cheese ball in the refrigerator for at least 1 hour—though, for best results, allowing it to rest for up to 4 hours or overnight can enhance flavor complexity and improve its firmness.
Total estimated time from start to finish, including chilling, is around 1 hour and 15 minutes. Planning ahead ensures the cheese ball is perfectly set and ready for presentation, and time management helps incoordination during busy party preparations.
Needed Equipment
- Mixing bowls: Large, sturdy bowls for mixing and combining ingredients.
- Electric mixer or whisk: For blending cream cheese and other ingredients smoothly.
- Measuring cups and spoons: Accurate measurements for spices, Worcestershire, and other add-ins.
- Grater: To shred the cheddar cheese efficiently and uniformly.
- Plastic wrap or parchment paper: For shaping and wrapping the cheese ball prior to chilling.
- Serving platter or cheese board: Elegant surface for presenting the cheese ball.
- Small dishes or saucers: For coating mixture of nuts, herbs, and onions.
- Chopping board and knife: For chopping green onions, parsley, or any additional herbs or ingredients.
- Spatula or wooden spoon: For folding ingredients together.
- Refrigerator: Essential for chilling and setting the cheese ball.
- Optional: Food processor for finely chopping herbs or nuts, if desired.
Tags
Party appetizers, cheese recipes, holiday food, crowd-pleaser, savory snacks, no-bake, easy recipes, finger foods, American cuisine, nostalgic recipes
Serving Size
Each cheese ball weighs approximately 8–10 ounces, easily serving 8–12 guests, with approximate portions of 2 ounces per person. This makes it perfect for parties where guests can enjoy it alongside an assortment of crackers, bread, or vegetable sticks. For larger gatherings, consider making multiple cheese balls or larger portions.
Difficulty Level
This recipe is considered beginner to intermediate. It involves simple mixing and shaping procedures but benefits from careful handling when coating and refrigerating to ensure a smooth, appealing presentation. No advanced culinary skills are necessary—just patience, attention to ingredient portions, and a little finesse in shaping and coating.
Allergen Information
| Allergen | Contains | Notes |
|---|---|---|
| Dairy | Cream cheese, cheddar cheese | |
| Nuts | Chopped pecans (or other nuts if substituted) | |
| Gluten | Potentially from crackers used for serving (not in the cheese ball itself) | |
| Wheat | Commonly present in crackers served alongside |
Dietary Preference
This cheese ball is suitable for vegetarians, provided no animal-derived additives are included in the cheeses used. It can be modified for gluten-free diets by selecting gluten-free crackers for serving and ensuring all ingredients are free from gluten contamination. For vegans, alternative plant-based cheeses and nut-only coatings can be experimented with, but note that the classic flavor profile will shift.
Course
Appetizer, Snack, Party Food
Cuisine
American, Party Cuisine
Ingredients
Primary Ingredients
| Ingredient | Quantity | Notes |
|---|---|---|
| Cream Cheese | 8 ounces (225g) | Softened at room temperature |
| Cheddar Cheese (shredded) | 1 cup (120g) | Sharp or mild, depending on preference |
| Chopped Nuts (pecans) | ½ cup (60g) | Roasted or raw, chopped finely |
| Green Onions (chopped) | ¼ cup (15g) | Freshly chopped |
| Fresh Parsley (chopped) | 2 tablespoons (8g) | Fresh yields best flavor |
| Garlic Powder | 1 teaspoon | Optional, for added savory depth |
| Worcestershire Sauce | 1 teaspoon | Adjust for flavor intensity |
| Salt and Pepper | to taste | Start with ¼ teaspoon salt and pepper each |
Extras for Coating
| Ingredient | Quantity | Notes |
|---|---|---|
| Chopped Pecan Nuts | ½ cup (60g) | |
| Chopped Fresh Herbs (parsley, chives) | 2 tablespoons (8g) | |
| Additional Chopped Nuts (optional) | as needed |
Instructions
Step 1: Prepare the Cream Cheese
Begin by letting the cream cheese sit at room temperature for about 30-45 minutes. This softening process makes it much easier to blend thoroughly with other ingredients, ensuring a smooth, cohesive mixture. If you’re pressed for time, you can microwave the cream cheese in short 10-15 second bursts until soft, but be careful not to melt it entirely or distort its texture.
Step 2: Mix the Main Ingredients
In a large mixing bowl, combine the softened cream cheese and shredded cheddar cheese. Using an electric mixer on medium speed or a sturdy wooden spoon, blend until creamy, uniform, and smooth. Incorporate garlic powder, Worcestershire sauce, salt, and pepper. Mix thoroughly to distribute spices evenly throughout the cheese mixture. If you’re using a mixer, scrape down the sides periodically to ensure total incorporation.
Step 3: Incorporate Herbs and Onions
Add the chopped green onions and parsley into the cheese mixture. Use your spatula or mixer to fold these ingredients in gently, distributing them evenly throughout the mixture. The green onions impart a delicate onion flavor and a fresh aroma, while parsley adds a burst of herbal brightness.
Step 4: Shape into a Cheese Ball
Lay out a sheet of plastic wrap or parchment paper on your work surface. Scoop the cheese mixture onto the center. Use your hands to gently mold the mixture into a round ball approximately 4-6 inches in diameter. Applying gentle pressure helps achieve a firm, well-shaped cheese ball that can be coated uniformly.
Step 5: Prepare the Nut and Herb Coating
In a small dish, combine chopped pecans, additional herbs if desired, and any extra chopped nuts. Mix these ingredients well. This mixture forms the exterior coating, giving the cheese ball its classic crunch and visual appeal.
Step 6: Coat the Cheese Ball
Unwrap the shaped cheese ball and roll it gently in the nut mixture, pressing lightly to ensure an even coating. Turn the cheese ball slowly, covering all sides thoroughly. For added flavor, you might roll it in a mixture of nuts, herbs, or additional spices.
Step 7: Chill and Rest
Wrap the coated cheese ball tightly in plastic wrap or parchment paper. Place it in the refrigerator and let it chill for at least 1 hour; however, resting it overnight enhances flavor integration and increases firmness. If pressed for time, even 30 minutes helps set the shape, but longer resting yields optimal results.
Step 8: Serve
Unwrap the chilled cheese ball just before serving. Place it on a decorative platter or cheese board. Surround it with an assortment of crackers, bread slices, celery sticks, carrot sticks, or other vegetable dippers. Optional adornments include fresh herb sprigs or edible flowers for a festive touch. Provide cheese knives and spreading utensils to facilitate easy serving.
Preparation Tips
- Ensure cream cheese is truly softened: Softening at room temperature guarantees the mixture blends smoothly without lumps.
- Adjust seasonings: Taste the cheese mixture before shaping. Add more Worcestershire or salt if needed, but remember that nuts and crackers will add saltiness too.
- Use fresh herbs: Fresh parsley and green onions provide vibrant flavor and color, but dried herbs can be substituted in a pinch.
- Chop nuts finely: Smaller pieces adhere better to the cheese ball, creating a more uniform coating.
- Experiment with flavors: Incorporate cayenne pepper or smoked paprika into the coating for additional spice or smoky aroma.
- Make ahead: The cheese ball can be prepared a day in advance, wrapped tightly, and stored in the refrigerator. The flavors will develop further overnight.
Nutritional Information
| Nutrient | Per Serving (Approximate) |
|---|---|
| Calories | 120 kcal |
| Total Fat | 10 g |
| Saturated Fat | 4.5 g |
| Cholesterol | 20 mg |
| Sodium | 200 mg |
| Carbohydrates | 2 g |
| Fiber | 0.5 g |
| Sugars | 0.4 g |
| Protein | 4 g |
Tips and Tricks
- Flavor boosting: Incorporate a splash of hot sauce or a dash of Liquid Smoke into the mixture for smokiness.
- Nuts: Toast nuts lightly beforehand to enhance their flavor and crunch.
- Herb variation: Experiment with dill, chives, or basil to customize the flavor profile.
- Shape options: Instead of a ball, shape the cheese mixture into a log or mini rounds for variety.
- Color contrast: Add diced red bell peppers or cherry tomato pieces for color and sweetness.
Add-ons
- Cracker assortment: Wheat, multigrain, gluten-free options
- Breadsticks or crostini
- Fresh vegetable sticks: Carrots, celery, cucumbers, bell peppers
- Fruit slices: Apples, grapes, or figs for a sweet contrast
- Additional toppings: Jalapeño slices, olives, or smoked paprika
Side Dishes
- Mixed green salad with vinaigrette
- Stuffed mini pita bread
- Caprese skewers
- Deviled eggs
- Assorted charcuterie and cheese platter
Improvements
- Spice it up: Add cayenne pepper or chili flakes for heat.
- Cheese variety: Substitute or mix in cream cheese with goat cheese or blue cheese for nuanced flavors.
- Smooth texture: Soften nuts in hot water or toast thoroughly to refine texture and tenderness.
- Vegan tweak: Use plant-based cream cheese and nuts such as macadamia or cashews to create a vegan-friendly version.
- Enhance presentation: Garnish with fresh herbs, edible flowers, or decorative toothpicks for parties.
Save and Store
Wrap the finished cheese ball tightly in plastic wrap or place in an airtight container. Store it in the refrigerator for up to 3 days. For longer storage, freeze the uncoated or coated cheese ball wrapped securely in plastic wrap and foil, but note that texture could change slightly upon thawing. To serve after freezing, thaw in the refrigerator overnight and recoat if needed for presentation.
FAQ
Can I make this cheese ball ahead of time?
Absolutely. Preparing the cheese ball the day before allows flavors to meld. Ensure it is tightly wrapped and refrigerated. For best flavor, let it sit at room temperature for 15–20 minutes before serving.
Can I substitute ingredients?
Yes. Variations include swapping cheddar for pepper jack, using different nuts, or adding spices like paprika or chili powder. Adjust seasoning and coating to your taste preference.
Is this recipe suitable for gluten-free diets?
Yes. Use gluten-free crackers and check ingredients of condiments like Worcestershire sauce for gluten content. The cheese mixture itself is gluten-free.
What are some vegetarian options?
The recipe as written is vegetarian. Ensure that Worcestershire sauce used is vegetarian-friendly if needed.
How can I make this vegan?
Substitute cream cheese with plant-based cream cheese and use chopped nuts instead of cheese in the outer coating. Consult vegan cheese brands for best flavor and texture.
Conclusion
Aunt Kay’s Party Cheese Ball stands as a celebration of simple ingredients transformed into a festive, crowd-pleasing appetizer. Its nostalgic roots and timeless appeal make it an essential dish for entertaining, ensuring smiles around the table. From preparation to presentation, every step offers an opportunity to customize and craft a version that suits your taste buds while maintaining its iconic charm. Remember, at Love With Recipes, we believe that food is both an art and a tradition—this cheese ball perfectly embodies that ethos, bringing people together one bite at a time.
References
- Betty Crocker Recipes: Classic cheese ball guide (Retrieved 2023)
- The New York Times Cooking: Party Cheese Ball Variations (2022)