Introduction
Goan Poi, also affectionately known as Goan Poee, stands as a quintessential bread that embodies the rich culinary traditions of Goa, India. This soft, fluffy bread is a staple in numerous Goan households and is celebrated for its tender crumb and subtle flavor that complements a myriad of curries and gravies. Its unique texture is achieved through a careful balance of ingredients, including all-purpose flour, wheat flour, wheat bran, and active dry yeast.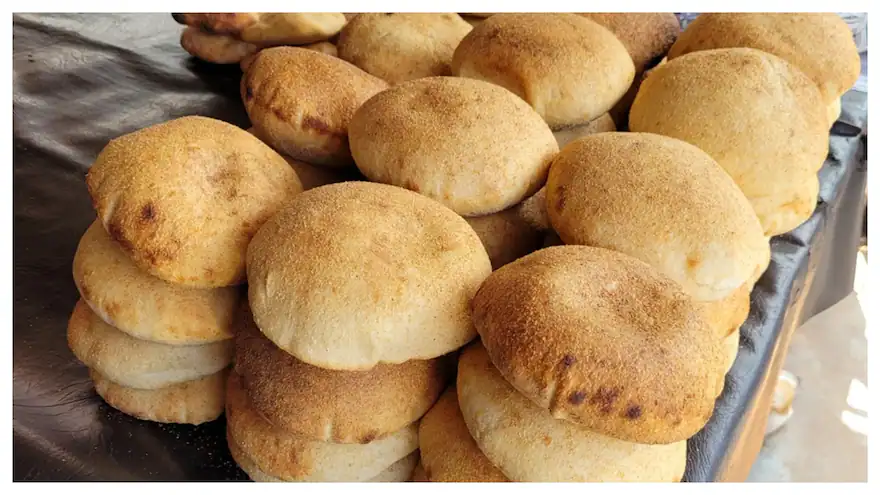
In Goa, Goan Poi is not just a breakfast item but a cultural icon, often sold fresh on the streets during the mornings or baked in local bakeries. Its versatility makes it an ideal accompaniment to dishes like Goan Style Mushroom Shagoti or Aloo Vindaloo, elevating the entire meal experience with its comforting softness. Whether you are an aspiring home baker or a seasoned culinary enthusiast, mastering this recipe offers an authentic taste of Goa’s vibrant food heritage. As part of the Love With Recipes platform, this comprehensive guide aims to walk you through every detail, ensuring your success in creating this delightful bread from scratch.

Time
The total preparation time for making Goan Poi is approximately 2 hours and 10 minutes, broken down as follows:
- Preparation and initial dough rising: 90 minutes
- Second proofing (after shaping): 1 hour
- Baking time: approximately 8 minutes
Note that actual times may vary based on your kitchen environment, including ambient temperature and humidity, which can influence yeast activity and dough proofing times.
Needed Equipment
To ensure a smooth baking process, gather the following equipment before starting:
- Mixing bowls (preferably large and sturdy)
- Measuring cups and spoons (for precise measurement)
- Kitchen scale (optional but recommended for accuracy)
- Wooden spoon or dough hook attachment for a stand mixer
- Damp cloth or plastic wrap (for covering dough)
- Baking sheet or tray (preferably lined with parchment paper or lightly greased)
- Rolling pin (for shaping the dough)
- Sharp knife or dough cutter (to divide the dough)
- Oven (preheated to the correct temperature)
- Cooling rack (for cooling the baked bread)
- Pastry brush or spray (optional, for moisture maintenance)
- Kitchen thermometer (to check water temperature and oven accuracy)
Tags
Traditional, Indian Bread, Goan Cuisine, Baking, Homemade Bread, Street Food, Breakfast, Fluffy Bread, Yeast Bread, Authentic Recipe
Serving Size
This recipe yields approximately 12 pieces of Goan Poi, ideal for a family meal or gatherings. Each piece is approximately 80-100 grams, making it perfect for sharing alongside rich curries or as a snack on its own.
Difficulty Level
This recipe is categorized as intermediate due to the need for precise kneading, proofing, and baking times. However, with patience and attention to detail, home cooks with basic baking experience can achieve excellent results.
Allergen Information
| Allergen | Present in Recipe | Notes |
|---|---|---|
| Gluten | Yes | Contains wheat flour and all-purpose flour |
| Soy | No | |
| Milk | No | Does not include dairy ingredients |
| Nuts | No | |
| Eggs | No |
Dietary Preference
This recipe is suitable for vegetarians. It is free of animal fats and preservatives, making it a wholesome choice for those adhering to a vegetarian diet. It can also be adapted for vegan diets by replacing water with plant-based alternatives and ensuring no dairy or eggs are introduced in future variations.
Course
This bread serves as a versatile component of a meal, fitting into categories such as:
- Breakfast
- Snack
- Side Dish
- Part of a Main Course (paired with curries or gravies)
Cuisine
Indian, Goan, Coastal Cuisine
Ingredients
| Ingredients | Quantity |
|---|---|
| Maida (All-purpose flour) | 1 cup (120 grams) |
| Wheat flour | 1 cup (120 grams) |
| Wheat bran | 1/4 cup (20 grams) |
| Active dry yeast | 1-1/4 teaspoons (about 4 grams) |
| Sugar | 1/4 teaspoon (about 1 gram) |
| Salt | 1/2 teaspoon (about 3 grams) |
| Water (lukewarm) | 1 cup (240 ml) |
Instructions
Step 1: Mixing the dry ingredients
Begin by preparing your workspace. In a large mixing bowl, combine the all-purpose flour, wheat flour, wheat bran, active dry yeast, sugar, and salt. Use a whisk or fork to thoroughly mix these dry ingredients, ensuring an even distribution of the yeast and salt. This step is crucial because it ensures that the yeast is evenly dispersed, which promotes uniform rising and aeration of the dough.
Step 2: Forming the dough
Gradually add lukewarm water to the dry mixture. It’s essential to add the water slowly, about a tablespoon at a time, while mixing with a spoon, spatula, or your hand. The water should be warm—around 37°C (98.6°F)—to activate the yeast without killing it. If you have a kitchen thermometer, verify the temperature to avoid overly hot water, which can inhibit yeast activity, or cold water, which can slow fermentation.
Continue mixing and kneading the dough until it begins to come together. Once a shaggy mass forms, transfer it onto a lightly floured surface or kneading board. Knead the dough by hand for at least 8-10 minutes, applying firm but gentle pressure. The goal is to develop gluten, which gives the bread its characteristic elasticity and softness. The dough should be smooth, supple, and slightly tacky but not sticky. If the dough is too sticky, sprinkle a little more flour; if too dry, add a small amount of water.
Step 3: First proofing (bulk fermentation)
Shape the dough into a ball and coat it lightly with a small amount of oil to prevent sticking. Place it in a clean, large bowl. Cover the bowl with a damp cloth or plastic wrap, ensuring that the cover is snug but not airtight. Allow the dough to rise in a warm, draft-free environment for approximately 2 hours. During this period, the yeast ferments the sugars, producing carbon dioxide that causes the dough to double in size and develop airy pockets.
To check if the dough has risen sufficiently, gently press a finger into the dough. If the indentation remains and does not spring back immediately, it has proofed adequately. If not, give it additional time, especially in cooler environments.
Step 4: Kneading after the first rise
Once the dough has doubled in volume, punch it down gently to release excess gas. Transfer it back onto your work surface and knead briefly to redistribute the yeast and remove large air bubbles. This step improves the bread’s texture and ensures even fermentation during the second proofing.
Step 5: Dividing and shaping the dough
Divide the dough into 12 equal portions using a sharp knife or dough cutter. To do this accurately, weigh each portion if you have a kitchen scale, which ensures uniform size and baking consistency. Roll each portion into a smooth ball, then lightly flatten each ball with your hands or a rolling pin to form small disks about 3-4 inches in diameter.
Place the shaped dough rounds onto a baking sheet lined with parchment paper or lightly dusted with wheat bran. Lightly press down on each piece to slightly flatten them further. Cover these shaped rounds with a damp cloth and allow them to rest and rise again for approximately 1 hour. This second proofing helps develop the bread’s oven spring and enhances its fluffy texture.
Step 6: Preheating the oven
While the dough rounds are resting, preheat your oven to 220°C (425°F). Place an oven rack in the middle position and allow at least 10 minutes for the oven to reach the correct temperature. For best results, use an oven thermometer to verify the temperature accuracy. Proper preheating is critical for achieving a crisp exterior and tender crumb.
Step 7: Baking the Goan Poi
Once the dough has adequately risen, carefully transfer the shaped rounds into the hot oven. Bake for 6-8 minutes. Keep a close watch to prevent over-baking, as this can render the bread hard rather than soft. The goal is to achieve a lightly golden-brown crust while retaining the soft, fluffy interior. If desired, lightly spritz the surface with water using a spray bottle before baking to promote a softer crust.
Remove the baked poi from the oven and transfer to a cooling rack. Let them cool for about 5 minutes before serving. Serve warm as an accompaniment to your favorite Goan curries or enjoy plain with butter or jam.
Preparation Tips
- Water Temperature: Always use lukewarm water to activate the yeast without killing it. Ideal temperature is around 37°C (98.6°F). A kitchen thermometer ensures precision.
- Proofing Environment: For optimal rising, place the dough in a warm, draft-free spot. You can create a proofing box by placing the bowl in an oven with the light on or near a warm appliance.
- Gluten Development: Knead thoroughly until the dough is smooth and elastic. Proper gluten formation ensures the bread will be soft yet sturdy.
- Shaping: Use a light touch when shaping to avoid deflating the dough excessively.
- Baking Time: Keep the baking time short to preserve softness. Longer baking results in harder bread.
Nutritional Information
| Nutrient | Per Serving (Approximate) |
|---|---|
| Calories | 150 kcal |
| Carbohydrates | 30 g |
| Protein | 4 g |
| Fat | 1 g |
| Fiber | 2 g |
| Sodium | 150 mg |
Tips and Tricks
- Use Fresh Yeast: Ensure your yeast is active and not expired to guarantee proper fermentation.
- Adjust Hydration: Depending on your flour brand and humidity, you might need to modify water slightly for the perfect dough consistency.
- Rest Periods: Do not skip the second resting period; it significantly improves the bread’s softness and rise.
- Oven Hotspot: Rotate your baking sheet halfway through baking if your oven has uneven heat distribution.
- Flavor Variations: For a subtle flavor twist, add a teaspoon of sesame seeds or ajwain seeds to the dough before kneading.
Add-ons
Enhance your Goan Poi with the following optional add-ons:
- Fresh herbs like cilantro or mint mixed into the dough for a fragrant variation.
- A sprinkle of nigella seeds or sesame seeds on top before baking for added texture and flavor.
- Butter or ghee brushed on hot bread for extra richness.
- Cheese stuffing or topping for a cheesy twist, baked briefly to melt.
Side Dishes
Goan Poi pairs beautifully with a variety of dishes, including:
- Goan Style Mushroom Shagoti
- Aloo Vindaloo
- Fish Curry (like Xacuti or Malvani fish curry)
- Vegetable Stews
- Chutneys and Pickles (such as mango or lime pickle)
Improvements
For a more nuanced flavor profile, consider the following enhancements:
- Incorporate a small amount of yogurt in the dough for tanginess and improved tenderness.
- Add a teaspoon of cumin or caraway seeds to infuse aromatic notes.
- Experiment with whole wheat flour instead of all-purpose flour for a healthier version.
- Use a sourdough starter instead of commercial yeast for a complex flavor and better fermentation.
Save and Store
Freshly baked Goan Poi can be stored at room temperature in an airtight container for up to 24 hours. For longer storage, wrap the bread tightly in plastic wrap or foil and freeze for up to 1 month. To reheat, simply warm in a preheated oven at 180°C (350°F) for 5-7 minutes or toast lightly. Avoid refrigerating, as this can dry out the bread and make it crumbly.
For best flavor and texture, consume the bread fresh or within 24 hours of baking.
FAQ
Can I make this bread vegan?
Yes. Replace lukewarm water with plant-based milk or water, and ensure no dairy or eggs are added. The recipe already is vegan-friendly if you avoid any animal-derived ingredients.
Why is my dough not rising well?
Possible reasons include inactive yeast, water that is too hot or cold, or a cold environment. Verify yeast freshness, ensure proper water temperature, and proof in a warm place.
Can I use whole wheat flour exclusively?
While traditional Goan Poi uses a combination of maida and wheat flour, you can substitute with whole wheat flour, but expect a denser bread. Adjust water content accordingly, as whole wheat absorbs more moisture.
What is the best way to get a soft crust?
Spraying the surface with water before baking or covering the bread with a damp cloth during baking can help maintain moisture. Avoid overbaking, and serve warm for optimal softness.
Conclusion
Crafting authentic Goan Poi at home is a rewarding culinary experience that transports you directly to the vibrant markets and cozy bakeries of Goa. This bread, with its delicate texture and subtle flavor, exemplifies the rich heritage of coastal Indian cuisine. By understanding each step—from the precise mixing of ingredients to the careful proofing and baking—you can produce a bread that rivals those found on Goa’s bustling streets. Remember, patience and attention to detail are your best allies in achieving perfect results. Whether enjoyed plain, slathered with butter, or paired with flavorful curries, Goan Poi offers a comforting taste of Goa’s culinary soul.
For further insights into Goan cuisine and bread-making techniques, consider consulting sources like “The Food of India” by Priya Wickramasinghe and “Indian Breads” by S. S. Satsangi, which offer detailed historical and technical perspectives.
Enjoy baking and sharing this delightful bread as part of your culinary journey with Love With Recipes!