Introduction
Sicilian Taralli, especially the sweet variety, encapsulate the rich culinary heritage of Sicily in a single bite. These delicately crispy, ring-shaped biscuits are a celebration of traditional Italian baking, combining simple ingredients with expert techniques to produce a treat that balances sweetness, citrus freshness, and a satisfying crunch. Originating from the sun-drenched shores of Sicily, these taralli are not only delightful as a dessert but also serve as an emblem of local culture, resonating with generations of families who have cherished their secret recipes. In this comprehensive guide, provided by Love With Recipes, you will learn how to craft these irresistible Sicilian sweet taralli from scratch, ensuring each step is detailed and precise to help you achieve authentic results. Whether you are a seasoned baker or a passionate home cook, this recipe invites you to experience the magic of Sicilian baking and bring a piece of Italy into your kitchen.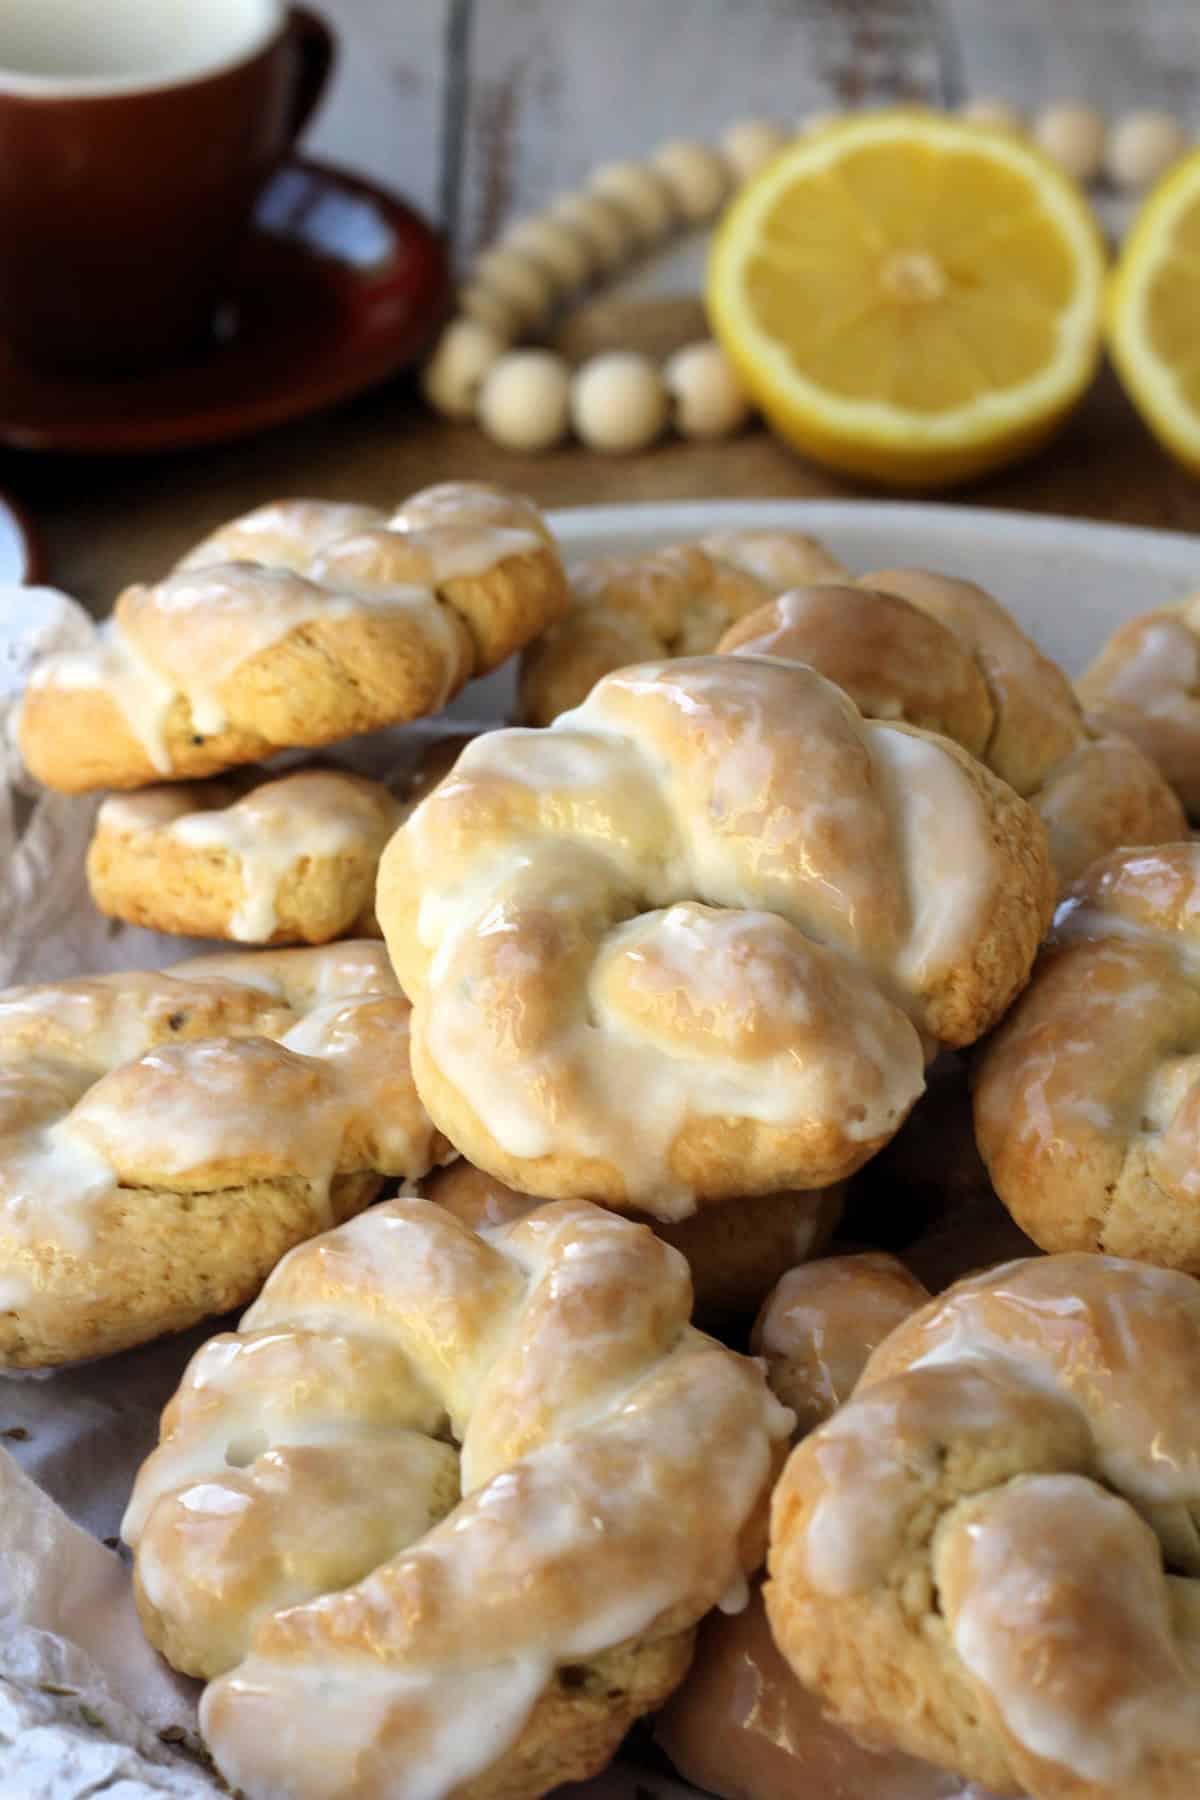
Time
Preparation Time: 30 minutes
Baking Time: 15 minutes
Cooling and Glazing: 20 minutes
Total Time: approximately 1 hour
Needed Equipment
- Large mixing bowls
- Measuring cups and spoons
- Grater (for lemon zest)
- Pastry brush
- Baking sheet
- Parchment paper
- Rolling pin (optional, for shaping)
- Sharp knife or dough scraper
- Cooling rack
- Small bowl for glaze
- Whisk or fork for mixing
- Kitchen scale (optional but recommended for precision)
Tags
Sweet, Italian, Sicilian, Biscuit, Cookies, Dessert, Traditional, Homemade, Citrus, Baked Goods, Ring-shaped, Crispy, Easy
Serving Size
Per serving: 1 tarallo (approximate)
Servings: 12 large taralli
Difficulty Level
Intermediate — requires basic baking skills and attention to detail, especially when shaping and glazing.
Allergen Information
- Contains gluten (wheat flour)
- Contains eggs
- Contains dairy (butter)
- Contains citrus (lemon zest and juice)
Dietary Preference
Vegetarian. Not suitable for vegans due to egg and butter content.
Course
Dessert, Snack, Tea-time treat
Cuisine
Italian, Sicilian
Ingredients
| Ingredient | Quantity | Notes |
|---|---|---|
| All-purpose flour (preferably Italian 00 flour) | 500g | Provides the base structure; high-quality flour yields better texture |
| Eggs | 2 | Bind the dough and add richness |
| Whole milk | 125g | Moistens the dough and helps achieve the right consistency |
| Butter | 100g | Unsalted preferred to control salt content |
| Sugar | 75g | Enhances sweetness and helps with browning |
| Lemon zest | 1 lemon (about 1 tablespoon) | Provides a fresh citrus aroma and flavor |
| Ammonia for sweets (ammonium bicarbonate) | 1 teaspoon | Leavening agent that yields crispy texture; use carefully |
| Baking powder | 1 teaspoon | Additional leavening to help rise |
| Salt | A pinch | Enhances overall flavor |
| Powdered sugar (icing sugar) | 250g | For glazing |
| Water | 25ml | To adjust glaze consistency |
| Lemon juice | 1 tablespoon | Concentrated flavor for glaze |
Instructions
Step 1: Preparing the Dough
Begin by assembling all your ingredients on a clean, organized workspace. In a large mixing bowl, sift the all-purpose flour (preferably Italian 00 flour) to ensure a fine, lump-free texture. Sifting also incorporates air into the flour, which can contribute to a lighter final product. Add the sugar to the flour and whisk together to distribute evenly. This step is crucial for the even sweetness and proper integration of dry ingredients.
Next, add the butter, which should be cut into small uniform cubes before incorporation. Using your fingertips or a pastry cutter, work the butter into the flour mixture until it resembles coarse crumbs. This process, often called “cutting in,” helps create a tender, flaky crumb in the finished taralli. Incorporate the baking powder and ammonia for sweets (ammonium bicarbonate), which act as leavening agents, helping the taralli develop a light, crispy texture during baking.
Grate the lemon zest directly into the mixture, making sure to avoid the bitter white pith. The zest is essential for imparting a fresh, citrusy aroma that complements the sweetness and balances the richness of butter and eggs. Mix thoroughly to distribute the zest evenly throughout the dry ingredients.
Step 2: Kneading the Dough
In a separate small bowl, lightly beat the eggs. Pour the eggs and the milk into the dry ingredients. Using a wooden spoon or your hands, combine the mixture until it begins to come together. The dough will initially appear shaggy and crumbly, but continue kneading until a cohesive, smooth dough forms. If the dough feels too dry or crumbly, add milk gradually—one teaspoon at a time—until the dough is soft but not sticky. Conversely, if the dough is too sticky, sprinkle a small amount of flour until manageable.
Transfer the dough onto a lightly floured surface. Knead with the heel of your hand for about 8-10 minutes, folding and pressing until the dough is elastic and smooth. Proper kneading ensures the gluten develops adequately, giving the taralli their structure and chewiness. Wrap the dough in plastic wrap and let it rest for 10-15 minutes. Resting allows the gluten to relax and makes shaping easier.
Step 3: Shaping the Taralli
Divide the rested dough into 12 equal portions, approximately 75 grams each. Using a kitchen scale guarantees uniform size, which promotes even baking. Roll each portion into a long, slender log about 20-25 cm in length. To shape the taralli, hold each log at both ends and twist slightly, then bring the ends together to form a ring. Pinch the edges to seal tightly, ensuring they won’t open during baking. The ring shape is traditional and helps achieve the characteristic appearance and texture.
Alternatively, if you prefer a more refined shape, you can roll the dough into smaller balls and flatten them slightly, but the classic ring is recommended for authenticity and texture.
Step 4: Preparing the Baking Sheet
Line a baking sheet with parchment paper to prevent sticking and facilitate easy cleanup. Arrange the shaped taralli on the baking sheet, spacing them about 2-3 centimeters apart. Proper spacing allows heat circulation, ensuring even baking and preventing sticking or merging of the rings. If you wish, you can lightly brush the taralli with an egg wash (beaten egg) for a shiny finish, but traditionally, these are glazed after baking.
Step 5: Baking the Taralli
Preheat your oven to 180°C (350°F) in static mode—avoid fan-forced settings, which can cause uneven baking. Once the oven reaches the desired temperature, place the baking sheet in the center rack. Bake for approximately 15 minutes, or until the taralli turn a beautiful golden brown. Keep a close eye during the last few minutes to prevent over-browning, as the goal is a crispy exterior with a tender interior.
Remove from the oven and transfer to a wire rack to cool slightly. The taralli will continue to firm up as they cool, so patience is key to achieving the perfect crunch.
Step 6: Preparing the Lemon Glaze
While the taralli are cooling, prepare the glaze. In a small bowl, sift the powdered sugar to remove lumps. Add the lemon juice gradually while whisking or stirring with a fork until you obtain a smooth, thick glaze. Adjust the consistency by adding a few drops of water if too thick or more powdered sugar if too runny. The glaze should be glossy and thick enough to coat the surface without dripping excessively.
Step 7: Glazing the Taralli
Once the taralli have cooled to a manageable temperature, use a pastry brush to gently apply the lemon glaze to each cookie. This step imparts a beautiful shine and enhances the citrus flavor, providing an appealing visual contrast against the crispy surface. Allow the glaze to set for 10-15 minutes before serving. For an extra touch, you can sprinkle a tiny amount of grated lemon zest on top of the glaze for added visual appeal and flavor intensity.
Preparation Tips
- Ingredient Quality: Use high-quality Italian flour, like 00 flour, for optimal texture and flavor. Fresh lemons will give a more vibrant zest and juice.
- Measuring Accuracy: Weigh ingredients for precision, especially when working with flour and liquids, to ensure consistent results.
- Shaping Consistency: Keep all portions of dough the same weight for uniform baking and appearance.
- Resting the Dough: Allow the dough to rest after kneading to improve elasticity and ease shaping.
- Monitoring Baking: Keep a close eye during baking, as oven temperatures vary, and over-baking can lead to excessive dryness.
- Glazing Techniques: Apply the glaze while the taralli are still warm for better adhesion and shine.
Nutritional Information
| Nutrient | Per Serving (Approximate) |
|---|---|
| Calories | 180 kcal |
| Protein | 4 g |
| Carbohydrates | 27 g |
| Fat | 7 g |
| Sugar | 8 g |
| Fiber | 1 g |
| Sodium | 50 mg |
Tips and Tricks
- Use Ammonia for Sweets: This leavening agent helps create the characteristic crispiness of traditional taralli. Handle with care and ensure proper ventilation during baking.
- Flavor Variations: Add vanilla extract or a splash of orange liqueur to the dough for different aromatic profiles.
- Color Control: For a darker, crunchier finish, extend baking by a couple of minutes, but watch carefully to prevent burning.
- Glaze Alternatives: For a different flavor, consider using honey or a light syrup instead of lemon glaze.
Add-ons
- Chopped nuts (almonds, pistachios) sprinkled before baking for added texture
- Dark chocolate drizzle after glazing for a decadent twist
- Orange zest in place of lemon for a different citrus note
Side Dishes
Serve these taralli alongside a selection of fresh fruit, cheese platter, or a light Italian dessert like panna cotta or cannoli for a delightful Italian-themed spread.
Improvements
- Incorporate a hint of cinnamon or nutmeg into the dough for warmth
- Add a splash of liqueur like Limoncello to enhance citrus flavor
- Experiment with different glazes, such as a white chocolate coating or a citrus glaze with zest
Save and Store
Allow the taralli to cool completely before storing. Place them in an airtight container at room temperature for up to one week. For longer storage, freeze in a sealed bag for up to one month. To restore crispiness after storage, reheat in a warm oven for 5-7 minutes.
FAQ
Can I make these taralli vegan?
Yes, substitute the butter with vegan margarine or coconut oil, and replace eggs with flaxseed or chia seed eggs (1 tablespoon ground seeds mixed with 3 tablespoons water per egg). Adjust liquids accordingly.
Is ammonia safe to use in baking?
When used in small quantities and baked thoroughly, ammonia for sweets (ammonium bicarbonate) is safe and commonly used in traditional Italian baked goods. Ensure proper ventilation during baking and avoid inhaling dust directly.
Can I freeze the raw shaped taralli?
Yes, shape the taralli and place them on a baking sheet to freeze individually. Transfer to a sealed bag and keep frozen. Bake directly from frozen, adding a few extra minutes to the baking time.
How do I prevent the taralli from cracking during baking?
Ensure the dough is well kneaded and rested. Seal the edges tightly when forming rings. Avoid overworking the dough, which can cause cracks. Bake at the correct temperature and monitor closely.
Conclusion
Crafting Sicilian sweet taralli at home allows you to connect deeply with a cherished Italian tradition. The process, from kneading to glazing, offers a rewarding baking experience that culminates in a beautifully crisp, citrus-infused treat. Perfect for sharing with loved ones or enjoying as a personal indulgence, these taralli exemplify the harmony of simple ingredients transformed through skill and passion. Remember, the key to authentic flavor lies in quality ingredients, precise technique, and a touch of patience. Bring the sun-kissed flavors of Sicily into your kitchen and delight in every crunchy, sweet bite. For more authentic recipes and culinary inspiration, visit Love With Recipes, your trusted source for home-cooked delights.
References
- “Sicilian Cuisine: The Art and Craft of Italian Cooking” by Carla Capalbo
- Traditional Italian baking techniques from “The Silver Spoon” cookbook