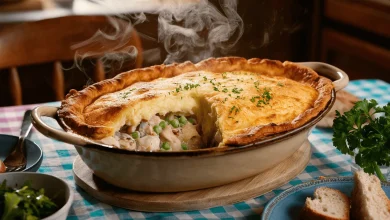
Introduction
At Love With Recipes, we believe that snacks should not only satisfy your cravings but also bring joy through their texture, flavor, and presentation. Our Cheese Straws With Rice Krispies recipe exemplifies this philosophy by combining the savory richness of sharp cheddar cheese with the light crunch of Rice Krispies cereal, all wrapped in a buttery, spiced dough. Whether you’re preparing for a casual afternoon snack, a sophisticated party appetizer, or a delightful gift for friends and family, these cheese straws are guaranteed to be a hit. The unique inclusion of Rice Krispies provides an unexpected crunch that elevates traditional cheese straws into a memorable culinary experience. This recipe is versatile, easy to customize, and perfect for those who appreciate the marriage of simple ingredients turned extraordinary. Dive into this detailed guide to craft the ultimate cheese straws with rice Krispies—your taste buds will thank you!
Time
- Preparation Time: 10 minutes
- Cooking Time: 45 minutes
- Total Time: 55 minutes
Needed Equipment
- Mixing bowls (large and medium)
- Fork or pastry cutter
- Measuring cups and spoons
- Grater (for cheese)
- Baking sheet (preferably ungreased or lined with parchment paper)
- Rolling pin (optional, for shaping)
- Knife or dough scraper
- Fork (for pressing shapes)
- Cooling rack
- Oven (conventional or convection)
- Spatula or rubber scraper
Tags
Snacks, Appetizer, Cheese, Rice Krispies, Baked Goods, Party Food, Easy Recipes, Cheesy Snacks, Crunchy, Homemade, Comfort Food
Serving Size
Approximately 12-16 cheese straws per batch, depending on size and shaping. Ideal for serving in small portions as an appetizer or snack.
Difficulty Level
Intermediate — requires basic baking skills, dough handling, and shaping techniques. Suitable for home bakers comfortable with measuring and mixing.
Allergen Information
| Allergen | Present in Recipe |
|---|---|
| Milk/Dairy | Yes (cheddar cheese, margarine, butter) |
| Wheat/Gluten | Yes (plain flour) |
| Soy | Margarine (may contain soy derivatives) |
| Gluten | Yes (plain flour) |
| Tree Nuts | None |
| Eggs | None |
Dietary Preference
Vegetarian — no meat or seafood products involved. Can be made vegan by substituting dairy ingredients with plant-based alternatives.
Course
Appetizer, Snack, Party Food
Cuisine
American, Comfort Food, Baked Goods
Ingredients
| Ingredient | Quantity | Notes |
|---|---|---|
| Sharp cheddar cheese, grated | 1 cup | Freshly grated for best flavor |
| Margarine | 1/2 cup (113g) | Softened to room temperature |
| Butter | 1 cup (227g) | Unsalted preferred for flavor control |
| Plain flour | 1 1/2 cups (180g) | Sifted for lightness |
| Paprika | 1/4 teaspoon | Optional for color and mild flavor |
| Tabasco sauce | 1/4 teaspoon | Adjust to taste for spiciness |
| Rice Krispies cereal | 1/4 cup (about 20g) | Adds crunch and texture |
Instructions
Step 1: Prepare the oven and workspace
Preheat your oven to 250°F (120°C). This low temperature helps in gently drying the cheese straws during the initial baking phase, ensuring they develop a crispy exterior without burning. Line your baking sheet with parchment paper or lightly grease it to prevent sticking. Clear your workspace so you have ample room to work with the dough, shaping, and baking. Gather all your ingredients and equipment so they are within reach, which streamlines the process and reduces stress during preparation.
Step 2: Cream the cheese and margarine
In a large mixing bowl, combine the grated sharp cheddar cheese and softened margarine. Use a fork or pastry cutter to blend the two ingredients thoroughly until you obtain a smooth, uniform mixture. This step is crucial because it integrates the cheese’s moisture and fat into the margarine, creating a creamy base that will help bind the dough. Proper mixing ensures that the cheese is evenly distributed, preventing uneven flavor and texture in your final product.
Step 3: Incorporate butter, flour, and spices
Add the butter to the mixture, incorporating it thoroughly with the cheese-margarine blend. The butter adds richness and helps achieve a tender, flaky texture. Next, gradually sift in the plain flour, ensuring it is evenly distributed to prevent lumps. Add the paprika for a subtle smoky flavor and a hint of color, and the Tabasco sauce to introduce a mild spicy kick. Mix all ingredients until they come together into a cohesive dough. If the dough appears too crumbly, you can add a teaspoon of cold water to help it bind, but avoid over-hydrating to keep the dough firm enough for shaping.
Step 4: Fold in Rice Krispies
Gently fold the Rice Krispies cereal into the dough. Use a spatula or your hands to incorporate the cereal evenly without crushing it excessively, preserving the intended crunch. The Rice Krispies will provide a crispy texture that contrasts beautifully with the cheesy interior. Distribute them throughout the dough, ensuring each piece of dough contains some cereal for a consistent bite.
Step 5: Shape the cheese straws
Pinch off small, marble-sized portions of dough—roughly 1 inch in diameter. Roll each piece between your palms into a smooth ball. Place these on your prepared baking sheet, spacing them about 1 to 2 inches apart to allow for expansion during baking. Use a fork to gently press down on each ball, creating a slight indentation and the iconic straw shape. This pressing also encourages even baking and enhances the visual appeal of your cheese straws. If desired, you can use a piping bag fitted with a star tip for more uniform and elongated straws, but the traditional method with pressing works just as well.
Step 6: Bake the cheese straws
Place the baking sheet on the middle rack of your preheated oven. Bake for 40 to 45 minutes. During this period, keep an eye on the color; the cheese straws should turn a beautiful golden brown, indicating they are crispy and cooked through. The low temperature ensures they dry out evenly without burning. If your oven runs hot, consider rotating the baking sheet halfway through baking for uniformity. The aroma that fills your kitchen during baking will be irresistible, hinting at the deliciousness awaiting.
Step 7: Cooling and serving
Once baked, remove the cheese straws from the oven and transfer them to a cooling rack. Allow them to cool for at least 5 minutes; this helps set their structure and enhances their crispiness. Serve these cheese straws warm or at room temperature. They are perfect for snacking, serving at parties, or gifting in decorative tins. The contrast between the crunchy exterior and the cheesy, tender inside makes every bite a delightful experience.
Preparation Tips
- Cheese: Use freshly grated sharp cheddar for maximum flavor. Pre-grated cheese often contains anti-caking agents that can affect the texture of your dough.
- Butter and Margarine: Ensure both are at room temperature to facilitate easier blending and achieve a smooth dough.
- Spices: Adjust paprika and Tabasco to suit your taste preferences. For a milder version, omit Tabasco or use smoked paprika for a deeper flavor.
- Rice Krispies: Do not crush the cereal too much; the chunks contribute to the crunch.
- Shaping: Keep the dough refrigerated if it becomes too soft to handle easily, which also helps the flavors to meld.
Nutritional Information
| Nutrient | Per Batch | Per Serving (approx. 12 servings) |
|---|---|---|
| Calories | 2348.8 kcal | 195.7 kcal |
| Fat | 167.8 g | 13.98 g |
| Saturated Fat | 67.1 g | 5.59 g |
| Cholesterol | 238.6 mg | 19.88 mg |
| Sodium | 2721.1 mg | 226.75 mg |
| Carbohydrates | 136 g | 11.33 g |
| Fiber | 4 g | 0.33 g |
| Sugar | 5.6 g | 0.47 g |
| Protein | 73.6 g | 6.13 g |
Tips and Tricks
- Flavor Variations: Introduce chopped herbs like chives or parsley into the dough for added freshness and color.
- Cheese Choices: Experiment with different cheeses such as Gruyère, Parmesan, or a blend for diverse flavor profiles.
- Spice Adjustments: For a smoky flavor, substitute paprika with smoked paprika or add a dash of cayenne pepper.
- Texture Play: Incorporate chopped nuts or seeds into the dough for added crunch and nutritional value.
- Serving Ideas: Pair these cheese straws with a variety of dips such as hummus, spicy salsa, or a creamy ranch dressing.
Add-ons
- Chopped fresh herbs (parsley, chives, dill)
- Crushed red pepper flakes for extra heat
- Finely chopped cooked bacon or ham for a savory twist
- Spiced up with a hint of cumin or coriander powder
Side Dishes
Complement your cheese straws with an assortment of sides for a well-rounded snack platter:
- Fresh vegetable crudités with dipping sauces
- Assorted cheeses and cured meats
- Fruit platter with grapes, figs, or apple slices
- Sweet chutneys or honey mustard for dipping
- Mini salads or coleslaw
Improvements
- Vegan Version: Swap butter and margarine for plant-based alternatives and use vegan cheese options.
- Gluten-Free: Substitute plain flour with a gluten-free flour blend and consider adding xanthan gum for structure.
- Spice Level: Increase or decrease Tabasco and paprika to match your heat preference.
- Cheese Varieties: Try different aged or flavored cheeses for unique taste combinations.
- Shape Creativity: Use cookie cutters or piping bags to create various shapes beyond traditional straws, such as spirals or knots.
Save and Store
Store the cooled cheese straws in an airtight container at room temperature for up to 3 days. For longer storage, place them in a resealable plastic bag or airtight container and refrigerate for up to a week. To re-crisp, reheat in a preheated oven at 350°F (175°C) for 5-7 minutes. Avoid freezing as the texture of the Rice Krispies may become compromised upon thawing.
FAQ
Can I make these cheese straws ahead of time?
Yes, prepare the dough in advance, shape, and refrigerate it. Bake just before serving to ensure maximum freshness and crunch.
Can I freeze the raw dough?
Yes, wrap the shaped dough tightly in plastic wrap and freeze for up to 1 month. Thaw in the refrigerator before baking.
Can I customize the spice level?
Absolutely. Adjust Tabasco and paprika to suit your taste, adding more for heat or less for milder flavor.
What if my cheese straws are not crispy enough?
Ensure you bake at the correct temperature and for the full duration. If they are still soft, return to the oven for an additional 5-10 minutes, keeping a close eye to prevent burning.
Are these suitable for kids?
Yes, but consider reducing or omitting the Tabasco sauce for milder flavor, and use milder spices to suit younger palates.
Conclusion
Creating homemade Cheese Straws With Rice Krispies is a rewarding culinary experience that combines simplicity with sophisticated flavor. These snacks are a testament to how basic ingredients can be transformed into a delightful treat that appeals to all ages. The crispy exterior, cheesy interior, and unexpected crunch of Rice Krispies make every bite memorable. Whether for a casual gathering or a special occasion, this recipe offers versatility, flavor, and fun. Love With Recipes encourages you to experiment with flavors, shapes, and accompaniments to truly make this dish your own. Remember, the key to perfect cheese straws lies in balancing flavors, baking times, and personal touches. Happy baking!
References
For more detailed techniques on baking and flavor variations, see King Arthur Baking and Food Network.