Introduction
Embarking on the journey of fermenting your own sauerkraut at home can be both an enriching experience and a delightful culinary adventure. Uncle Bill’s Sauerkraut With Wine is a time-honored recipe that combines traditional European techniques with a subtle infusion of white wine, elevating this humble fermented cabbage into a sophisticated side dish or ingredient that complements a wide array of dishes. At Love With Recipes, we are passionate about sharing recipes that not only tantalize your taste buds but also promote healthy living through natural fermentation and wholesome ingredients.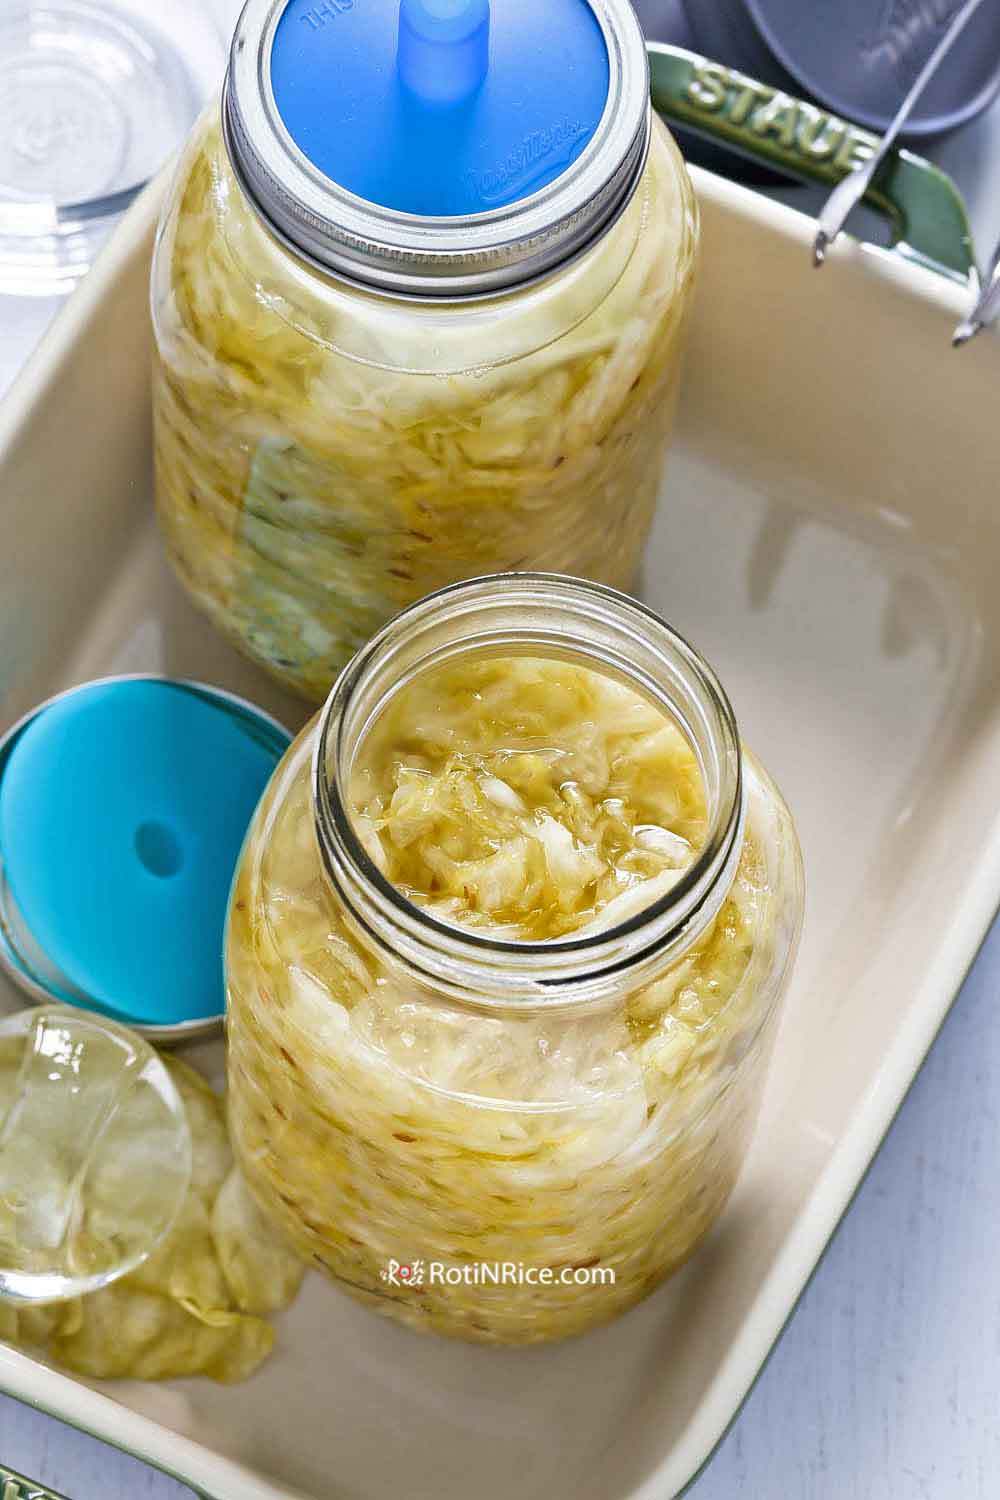
This recipe is designed to be accessible for home cooks, yet it delivers complex flavors reminiscent of authentic European fermentation traditions. The inclusion of wine adds depth and a gentle fruity undertone, making it perfect for pairing with hearty meats, cheeses, or even as a standalone probiotic-rich snack. The process involves careful preparation, fermentation, and preservation techniques, ensuring the sauerkraut develops its optimal flavor while maintaining food safety standards. Whether you’re a seasoned fermenter or a curious beginner, this detailed guide will walk you through every step of creating Uncle Bill’s Sauerkraut With Wine, which yields approximately 12 quart jars of delicious, tangy goodness.
Estimated Time
The entire process from initial preparation to final storage spans approximately 4 to 6 weeks, depending on your fermentation environment and taste preferences. Here’s a breakdown:
- Preparation: 1 hour
- Fermentation initial phase: 2 to 3 weeks at warm temperature (70°F–75°F)
- Secondary fermentation: 2 weeks at cooler temperatures (60°F–65°F)
- Packaging and processing: Approximately 2 hours (including sterilizing jars and boiling water bath)
It is essential to plan ahead and allocate sufficient time for each stage, especially fermentation, which is crucial for developing the characteristic flavor and probiotic qualities of the sauerkraut.
Needed Equipment
To successfully prepare Uncle Bill’s Sauerkraut With Wine, you will require a range of specialized and standard kitchen tools. Proper equipment ensures safety, consistency, and the best flavor development. Here is a comprehensive list:
Fermentation and Preparation Tools
- Large Crock or Fermentation Vessel: Preferably ceramic or food-grade plastic, large enough to hold 12 quarts of cabbage with room for expansion.
- Sharp Chef’s Knife: For cutting cabbage and slicing peppers with precision.
- Shredder or Mandoline: To finely shred cabbage uniformly, ensuring consistent fermentation.
- Measuring Cups and Spoons: Accurate measurement of liquids and salts.
- Kitchen Scale: For precise weighing of ingredients or weights.
- Large Mixing Bowls: For combining and layering ingredients.
- Heavy Plate or Food-Grade Weight: To keep the cabbage submerged during fermentation.
- Clean Rocks or Weights: Heavy, smooth, and food-safe rocks (4-5 pounds), thoroughly washed and soaked before use.
- Cheesecloth or Fine Mesh Cloth: To cover the fermentation vessel, allowing gases to escape while preventing contaminants.
- String or Twine: To secure the cheesecloth tightly around the vessel opening.
- Thermometer: To monitor fermentation temperature.
- Sterilized Quart Jars with Lids: For storing finished sauerkraut, with sterilization equipment or boiling water for sanitation.
- Large Stockpot or Canner: For boiling water bath processing of jars.
- Jar Lifter and Tongs: For safe handling of hot jars.
- Funnel: For transferring sauerkraut and liquids into jars without spillage.
- Headspace Measurement Tool: To ensure proper headspace in jars.
- Labels and Permanent Marker: For dating and identifying jars.
Tags
European, Fermentation, Sauerkraut, Probiotic, Canning, Fermentation, Homemade, Healthy, Vegetarian, Vegan, Low Cholesterol, Low Protein, Weeknight, Easy, Traditional
Serving Size
Each jar contains approximately 1 quart of sauerkraut, which serves about 4 to 6 people as a side dish or condiment. Total yield from this recipe is 12 quart jars, suitable for preserving and sharing or enjoying over several months.
Difficulty Level
This recipe is rated as Moderate. While it involves fermentation steps that require attention to detail and patience, the actual preparation process is straightforward with proper hygiene and careful layering. It is suitable for home cooks with basic culinary skills and an interest in fermentation techniques.
Allergen Information
This recipe contains no common allergens, but always consider individual sensitivities:
- Gluten: None
- Dairy: None
- Nuts: None
- Sulfites: Naturally occurring in wine, which may affect sensitive individuals
Dietary Preference
Vegan and vegetarian-friendly, this sauerkraut is free from animal products and suitable for plant-based diets. It is also low in cholesterol and saturated fats, making it a heart-healthy addition to your meals.
Course
Side Dish, Condiment, Fermented Food
Cuisine
European, Russian-inspired, Central European
Ingredients
| Quantity | Ingredient |
|---|---|
| 4 | Green cabbage |
| 8 tbsp | Pickling salt |
| 3 | Red peppers |
| 4 cups | Cold water |
| 2 cups | Dry white wine |
Detailed Instructions
1. Preparing the Cabbage
The first step in creating Uncle Bill’s Sauerkraut With Wine is selecting fresh, high-quality cabbage. Opt for firm, bright green heads with tight leaves, avoiding any that show signs of spoilage or wilting. Begin by removing any damaged, wilted, or discolored outer leaves—these are often the first to show signs of aging or contamination. Discard these leaves into the compost or trash, ensuring that only healthy leaves make it into the process.
Place the cabbage under cold running water, rinsing thoroughly to remove dirt, pesticides, or residual debris. This step is crucial to prevent unwanted bacteria or mold from contaminating your fermentation. After rinsing, cut the cabbage into quarters, cutting through the core and discarding it. The core is fibrous and less desirable for fermentation, so removing it helps achieve a tender, uniform shred.
2. Shredding the Cabbage
Using a sharp chef’s knife or a dedicated cabbage shredder, finely shred the cabbage into thin strips approximately 1/8 to 1/4 inch wide. Uniform shreds facilitate even fermentation and consistent flavor. If using a mandoline, set the thickness to the thinnest setting to achieve delicate, evenly sliced shreds. Be cautious when handling sharp tools to prevent injury.
As you shred, transfer the cabbage to a large mixing bowl to prepare for layering and salting. The process of shredding releases moisture from the cabbage, which is essential for the natural fermentation process by creating an environment conducive to beneficial bacteria growth.
3. Layering in the Crock
Place the shredded cabbage into your large fermentation vessel, creating layers approximately 4-6 inches deep. After each layer, sprinkle about 2 tablespoons of pickling salt evenly over the cabbage. Salt acts as a preservative, drawing out moisture and inhibiting spoilage organisms while encouraging the proliferation of lactobacilli—the beneficial bacteria responsible for fermentation.
Between layers, sprinkle sliced red peppers for added flavor and subtle heat. The peppers also contribute to the visual appeal and nutritional diversity of your sauerkraut. Repeat this layering process until all cabbage and peppers are used, ensuring a consistent distribution of salt and peppers throughout.
4. Adding Liquids
In a separate container, combine the cold water with the dry white wine. The wine introduces aromatic complexity and enhances the flavor profile of the sauerkraut. Pour this mixture evenly over the layered cabbage, ensuring all layers are adequately submerged. The liquid should cover the cabbage entirely; if not, add more cold water or wine until submerged.
The liquid environment is critical for anaerobic fermentation, preventing molds and spoiling bacteria from developing on the surface of the cabbage. Maintaining a submerged environment promotes a clean, safe fermentation process that yields flavorful, probiotic-rich sauerkraut.
5. Weighing Down and Covering
Place a large, clean plate or a food-grade fermentation weight directly on top of the cabbage, pressing down to ensure the shredded cabbage remains submerged under the liquid. Top this with a clean, thoroughly washed rock weighing approximately 4-5 pounds. The weight must be smooth and free of contaminants; washing with hot water and a brief soak in vinegar can sanitize the rock.
Cover the entire fermentation vessel with several layers of cheesecloth or fine mesh cloth. Secure the cloth tightly with string or twine, ensuring it stays in place while allowing gases to escape. Proper coverage prevents dust, insects, and airborne contaminants from entering, while still enabling the natural fermentation gases to vent.
6. Fermentation Phase 1: Warmer Environment (2–3 Weeks)
Place the crock in a warm, draft-free area with a stable temperature between 70°F and 75°F (21°C–24°C). Temperatures outside this range can slow down fermentation or promote unwanted microbial growth. Use a thermometer to monitor the environment regularly.
During this period, fermentation begins actively as beneficial bacteria convert sugars into lactic acid, giving sauerkraut its characteristic tang. You’ll observe bubbling and foaming around the edges of the plate or weight, indicating active fermentation. If the liquid level drops below the cabbage, add more cold water or wine to keep the cabbage submerged.
Check daily for signs of mold or scum on the surface; these can be skimmed off carefully. Also, ensure the weight remains pressing down on the cabbage to prevent exposure to air. The process may produce an aroma similar to sourdough bread or yogurt, a sign that fermentation is progressing correctly.
7. Fermentation Phase 2: Cooler Environment (Additional 2 Weeks)
Once the initial bubbling subsides and the sauerkraut develops a tangy aroma, move the crock to a cooler space, ideally around 60°F to 65°F (15°C–18°C). This secondary fermentation allows the flavors to deepen and mature, resulting in a more refined taste.
Continue to monitor the sauerkraut periodically, ensuring it remains submerged and free of mold. The temperature drop slows fermentation, which enhances flavor complexity and probiotic development. Taste test periodically by carefully removing a small portion—if the flavor is to your liking, you can proceed to packaging; if not, allow it to ferment longer.
8. Packaging and Preservation
Once fermentation has reached your preferred flavor profile, it’s time to package the sauerkraut for storage. Carefully transfer the sauerkraut along with some of the liquid into sterilized quart jars, leaving about 1/2 inch of headspace. Use a funnel to prevent spillage and ensure clean transfer.
Wipe the rims of the jars with a clean, damp cloth to remove any residue and secure the lids according to manufacturer instructions. For long-term preservation, process the jars in a boiling water bath canner for 25 minutes. This step kills remaining bacteria and creates a vacuum seal, extending shelf life and ensuring safety.
After processing, remove the jars with jar lifters and allow them to cool undisturbed for at least 12 hours. Check the seals—lids should be concave and firmly sealed. Store in a cool, dark place such as a cellar or pantry. Properly sealed jars can last for up to a year, with flavor developing further over time.
Preparation Tips
- Use fresh, high-quality cabbage for optimal fermentation and flavor.
- Ensure all equipment and jars are thoroughly sterilized to prevent contamination.
- Adjust salt levels based on cabbage size; 2 tablespoons per layer is a guideline, but taste and preference matter.
- Maintain consistent temperature during fermentation for predictable results.
- Label jars with date of fermentation and contents for easy identification.
- Experiment with adding herbs or spices—caraway seeds, garlic, or juniper berries—for personalized variations.
Nutritional Information (Per Serving)
| Nutrient | Amount |
|---|---|
| Calories | 115.8 kcal |
| Fat | 0.5 g |
| Saturated Fat | 0.1 g |
| Cholesterol | 0 mg |
| Sodium | 4709.8 mg |
| Carbohydrates | 20.4 g |
| Fiber | 7.8 g |
| Sugar | 12.9 g |
| Protein | 4.8 g |
Tips and Tricks
- Use non-iodized salt; iodine can inhibit beneficial fermentation bacteria.
- Maintain consistent temperature to prevent spoilage or overly rapid fermentation.
- Adjust fermentation time based on taste preference—longer fermentation yields a tangier, more complex flavor.
- For a milder sauerkraut, ferment for a shorter period; for a more pronounced sourness, extend fermentation.
- Use a fermentation weight that fits snugly to keep all cabbage submerged and prevent mold.
Add-ons and Variations
- Incorporate garlic, caraway seeds, juniper berries, or bay leaves for additional flavor layers.
- Mix in shredded carrots or apples for sweetness and color.
- Use different types of wine—such as dry Riesling or Chardonnay—to diversify flavor profiles.
- Experiment with spicy additions like chili flakes or fresh horseradish root.
- Preserve in smaller jars for gift-giving or immediate consumption.
Suggested Side Dishes and Pairings
- Serve alongside grilled sausages or roasted meats for a tangy contrast.
- Pair with hearty stews or goulash for added acidity and depth.
- Use as a topping for open-faced sandwiches or burgers.
- Mix into salads for a probiotic boost and crunch.
- Enjoy on its own as a healthy snack rich in probiotics and fiber.
Improvements and Customizations
For an even more complex flavor, consider aging the sauerkraut for several months in a cool, dark cellar. This allows the flavors to deepen and mellow, resulting in a nuanced taste profile. Additionally, experimenting with different cabbage varieties—such as red or Savoy—can introduce color and texture variations.
Adjust fermentation times based on ambient temperature, as warmer environments accelerate fermentation. Use a pH meter or test strips to monitor acidity levels, aiming for a pH below 4.0 for safety and optimal sourness.
Save and Store
Proper storage is key to maintaining the quality and safety of your homemade sauerkraut. Keep sealed jars in a cool, dark pantry or cellar, ideally between 55°F and 65°F (13°C–18°C). Avoid direct sunlight, which can degrade flavors and affect preservation. Once opened, refrigerate the jar and consume within 4 to 6 weeks for best flavor and probiotic benefits.
If fermentation was conducted correctly, the sauerkraut can be stored for up to a year, gradually mellowing and developing more complex flavors over time.
Frequently Asked Questions (FAQ)
1. Can I skip the wine in the recipe?
Yes. The wine adds flavor complexity but is not essential. You can substitute with additional cold water or a splash of apple cider vinegar for acidity. However, the wine enhances aroma and depth, so it’s recommended if you want authentic European flair.
2. How do I know when the sauerkraut is ready?
Fermentation usually takes 4 to 6 weeks. Signs of readiness include a pleasing tangy aroma, a sour taste, and a firm, crunchy texture. The liquid should be slightly cloudy but free from mold or sliminess. Taste testing a small sample will help determine if it has developed to your liking.
3. Is it safe to ferment at room temperature?
Yes, as long as the temperature remains stable within the recommended range (70°F–75°F). Fluctuations can slow fermentation or promote spoilage. Use a thermometer to monitor and adjust placement accordingly.
4. What if mold appears on the surface?
Gently skim off any mold or scum. If mold persists or covers the entire surface, discard the batch for safety. Proper sanitation and keeping the cabbage submerged help prevent mold growth.
5. Can I reuse leftover sauerkraut liquid for future batches?
It’s best to start fresh for each batch to prevent contamination. However, some experienced fermenters use a small amount of previous liquid as a starter culture to jump-start fermentation, but this requires careful handling and understanding of microbiology principles.
Conclusion
Creating Uncle Bill’s Sauerkraut With Wine at home is a rewarding process that combines traditional fermentation methods with a touch of culinary sophistication. The result is a probiotic-rich, flavorful, and versatile condiment that enhances countless dishes. The process emphasizes patience, cleanliness, and attention to detail, which are essential for safe and successful fermentation. With this comprehensive guide, you are equipped to embark on your fermentation journey, produce delicious sauerkraut, and enjoy the satisfaction of homemade, health-promoting foods. Remember, at Love With Recipes, we believe that cooking is both an art and a science—so don’t hesitate to experiment and tailor this recipe to suit your palate and dietary needs.
References
- Sandor Ellix Katz, “The Art of Fermentation,” Chelsea Green Publishing, 2012.
- Sandor Ellix Katz, “Wild Fermentation,” Chelsea Green Publishing, 2003.