Introduction
Bandeng Presto, a beloved dish from Indonesia, exemplifies the rich culinary heritage of the archipelago. This dish features milkfish, known locally as “bandeng,” which is renowned for its firm, white flesh and subtle, sweet flavor. The preparation process involves pressure cooking the fish to achieve a tender, flavorful core infused with aromatic herbs and spices, followed by a delightful frying step that yields a crispy exterior. This combination creates a symphony of textures and flavors that make Bandeng Presto a must-try for seafood enthusiasts and culinary explorers alike. As a traditional Indonesian delicacy, it embodies the harmonious blend of indigenous ingredients and cooking techniques, offering a taste of Indonesia’s vibrant food culture.
Time
- Preparation Time: 30 minutes
- Cooking Time (Pressure Cooking): 1 hour
- Cooling and Frying: 15 minutes
- Total Estimated Time: Approximately 1 hour 45 minutes
Needed Equipment
- Pressure cooker
- Banana leaves (or parchment paper as a substitute)
- Large mixing bowls
- Frying pan or wok
- Tongs or slotted spoon
- Knife and chopping board
- Measuring spoons and cups
- Whisk
- Kitchen thermometer (optional, for oil temperature)
- Paper towels for draining
- Serving platter
Tags
Indonesian cuisine, seafood, pressure cooker recipes, traditional Indonesian dishes, fish recipes, crispy fried fish, authentic Indonesian food
Serving Size
Serves 4-6 people, depending on portion sizes and accompaniments.
Difficulty Level
Intermediate — requires familiarity with pressure cooking and frying techniques, but accessible for home cooks with basic culinary skills.
Allergen Information
This recipe contains seafood (milkfish) and eggs. It is not suitable for individuals with fish allergies or egg allergies. Always ensure to check for cross-contamination if preparing for allergen-sensitive guests.
Dietary Preference
Gluten-Free, Dairy-Free (if eggs are omitted or replaced), Nut-Free, Suitable for Pescatarians
Course
Main Course, Appetizer
Cuisine
Indonesian
Ingredients
| Ingredient | Quantity | Notes |
|---|---|---|
| Milkfish (Bandeng), cleaned and cut into 2 pieces | 1 kg | Fresh or frozen, ensure gut and scales are removed |
| Fish fry seasoning | 1 packet (approximately 1-2 tablespoons) | Available in Asian markets or online; contains spices and flavorings for frying |
| Bay leaves | 3 leaves | Fresh or dried |
| Lemongrass stalk, finely sliced | 1 stalk | Bruise slightly to release aromatic oils |
| Eggs | 2 large | For coating |
| Vegetable oil | For frying | Use a neutral oil with high smoke point like vegetable or canola oil |
| Sufficient water for boiling | As needed | To submerge the fish during pressure cooking |
Instructions
Step 1: Preparing the Pressure Cooker
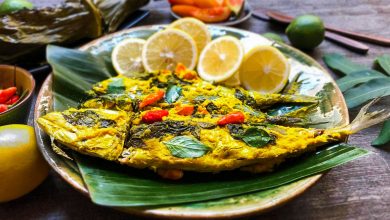
Begin by preparing your pressure cooker to ensure a seamless cooking process. Line the bottom of the cooker with banana leaves, which serve multiple purposes. Firstly, they act as a natural non-stick surface, preventing the fish from sticking to the metal base. Secondly, banana leaves impart a subtle, earthy aroma that infuses the fish with additional flavor, elevating the overall sensory experience of the dish. If banana leaves are unavailable, parchment paper can be used as a substitute, although it may not carry the same aromatic benefits. Make sure the banana leaves are clean, cut to size, and sanitized before lining the cooker.
Step 2: Layering the Aromatics and Fish
Once the base is prepared, arrange the bay leaves and sliced lemongrass on the banana leaves. The bay leaves, with their aromatic, slightly bitter profile, complement the fish beautifully, providing depth and a hint of earthiness. The lemongrass introduces a citrusy, refreshing note that balances the richness of the milkfish. Distribute these ingredients evenly across the banana leaves to ensure consistent aroma infusion.
Next, carefully place the milkfish pieces on top of the aromatic bed. Arrange the pieces so they are evenly spaced and not overcrowded. Proper arrangement ensures even pressure cooking and flavor distribution. It is crucial that the fish are submerged in water during cooking, but avoid overfilling the cooker, which can lead to spillage or uneven cooking.
Step 3: Seasoning and Water Addition
Sprinkle the fish fry seasoning generously over the fish pieces. The seasoning packet typically contains a blend of spices such as garlic, shallots, turmeric, salt, and other flavorings, designed to enhance the natural taste of the fish while providing a savory base for the dish. Use your hands or a spoon to distribute the seasoning evenly, ensuring every piece is coated well.
Pour in enough water to just cover the fish. The water level is critical; it should be sufficient to create steam and facilitate tenderization but not so high that it dilutes the flavors or causes the ingredients to float excessively. Close the lid of the pressure cooker securely, ensuring the gasket and safety valves are in place.
Step 4: Pressure Cooking
Place the pressure cooker on the stove over medium heat. Allow the cooker to reach the proper pressure; once steam begins to escape steadily and the pressure indicator rises, reduce the heat to maintain a gentle simmer. Cook the fish for approximately 1 hour. This extended cooking time allows the milkfish to become exceedingly tender, breaking down connective tissues and absorbing aromatic flavors deeply. During this period, avoid opening the lid or adjusting the heat excessively, as maintaining consistent pressure is essential for optimal results.
Note: The exact cooking time may vary depending on the size and thickness of the fish pieces, as well as the specific pressure cooker model. It is advisable to monitor the pressure gauge or the steam release valve, ensuring safety and proper cooking conditions.
Step 5: Cooling and Preparing for Frying
Once the cooking time has elapsed, turn off the heat and carefully release the pressure using the pressure release valve or natural cooling method, depending on your cooker’s instructions. Allow the fish to cool sufficiently to handle safely. This cooling period also helps the flavors to settle and makes handling easier.
After cooling, open the pressure cooker and gently lift out the fish pieces. Drain any excess liquid and set them on a plate lined with paper towels to absorb residual moisture, which is crucial for achieving crispiness during frying.
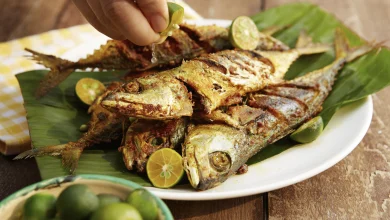
In a separate bowl, beat the eggs thoroughly until well combined. Dip each fish piece into the beaten eggs, ensuring an even coating. The egg coating acts as a binder, creating a crispy exterior when fried.
Step 6: Frying to Achieve Crunch
Heat vegetable oil in a frying pan or wok over medium heat. To determine if the oil is ready, you can drop a small piece of egg-coated fish into the oil; if it sizzles immediately and rises to the surface, the oil is at the right temperature (around 170-180°C or 340-356°F). Carefully place the coated fish pieces into the hot oil using tongs or a slotted spoon, avoiding overcrowding to ensure even frying.
Fry the fish until golden brown and crispy on the outside, which typically takes about 3-4 minutes per batch. Turn the pieces occasionally to ensure uniform browning. Once cooked, transfer the fish to a paper towel-lined plate to drain excess oil.
Preparation Tips
- Fish selection: Use fresh or properly thawed milkfish for optimal flavor and texture. Ensure the fish is thoroughly cleaned, with scales and guts removed.
- Banana leaves alternative: If unavailable, parchment paper or aluminum foil can be used, but these will not impart the same aroma.
- Seasoning adjustments: Customize the seasoning packet by adding chili powder or lime juice for extra flavor.
- Egg coating: For a thicker crust, double dip the fish in egg and fry in batches.
- Oil temperature: Maintaining consistent oil temperature during frying is vital for crispy results; use a thermometer if possible.
Nutritional Information
| Nutrient | Per Serving (approximate) | Notes |
|---|---|---|
| Calories | 350 kcal | Includes frying oil |
| Protein | 25 grams | High-quality protein from milkfish |
| Fat | 20 grams | Includes frying oil; can be reduced with baking |
| Carbohydrates | 10 grams | Primarily from seasoning and egg coating |
| Sodium | 600 mg | Dependent on seasoning salt content |
Tips and Tricks
- Infuse more flavor: Add slices of ginger or garlic to the water during pressure cooking for additional aroma and depth.
- Achieving perfect crispiness: Ensure the oil is hot enough before frying; too cold, and the coating will absorb oil and become soggy.
- Prevent sticking: Make sure the fish pieces are dry before dipping into eggs; excess moisture can hinder crisping.
- Serving suggestion: Serve immediately after frying for the best crispy texture and flavor.
Add-ons
- Fresh lime wedges for squeezing over the fried fish
- Sambal or chili sauce for added heat and flavor
- Fresh herbs such as cilantro or basil for garnish
- Steamed rice or nasi uduk as a complementary side
Side Dishes
- Indonesian vegetable stir-fry (sayur lodeh)
- Spicy sambal goreng
- Fried tempeh or tofu slices
- Steamed jasmine rice or coconut rice (nasi uduk)
Improvements
- Use a batter made from rice flour or cornstarch for extra crunch.
- Marinate the fish in turmeric and lime juice before pressure cooking for enhanced flavor.
- Experiment with different seasonings, such as turmeric, coriander, or chili powder, to customize the flavor profile.
- Try baking instead of frying for a healthier version—bake at 200°C (392°F) until crispy.
Save and Store
Leftover fish can be stored in an airtight container in the refrigerator for up to 2 days. To reheat, bake in a preheated oven at 180°C (356°F) for 10-15 minutes or until crispy. Avoid microwaving, as it tends to make the coating soggy. For longer storage, freeze the fried fish in a sealed bag; reheat in the oven for best results.
FAQ
Can I use frozen milkfish?
Yes, but ensure it is fully thawed and drained before cooking. Frozen fish may require slightly longer cooking times, and excess moisture should be removed to achieve crispy frying results.
Can I skip the frying step?
Absolutely. For a healthier option, after pressure cooking, you can serve the fish as is, perhaps with a squeeze of lime and fresh herbs. Alternatively, bake or pan-fry with minimal oil for a lighter version.
What can I substitute for banana leaves?
Parchment paper or aluminum foil can be used, but they won’t impart the same aroma. If available, dried lotus leaves or palm leaves can also be options for an authentic touch.
How do I prevent the fish from falling apart during cooking?
Handle the fish gently, and do not overfill the pressure cooker. Using a sturdy fish variety like milkfish helps maintain integrity during pressure cooking.
Conclusion
Creating authentic Indonesian Bandeng Presto at home is a rewarding culinary journey that combines traditional techniques with accessible ingredients. The process underscores the importance of patience—slow pressure cooking ensures tender, flavorful fish, while frying offers a crispy contrast that delights the palate. Perfecting this dish involves attention to detail at each step, from preparing the aromatics to controlling frying temperature. As featured on Love With Recipes, this dish is an exemplary representation of Indonesia’s vibrant seafood cuisine, suitable for festive gatherings or everyday meals. Whether served with steamed rice or as part of a larger Indonesian feast, Bandeng Presto promises a memorable dining experience filled with rich flavors and cultural authenticity.
References
- Indonesian Food & Cooking by Dina Yuen
- Traditional Indonesian Recipes from the Archipelago, Indonesian Culinary Institute