Green Moong Dal Paratha Recipe: Stuffed Lentil Flatbread
Description:
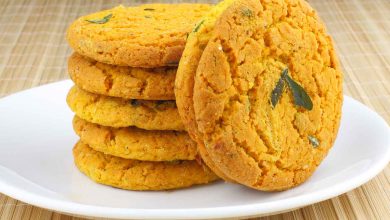
The Green Moong Dal Paratha is a wholesome and protein-packed flatbread, offering a perfect blend of flavors and textures. Stuffed with a delicious filling of cooked green moong dal (split lentils), fresh ginger, green chillies, onions, and coriander leaves, it brings a burst of natural flavors. Lightly spiced with turmeric, cumin, and coriander powder, this paratha is both nutritious and aromatic. Ideal for a fulfilling breakfast or a hearty Sunday brunch, it’s a delightful way to incorporate lentils into your diet. Enjoy it with a side of raita, curry, or simply a dollop of yogurt for a satisfying meal that the whole family will love.
Cuisine: North Indian
Course: Breakfast
Diet: High Protein Vegetarian
Ingredients
Ingredients for the Filling:
| Ingredient | Quantity |
|---|---|
| Green Moong Dal (Split) | 1 cup |
| Fresh Ginger (finely chopped) | 2-inch piece |
| Green Chillies (finely chopped) | 2 |
| Onion (finely chopped) | 1 medium |
| Turmeric Powder (Haldi) | ½ teaspoon |
| Cumin Powder (Jeera) | 1 teaspoon |
| Coriander Leaves (finely chopped) | 2 tablespoons |
| Salt | To taste |
Ingredients for the Dough:
| Ingredient | Quantity |
|---|---|
| Whole Wheat Flour | 2 cups |
| Salt | ¼ teaspoon |
| Water | As needed |
| Ghee or Oil for cooking | As required |
Preparation Time:
Prep Time: 15 minutes (not including soaking)
Cook Time: 45 minutes
Instructions
Step 1: Prepare the Moong Dal Filling
-
Soak the Moong Dal:
Begin by soaking the green moong dal in 1 ½ cups of water for at least 30 minutes. After soaking, drain the water and set it aside. This water can be saved to make a flavorful soup if desired. -
Cook the Moong Dal:
Cook the moong dal using either a pressure cooker or a saucepan method. If using a pressure cooker, cook it for about 3-4 whistles or until the dal is soft. If using a saucepan, cook the dal over medium heat for about 20-25 minutes or until the dal is tender. Ensure that there’s no excess water left after cooking. -
Mash the Dal:
Once the moong dal is cooked and softened, coarsely mash it with a fork or a potato masher, leaving a few chunks for texture. Set aside to cool. -
Prepare the Filling:
In a mixing bowl, combine the mashed moong dal with finely chopped onions, green chillies, ginger, coriander leaves, turmeric powder, cumin powder, and salt. Mix everything well, making sure the spices and herbs are evenly distributed. Divide the filling into 10-12 equal portions and set them aside.
Step 2: Make the Paratha Dough
-
Prepare the Dough:
In a large mixing bowl, combine the whole wheat flour and salt. Gradually add water little by little, kneading the flour into a soft, smooth dough. The dough should be pliable and not sticky. Cover the dough with a damp cloth and let it rest for 10 minutes. -
Divide the Dough:
After resting, divide the dough into 10-12 equal portions. This ensures that you will have enough dough to make the parathas and that the filling is evenly distributed in each one.
Step 3: Stuff the Parathas
-
Roll the Dough:
Take one portion of dough and roll it into a small ball. Dust it with a little flour and flatten it with your palms to form a small disc about 3 inches in diameter. -
Add the Filling:
Place a portion of the moong dal filling in the center of the dough disc. Spread it evenly, leaving some space around the edges. -
Seal the Paratha:
Now, take another portion of the dough and roll it into a similar-sized disc. Place it over the stuffed dough disc with the filling inside. Press the edges to seal the filling, ensuring no gaps or openings. Gently press the paratha with your palms to release any trapped air. -
Roll Again:
Lightly dust the stuffed dough with flour and use a rolling pin to roll it into a larger circle. Be gentle and avoid pressing too hard to prevent the filling from oozing out.
Step 4: Cook the Parathas
-
Heat the Skillet:
Preheat a tava or non-stick skillet over medium heat. Once it’s hot, place the stuffed paratha on the skillet. -
Cook the First Side:
Let the paratha cook for about 30-45 seconds, or until small bubbles begin to form on the surface. Flip the paratha over using tongs or a spatula. -
Add Ghee or Oil:
Once flipped, add a teaspoon of ghee or oil around the edges of the paratha. Flip again to allow the ghee to cook into the paratha. Press gently with a spatula or a cloth to ensure it cooks evenly. -
Cook Until Golden and Crisp:
Flip the paratha a few more times, adding ghee as needed. Cook for 2-3 minutes on each side until it is golden brown and crisp. The paratha should be well-cooked on both sides. -
Repeat:
Continue cooking the rest of the parathas in the same manner, adding ghee or oil as needed for each one.
Step 5: Serve
Once all the parathas are cooked, transfer them to a serving plate. Serve the Green Moong Dal Parathas hot with a side of Lauki Raita, a tangy yogurt-based dip, or your favorite curry. You can also enjoy these parathas with a dollop of fresh yogurt or pickle for extra flavor.
Tips for the Perfect Green Moong Dal Paratha:
- Soaking the Dal: Soaking the moong dal before cooking makes it soft and easy to mash. If you’re short on time, you can skip soaking, but cooking time will be longer.
- Filling Variations: Feel free to add finely chopped tomatoes, carrots, or spinach to the moong dal filling for added nutrients and flavor.
- Rolling Tips: Be gentle while rolling the paratha to ensure the filling doesn’t spill out. If needed, use parchment paper or a silicone baking mat to roll the parathas easily.
- For a Crispier Paratha: If you prefer a crispier paratha, cook it with slightly more ghee or oil. The ghee adds flavor and richness to the parathas.
Nutritional Information (per serving):
| Nutrient | Amount |
|---|---|
| Calories | 200 kcal |
| Protein | 6g |
| Carbohydrates | 35g |
| Dietary Fiber | 4g |
| Fat | 6g |
| Sodium | 150mg |
Green Moong Dal Paratha is a comforting and healthy choice for any meal. Its balanced combination of lentils, spices, and whole wheat flour makes it a nutritious option that’s both satisfying and delicious. Whether served with yogurt, raita, or curry, this paratha is a must-try for anyone seeking to incorporate more plant-based protein into their diet. Enjoy!


