Introduction
At the heart of many cherished family traditions lies a simple yet profoundly nostalgic recipe that connects generations through the shared love of homemade preserves. Grandma’s Grape Jelly, a treasured recipe passed down through family archives and cherished memories, embodies this spirit perfectly. This recipe, originating from a humble yet flavorful batch of Canadian grapes, showcases the art of turning fresh fruit into a luscious, sweet spread that can elevate breakfast tables, serve as thoughtful gifts, or accompany festive celebrations such as Christmas, Hanukkah, and Ramadan. Its rich, natural grape flavor, coupled with a perfectly balanced sweetness, makes it a kid-friendly favorite and an essential staple for those who appreciate the warmth of homemade goodness. As shared on Love With Recipes, this comprehensive guide aims to provide you with all the details necessary to recreate Grandma’s beloved grape jelly in your own kitchen, with attention to detail, safety, and culinary excellence.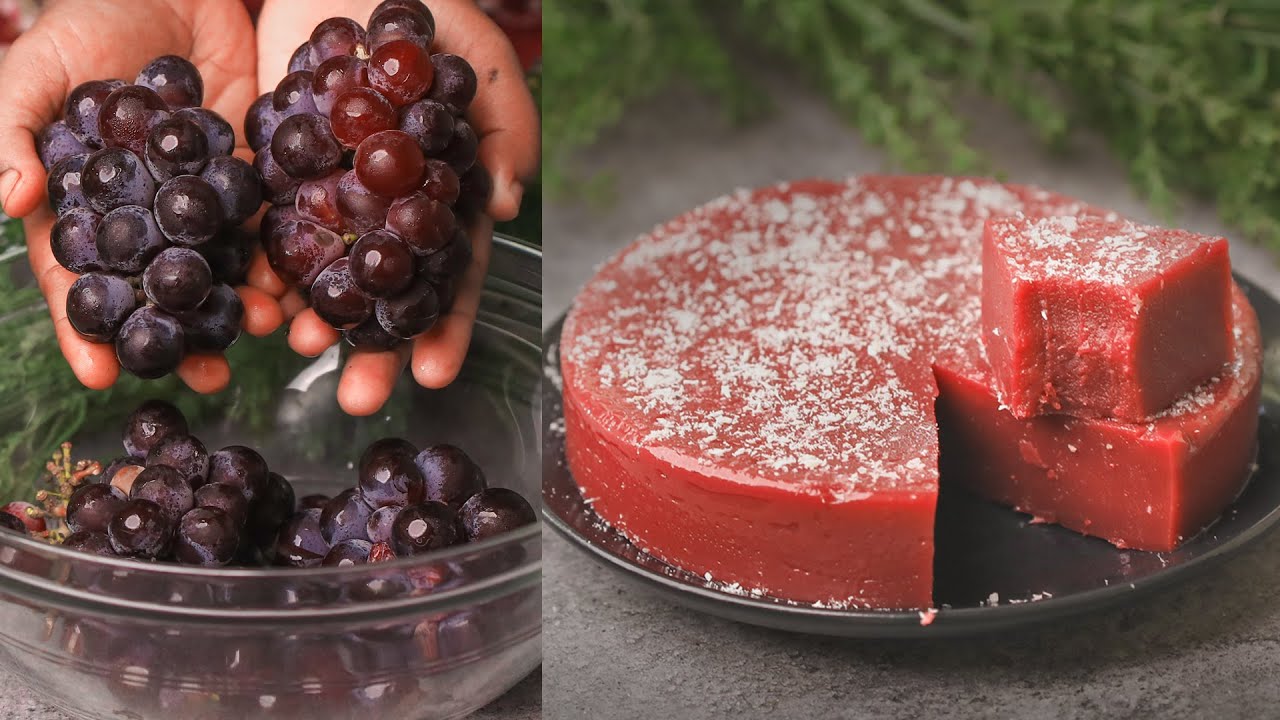
Time
Preparation Time
15 minutes
Cook Time
25 minutes
Total Time
40 minutes
Needed Equipment
- Large heavy-bottomed saucepan or stockpot
- Sterilized glass jars with lids (preferably canning jars)
- Cloth or fine mesh strainer
- Cheesecloth or jelly bag for juice extraction
- Measuring cups (especially 7 and 4-cup measures)
- Wooden spoon or heat-resistant spatula
- Cooking thermometer (optional but recommended)
- Ladle for pouring hot jelly
- Sterilization supplies (boiling water, sterilizing solution)
- Paraffin wax or sealant (if traditional sealing method is preferred)
- Kitchen tongs or jar lifter for handling hot jars
Tags
Jellies, Fruit Preserves, Homemade, Canning, Kid-Friendly, Christmas, Hanukkah, Ramadan, Easy Recipes, Natural Sweetener, Canadian Cuisine
Serving Size
Approximately 1 tablespoon (15 grams) per serving
Difficulty Level
Intermediate — requires attention to boiling points, proper sterilization, and careful sealing for preservation
Allergen Information
This recipe contains no common allergens; however, always exercise caution regarding grape allergies.
Dietary Preference
Vegan, Vegetarian, Nut-Free, Dairy-Free
Course
Preserve, Condiment, Spread
Cuisine
Canadian-inspired homemade preserves
Ingredients
Ingredient Details and Nutritional Contributions
| Ingredient | Quantity | Notes |
|---|---|---|
| Grapes | 3 pounds (approx. 1.36 kg) | Choose ripe, fresh, and seedless or seeded grapes based on preference; Concord grapes are ideal for their rich flavor |
| Sugar | 7 cups (approx. 1.4 kg) | Granulated white sugar; essential for the jelly’s sweetness and preservation |
| Water | 1/2 cup (120 ml) | Helps extract juice from grapes during simmering |
Instructions
Step 1: Preparing the Grapes
Begin by thoroughly washing the grapes under cold running water to remove any dirt, pesticides, or residues. Remove stems carefully, ensuring all leaves and debris are discarded. If using seedless grapes, proceed directly; if seeds are present, you may choose to remove them or include them, as they can add natural pectin and flavor, though they may slightly alter the texture.
Step 2: Crushing and Juicing
Place the prepared grapes into a large mixing bowl or directly into your saucepan. Use a sturdy wooden spoon, potato masher, or even a clean muddler to crush the grapes thoroughly. The goal is to break down the skins and release as much juice as possible. Crushing should be vigorous but controlled, ensuring the grapes are well mashed but not overly pulverized.
Next, add 1/2 cup of water to the crushed grapes. This helps facilitate juice extraction and prevents the mixture from sticking to the pan. Stir well to combine.
Step 3: Simmering the Grapes
Transfer the mixture into a large, heavy-bottomed saucepan. Place the pan over medium-high heat. Bring the mixture to a rolling boil, stirring frequently to prevent scorching. Once boiling, reduce heat to low and let it simmer gently for about 10 minutes. This simmering process softens the grape skins and allows the juices to be fully released. Stir intermittently to avoid burning or sticking, and ensure uniform heating.
Use a timer to maintain consistency and monitor the process carefully, as overcooking can affect the flavor and pectin content.
Step 4: Extracting the Juice
Line a fine mesh strainer or colander with cheesecloth or a clean, thin cloth. Place this over a large bowl or another clean container. Carefully pour the cooked grape mixture into the cloth-lined strainer. Allow the juice to drain naturally, pressing gently with the back of a spoon or using a clean spatula to squeeze out residual juice without forcing pulp through the cloth. For maximum yield, you can also gently twist the cloth to extract every drop of juice.
Measure the resulting juice using a standard measuring cup. For this recipe, you will need 4 cups of grape juice to proceed. If you have more juice, you can save the excess for other recipes or freeze it for later use.
Step 5: Preparing the Jelly Mixture
Pour 4 cups of freshly extracted grape juice into a clean, large saucepan. Add 7 cups of sugar gradually, stirring constantly to ensure dissolution. The sugar acts as both a sweetener and a preservative, and proper mixing is crucial for achieving the desired jelly consistency.
Place the saucepan over high heat. Stir continuously to prevent burning and to promote uniform dissolution of sugar. Once the mixture begins to boil vigorously, you may add optional natural pectin or a commercial pectin product if you prefer a firmer jelly. However, traditional recipes like Grandma’s often rely solely on natural pectin from grapes.
Step 6: Boiling to Set the Jelly
Bring the mixture to a rolling boil, characterized by continuous bubbling that cannot be stirred down. Maintain high heat and stir constantly to prevent scorching. Use a cooking thermometer to monitor the temperature; it should reach approximately 220°F (104°C), which is the setting point for jam and jelly. Alternatively, perform a gel test: place a small spoonful on a cold plate, and if it wrinkles when pushed, it’s ready.
Boil hard for exactly 1 minute, maintaining the vigorous boil. This step ensures proper setting and consistency of the jelly, as well as effective preservation.
Step 7: Finalizing and Sealing
Remove the saucepan from heat. Skim off any foam or impurities with a slotted spoon or ladle to ensure a clear, attractive jelly. Carefully ladle the hot jelly into sterilized glass jars, leaving about 1/4 inch headspace to allow for expansion during sealing. Use a clean spatula or funnel to prevent spills and ensure precision.
Seal the jars immediately with sterilized lids. Traditional sealing involves placing paraffin wax on the surface of hot jelly, especially if the jelly will be stored for a longer period without refrigeration. Alternatively, use vacuum-sealed lids or a canning water bath for longer shelf life. Allow jars to cool naturally at room temperature before storing in a cool, dark place.
Preparation Tips
- Fruit selection: Use ripe, flavorful grapes for the best taste. Concord grapes are classic, but other sweet varieties like moon drops or black grapes work well.
- Juice extraction: For maximum yield, do not over-mash; gentle squeezing yields clearer juice.
- Sterilization: Properly sterilize jars and lids to prevent spoilage. Boil jars and lids in water for at least 10 minutes before filling.
- Consistency: Use a thermometer or gel test to achieve the perfect jelly set.
- Flavor variations: Add a splash of lemon juice or natural flavoring (e.g., vanilla essence) for nuanced taste.
Nutritional Information
| Nutrient | Amount per Batch | Per Serving (approx. 15g) |
|---|---|---|
| Calories | 6357.8 kcal | ~3.8 kcal |
| Fat | 2.2 g | ~0.0013 g |
| Saturated Fat | 0.7 g | ~0.0004 g |
| Cholesterol | 0 mg | 0 mg |
| Sodium | 27.2 mg | ~0.016 mg |
| Carbohydrates | 1646.2 g | ~0.98 g |
| Fiber | 12.3 g | ~0.007 g |
| Sugar | 1609.6 g | ~0.96 g |
| Protein | 9.8 g | ~0.006 g |
Tips and Tricks
- Adjust sweetness: Taste the juice before adding sugar; if the grapes are very sweet, you can reduce sugar slightly.
- Natural pectin: Ripe grapes contain enough pectin for jelling, but if your jelly doesn’t set, add commercial pectin as directed.
- Flavor enhancements: Incorporate a splash of natural vanilla extract or a hint of cinnamon for complex flavor profiles.
- Preservation: For long-term storage, process sealed jars in a boiling water bath for 10 minutes to ensure safety and shelf stability.
Add-ons
- Fresh mint leaves for a hint of herbal freshness
- Spiced variants with cinnamon or cloves added during simmering
- Mixed berry blends: combine grapes with berries like blueberries or blackberries for a unique flavor
- Infuse with natural citrus zest for added brightness
Side Dishes
- Homemade scones or biscuits topped with Grandma’s Grape Jelly
- Yogurt parfaits layered with jelly and fresh fruits
- Cheese platters featuring a variety of jams and jellies
- Grilled bread or toast with a generous spread of grape jelly
Improvements and Variations
- Use pectin powder or liquid for a firmer set if natural pectin isn’t enough
- Experiment with different grape varieties for unique color and flavor
- Incorporate a splash of balsamic vinegar for depth
- Reduce sugar for a lower-sugar, more natural preserve, balancing with added natural pectin
Save and Store
Proper storage is essential for maintaining the quality and safety of your homemade grape jelly. After sealing the jars, store them in a cool, dark, and dry place like a pantry or cellar. Unopened jars can last up to a year or more when stored correctly. Once opened, refrigerate the jelly and consume within three weeks for optimal freshness.
If you plan to preserve the jelly for extended periods, consider processing the filled jars in a boiling water bath for 10 minutes to ensure sterilization and vacuum sealing. Label each jar with the date of canning for easy reference and rotation.
FAQ
Can I use frozen grapes for this recipe?
Yes, frozen grapes can be used; however, ensure they are fully thawed and drained before crushing and juicing. Freezing can sometimes break down cell walls, aiding in juice extraction.
Can I reduce the sugar content?
Reducing sugar can affect the setting process. If you wish to make a lower-sugar version, add a commercial pectin or natural pectin supplement and follow the manufacturer’s instructions for adjustments.
How long does homemade grape jelly last?
If properly sealed and stored in a cool, dark place, homemade grape jelly can last up to 12 months or longer. Always check for signs of spoilage before use.
Is this recipe suitable for canning?
Yes, this recipe can be adapted for water bath canning. Ensure jars are sterilized, and process them in boiling water for 10 minutes to ensure safety and shelf stability.
Conclusion
Crafting Grandma’s Grape Jelly at home is a rewarding culinary experience that connects you to family traditions and offers a delicious natural spread for various occasions. By understanding each step—from selecting ripe grapes to proper sealing—you ensure a high-quality product that preserves the vibrant flavors of fresh grapes. Whether enjoyed on toast, used in recipes, or shared as gifts, this jelly embodies the warmth of home and the enduring love of family recipes. Remember, patience and attention to detail are key to achieving the perfect consistency, flavor, and preservation. As always, Love With Recipes is here to guide you through every delicious step of your culinary journey.
References
- Simmons, S. (2017). The Complete Book of Jams, Jellies, and Preserves. Harvard Common Press.
- Canadian Food Inspection Agency. (2022). Food Preservation: Jam and Jelly Storage Guidelines.