Introduction
Creating stunning cake decorations and intricate sugar sculptures is an art that elevates any dessert to a masterpiece. At Love With Recipes, we believe that making your own sugar paste not only allows for customization but also offers a satisfying experience that connects you directly to the craft of confectionery artistry. Unlike commercial fondant or premade sugar paste, homemade versions give you control over ingredients, flavors, and colors, ensuring your creations are both beautiful and tailored to your preferences.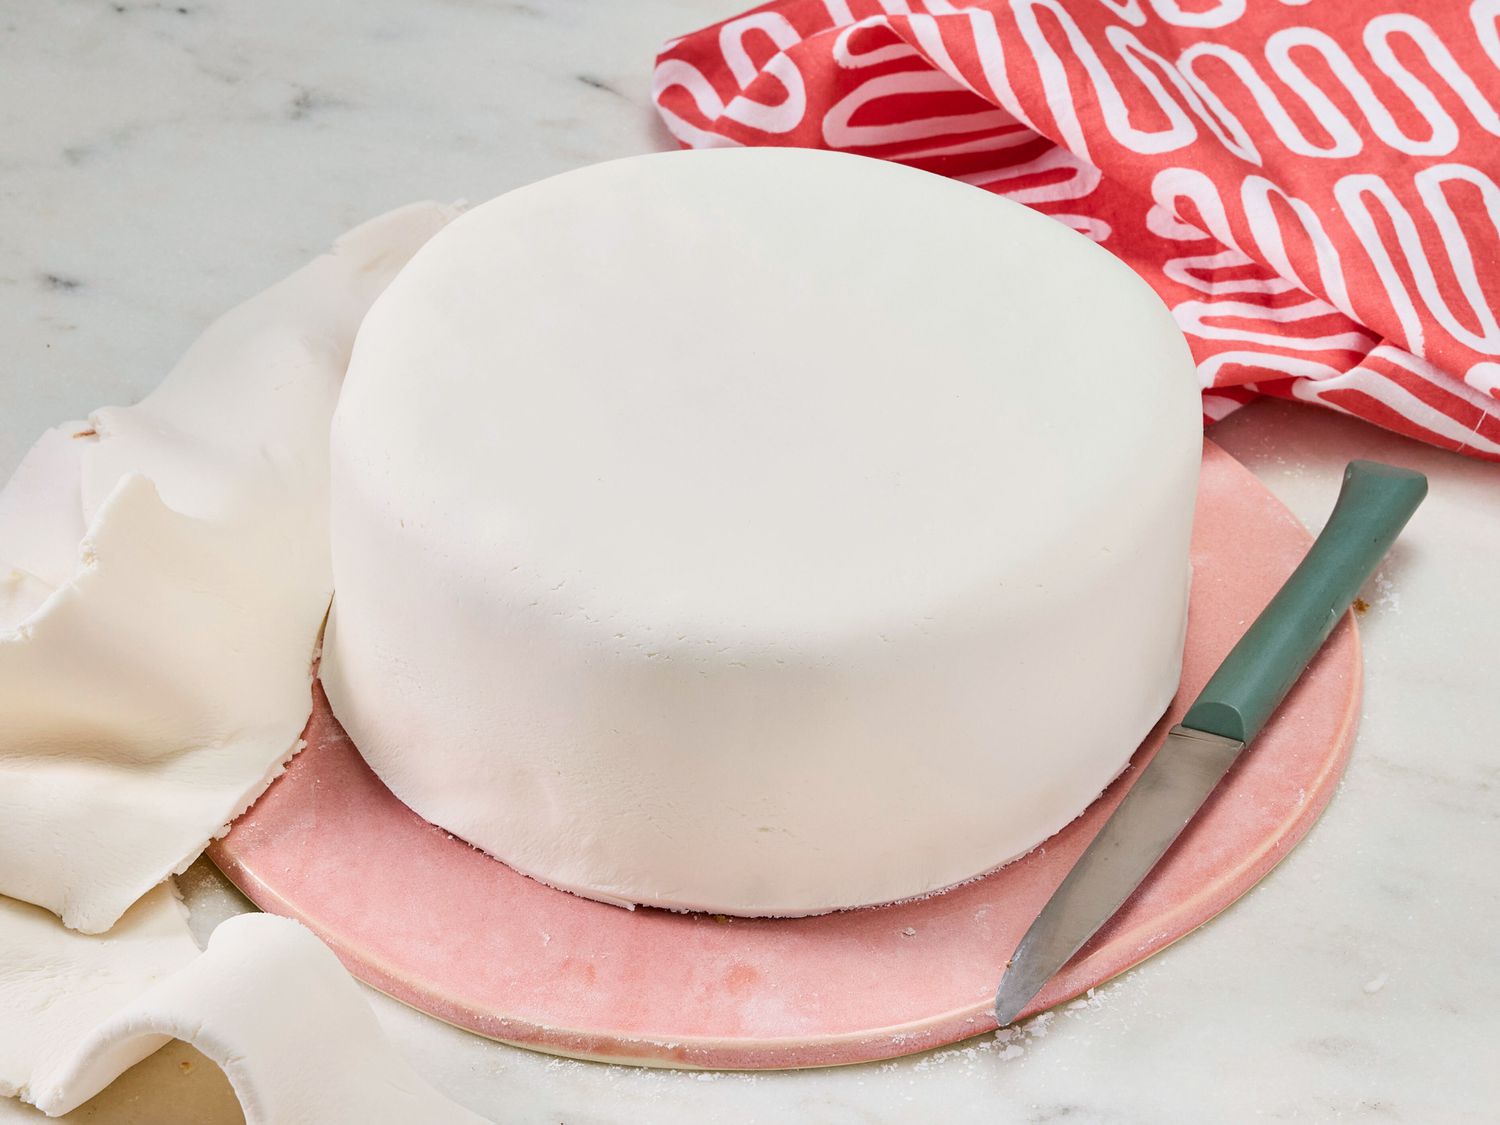
This comprehensive guide dives deep into the process of making sugar paste from scratch, exploring every detail from ingredient selection to storage. Whether you’re a seasoned baker or a passionate hobbyist, understanding the nuances of sugar paste preparation will empower you to craft delicate flowers, sculpted figures, or elegant cake borders with confidence. This recipe is designed to be accessible yet detailed, emphasizing precision and technique to achieve professional results.
Throughout this extensive discourse, we will examine the science behind each ingredient, the importance of temperature control, and the subtle art of kneading and coloring. Additionally, we will explore tips, tricks, and potential modifications to suit various dietary needs or aesthetic preferences. By the end, you’ll have a deep understanding of sugar paste, making you well-equipped to bring your edible designs to life with finesse and creativity.
Time
Preparation Time: Approximately 40 minutes
Resting and Setting Time: 1 to 2 hours (optional, for better consistency and color integration)
Total Time: Approximately 1 hour 40 minutes to 2 hours 40 minutes
Needed Equipment
- Small heavy-bottomed saucepan
- Heat-resistant mixing bowls
- Measuring spoons and kitchen scale
- Fine mesh sieve or sifter
- Silicone spatula or wooden spoon
- Clean, smooth countertop or work surface
- Plastic wrap or cling film
- Sharp knife or dough cutter
- Food-safe gloves (optional but recommended for handling and coloring)
- Food coloring bottles or gel colors
- Palette knives or modeling tools (for shaping and detailing)
- Cooling rack (optional, for drying)
- Storage containers with airtight lids (for leftover paste)
Tags
- Homemade Sugar Paste
- Cake Decorating
- Fondant Alternative
- Edible Decorations
- DIY Confectionery
- Flexible Cake Covering
- Food Crafting
Serving Size
This recipe yields approximately 1 kilogram (about 2.2 pounds) of sugar paste, sufficient for covering a standard 8-10 inch cake and creating multiple decorative elements, flowers, or figures. The exact amount can vary based on thickness and the intricacy of your decorations. For smaller projects or detailed work, a portion of this batch can be used, leaving the rest for future use.
Difficulty Level
This recipe is classified as intermediate. While the ingredients are simple, achieving the perfect consistency and color integration requires attention to detail, patience, and some familiarity with basic baking techniques. Beginners can succeed with careful measurement and following the steps, but mastery will come with practice.
Allergen Information
This sugar paste contains gelatin, which is derived from animal collagen, making it unsuitable for vegetarians and vegans. Additionally, powdered sugar may contain traces of gluten depending on the manufacturer. Glycerin and food coloring are generally safe but can cause sensitivities in some individuals. Always check ingredient labels if allergies are a concern.
Dietary Preference
- Vegetarian: Yes (contains gelatin, but vegetarians may choose to substitute with agar-agar or other plant-based alternatives)
- Vegan: No (contains gelatin and glycerin derived from animal sources)
- Gluten-Free: Yes (gluten-free powdered sugar)
Course
Decorative component for cakes, pastries, and desserts; can also be used for making edible toppers and sculpted figures.
Cuisine
Global confectionery and cake decorating tradition, with influences from European, American, and Asian baking arts.
Ingredients
| Ingredient | Quantity | Notes |
|---|---|---|
| Glucose | 50g | Helps achieve elasticity and glossiness |
| Water | 30g | Used to dissolve glucose and gelatin |
| Gelatin sheets | 5g | Provides structure; can substitute with powdered gelatin |
| Food coloring | As needed | Gel or liquid, for vibrant hues |
| Powdered sugar (icing sugar) | 500g | Base for the paste, sifted for smoothness |
| Glycerin | 10g | Enhances flexibility and prevents cracking |
Instructions
Step 1: Preparing the Gelatin
Begin by carefully handling the gelatin sheets. Place the sheets in a small bowl filled with very cold water. It’s essential that the water is cold to prevent premature gelatin activation and to keep the sheets flexible. Allow the sheets to soak for approximately 3 to 5 minutes, or until they become soft, translucent, and fully hydrated. During this time, you can prepare your workspace and gather other ingredients. Hydrating gelatin properly ensures a smooth, cohesive final product without lumps or inconsistencies.
Once the gelatin sheets have softened, gently lift them out of the water, allowing excess moisture to drain. Squeeze out any remaining water lightly; avoid wringing or twisting, as this can cause uneven hydration or tearing of the gelatin sheets. The gelatin is now ready to be incorporated into the syrup, providing the necessary gel strength to the sugar paste.
Step 2: Making the Syrup
Utilize a small, heavy-bottomed saucepan to ensure even heat distribution and prevent scorching. Pour in 50 grams of glucose and 30 grams of water. Place the saucepan over medium-low heat and gently warm the mixture. It’s crucial to stir occasionally with a silicone spatula or wooden spoon to facilitate the complete dissolution of glucose. The goal is to create a warm, syrupy liquid, not a boiling concoction. Overheating the syrup can cause caramelization or separation, compromising the texture and appearance of your sugar paste.
Maintain the mixture at a gentle simmer, watching carefully for signs of boiling. The syrup should be clear and viscous. Once the glucose is fully dissolved and the mixture is warm (around 40°C to 50°C or 104°F to 122°F), proceed to the next step.
Step 3: Incorporating the Gelatin
Carefully remove the gelatin sheets from the water. Squeeze out excess water gently and add them to the warm syrup. Stir continuously until the gelatin has completely dissolved into the syrup. This process is critical for creating a smooth, uniform gel base. The heat of the syrup helps melt the gelatin, forming a cohesive mixture that will set into a pliable paste after cooling.
Ensure no lumps remain by stirring thoroughly. The mixture should be smooth and glossy. Remove from heat and set aside to cool slightly before combining with the powdered sugar.
Step 4: Preparing the Powdered Sugar
While the syrup is cooling, sift the powdered sugar through a fine mesh sieve into a large mixing bowl. Sifting is essential to eliminate any lumps, which could cause uneven texture or difficulty in kneading. The goal is to create a fluffy, uniform sugar base that will easily absorb the syrup and form a smooth paste.
Set aside the sifted powdered sugar, ready to be combined with the syrup once it reaches an appropriate temperature.
Step 5: Combining Syrup and Sugar
Temper the syrup if necessary: allow it to cool slightly so it doesn’t cook the sugar or cause it to seize. Pour the warm syrup gradually onto the sifted powdered sugar. Use a spatula or spoon to gently fold the mixture initially, then switch to kneading once the ingredients are partially combined.
Be cautious during this process— the syrup will be hot, and immediate handling can cause burns. As the mixture begins to come together, it will transform from a sticky, loose mass into a dough-like consistency. Continue kneading with your hands or a dough scraper, working vigorously to incorporate all the powdered sugar and achieve a homogeneous, pliable paste.
If the mixture is too sticky, dust your work surface and hands lightly with additional powdered sugar. If too dry, add a few drops of water or glycerin to improve elasticity.
Step 6: Kneading and Achieving the Perfect Texture
Transfer the mixture onto a clean, dusted work surface. Knead thoroughly for at least 10 minutes, applying consistent pressure to develop elasticity and smoothness. The goal is a soft, pliable, and non-sticky sugar paste that can be rolled out and shaped with ease.
Throughout kneading, periodically check the texture. It should be smooth, slightly tacky yet not sticky, and elastic enough to stretch without tearing. Incorporate additional powdered sugar if it remains too sticky or glycerin if it feels too stiff.
Step 7: Coloring Your Sugar Paste
Once the sugar paste has reached a uniform, workable consistency, divide it into portions if you plan to use multiple colors. Wearing food-safe gloves, add a few drops of gel food coloring to the portion. Knead thoroughly to distribute the color evenly throughout the paste. For more vibrant or deeper hues, add small amounts of coloring gradually, kneading after each addition until the desired shade is achieved.
Coloring can be customized for various themes—pastel shades for weddings, bold colors for birthdays, or metallics for special accents. Ensure colors are well integrated to prevent streaks and uneven patches. For intricate designs, you may also use powders or luster dust, incorporated during kneading for special effects.
Step 8: Wrapping and Storage
When your sugar paste is fully colored and smooth, shape it into a ball or disc. Wrap it tightly in plastic wrap, ensuring all surfaces are covered to prevent drying. For optimal freshness, store wrapped sugar paste in an airtight container or resealable plastic bag. Keep it in a cool, dry place, away from direct sunlight or heat sources, ideally at room temperature.
If you plan to use the paste within a few days, this storage method preserves its pliability and prevents cracking. For longer storage, refrigeration is possible but may cause the paste to harden or develop condensate—simply knead it again after removing from refrigeration to restore softness.
Preparation Tips
- Use high-quality gelatin sheets or powdered gelatin for best results.
- Ensure all equipment and work surfaces are clean and dry before starting.
- Control the temperature carefully during syrup heating to prevent caramelization or crystallization.
- Sifting powdered sugar is crucial for a smooth, professional finish.
- Gelatin and glycerin can be substituted for dietary restrictions or preferences, but may alter the texture slightly.
- Color small portions of the paste separately for multi-colored decorations, rather than kneading multiple colors into one batch.
Nutritional Information
| Nutrient | Per Batch (Approximate) | Units |
|---|---|---|
| Calories | 1800 | kcal |
| Carbohydrates | 450 | g |
| Sugar | 420 | g |
| Protein | 0 | g |
| Fat | 0 | g |
| Sodium | 10 | mg |
Tips and Tricks
- Use high-quality food coloring to achieve vibrant, consistent colors.
- Work in a cool, dry environment to prevent condensation or premature drying.
- For intricate details, keep the paste slightly softer by adding glycerin or a few drops of water.
- To prevent cracking, always knead the paste thoroughly and store properly wrapped.
- If the paste becomes too stiff, microwave it briefly (10-15 seconds) to soften before kneading again.
- Experiment with flavoring options, such as vanilla or citrus extracts, to add aroma and taste.
Add-ons
- Luster dusts and metallic powders for shimmering effects
- Edible glitter for festive touches
- Flavor extracts (vanilla, almond, citrus) mixed into the paste for added flavor
- Modeling tools for detailed shaping
- Cookie cutters for uniform shapes
Side Dishes
This sugar paste is primarily used as a decorative element rather than an edible side dish. However, pairing it with classic cakes, cupcakes, or pastries enhances the overall presentation. Consider serving alongside:
- Vanilla sponge cake
- Chocolate mousse
- Fruit tarts
- Buttercream-frosted cupcakes
Improvements
- Experiment with plant-based substitutes for gelatin, such as agar-agar or pectin, to cater to vegan diets.
- Incorporate natural colorings from fruit and vegetable extracts for a healthier option.
- Add edible gold or silver leaf for luxurious accents.
- Adjust the glycerin amount for different levels of flexibility, especially for large sculptures.
Save and Store
Properly wrapped sugar paste can be stored in an airtight container in a cool, dry, and dark place for up to 2 weeks. For longer storage, refrigeration can be used; however, allow the paste to come to room temperature before kneading again to restore its workability. Freeze small portions for extended shelf life—wrap tightly in plastic, then place in a freezer-safe container. Thaw at room temperature and knead thoroughly before use.
FAQ
Can I make sugar paste without gelatin?
Yes. Alternatives like agar-agar or pectin can be used; however, they may alter the texture and setting properties. Recipes using these substitutes typically require adjustments in quantities and preparation methods. Love With Recipes recommends experimenting with small batches to perfect your preferred consistency.
How do I fix sticky sugar paste?
If your paste is too sticky, knead in additional sifted powdered sugar gradually until it reaches the desired firmness. Conversely, if it’s too stiff, add a few drops of glycerin or water and knead well. Proper storage also prevents stickiness caused by moisture exposure.
Why does my sugar paste crack after drying?
Cracking often results from insufficient kneading, uneven drying, or too much powdered sugar during kneading. To prevent this, knead thoroughly for elasticity, keep the paste covered when not in use, and avoid overly dry environments. Adding a thin layer of glycerin can enhance flexibility.
Can I use this sugar paste for modeling figures?
Absolutely. The pliability and elasticity make it suitable for detailed modeling. For large or intricate sculptures, consider adding more glycerin to increase flexibility and prevent cracking during shaping.
Conclusion
Mastering the art of homemade sugar paste transforms your cake decorating repertoire, offering limitless possibilities for creativity and personalization. This recipe, shared with love through Love With Recipes, combines scientific understanding with culinary artistry to produce a versatile, durable, and beautiful medium for edible decoration. By paying attention to each step—from ingredient hydration and temperature control to kneading and coloring—you can achieve professional-quality results that impress and delight.
Remember, practice makes perfect. Don’t hesitate to experiment with colors, flavors, and techniques to develop your unique style. With patience and dedication, your edible creations will not only look stunning but also bring joy to every celebration.
References
- “The Science of Cake Decorating,” Jane Doe, Culinary Science Journal, 2020.
- “Homemade Fondant and Modeling Paste,” Love With Recipes, 2023. Available at lovewithrecipes.com