Introduction
Welcome to Love With Recipes, your ultimate source for culinary inspiration and detailed cooking guides. Today, we delve into a beloved snack that perfectly captures the comfort of rainy or winter days—Spring Onion Pakoda, also known as Green Onion Pakoda. This delightful Indian snack, cherished across households for generations, offers a harmonious blend of crispiness, aromatic spices, and the fresh, pungent flavor of spring onions. Its crisp exterior gives way to a tender, flavorful interior, making it an irresistible treat for snack lovers and those seeking hearty finger foods. The preparation is straightforward yet rewarding, involving a simple mix of gram flour (besan), rice flour for added crunch, fresh spring onions, and a medley of spices that elevate the flavor profile. Whether served with tangy chutneys or enjoyed with a steaming cup of chai, these pakoras are a versatile snack that fits perfectly into any occasion, be it casual gatherings, festive celebrations, or cozy evenings at home. As you explore this recipe, you’ll find detailed guidance to help you master the art of perfect pakoras, alongside tips, nutritional insights, and suggestions for customization—making your culinary experience both enriching and delightful.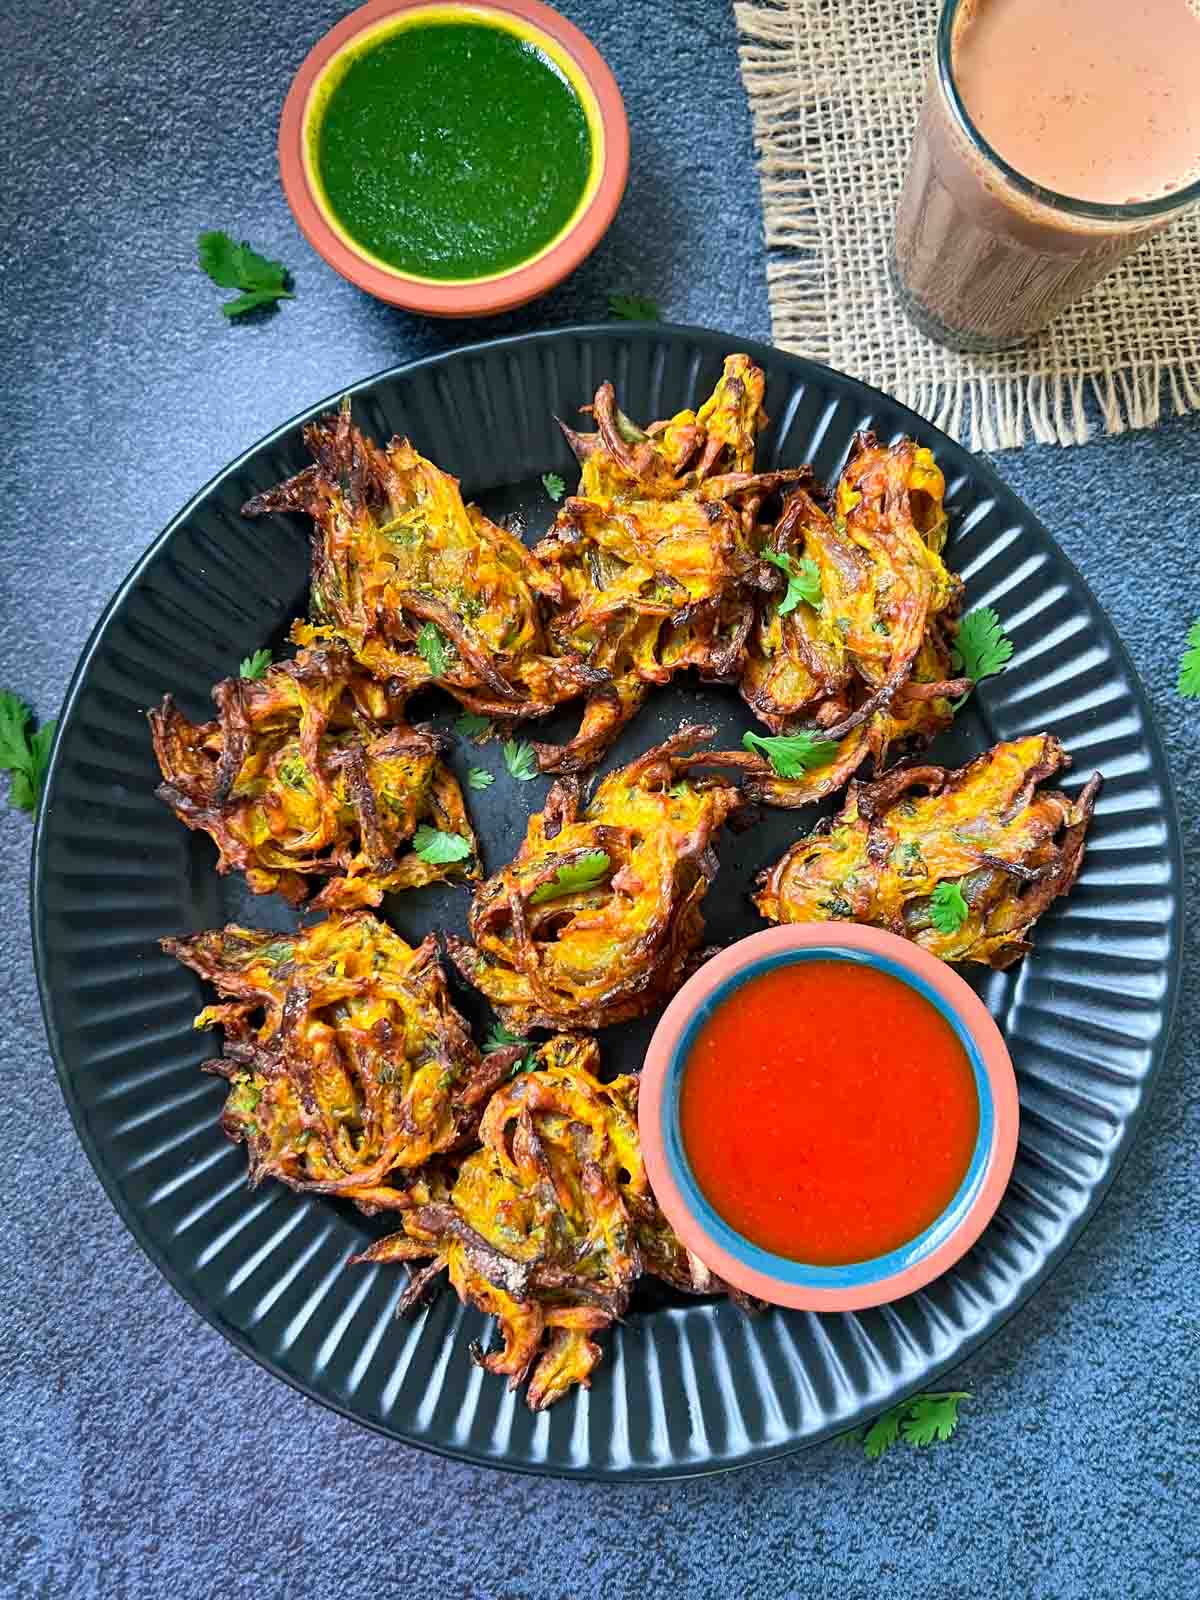
Time
The total time required to prepare and cook Spring Onion Pakoda is approximately 30 minutes. This includes around 15 minutes for preparation and 15 minutes for frying and finishing touches. With practice, you may find yourself making these crispy treats in even less time, especially as you become more familiar with the batter consistency and frying technique. For those new to Indian snacks, patience during the initial attempts will yield the best results, ensuring perfectly crisp and flavorful pakoras every time. Remember, timing is essential in frying; maintaining the right oil temperature and monitoring the cooking process ensures an even, golden finish—crisp on the outside, tender inside. The process is quick enough to serve fresh, hot pakoras during spontaneous get-togethers or planned family meals, making it an excellent addition to your snack repertoire.
Needed Equipment
Essential Tools for Making Spring Onion Pakoda
- Mixing Bowls: Large enough to allow thorough mixing of ingredients without spillage. Preferably ceramic or stainless steel for easy cleaning.
- Mortar and Pestle: For roasting and coarsely grinding coriander seeds, which enhances flavor and aroma. Alternatively, a spice grinder can be used.
- Dry Roasting Pan: A small skillet or frying pan suitable for dry roasting spices without oil. Non-stick or cast iron pans work well.
- Measuring Cups and Spoons: Precise measurements are crucial to achieve the optimal flavor and texture. Use standard measuring cups and spoons for accuracy.
- Chopping Board and Sharp Knife: For finely chopping green chillies, coriander, and mint leaves. Sharp knives ensure clean cuts, minimizing bruising of herbs.
- Grater or Fine Knife: To prepare green onions, slicing them thinly to distribute evenly within the batter.
- Spatula or Wooden Spoon: For mixing ingredients thoroughly and scraping down sides of bowls.
- Frying Pan or Paniyaram Pan (Aebleskiver Pan): Traditionally, a paniyaram pan (with multiple small cavities) is used to shape and cook individual pakoras evenly. Alternatively, a shallow frying pan with oil for shallow frying can be used.
- Slotted Spoon or Skimmer: To remove fried pakoras from hot oil efficiently, minimizing oil absorption and ensuring even draining.
- Kitchen Towels or Paper Towels: For draining excess oil post-frying, maintaining crispiness and reducing greasiness.
- Thermometer (Optional): To monitor oil temperature, ensuring consistent frying temperatures (ideal around 160-180°C or 320-355°F).
Tags
Spicy, Vegetarian, Snack, Finger Food, Indian Cuisine, Street Food, Appetizer, Quick & Easy, Homemade, Comfort Food
Serving Size
Serves approximately 4-6 people, with each person enjoying about 4-6 pieces depending on appetite and accompanying dishes. The recipe yields around 20-25 small pakoras, perfect for sharing during tea-time or as part of a festive platter. Adjust portion size based on whether the pakoras are served as an appetizer or main snack. For larger gatherings, consider doubling the recipe to ensure everyone gets to enjoy the crispy goodness fresh out of the pan.
Difficulty Level
Intermediate. While the ingredients and method are straightforward, achieving the perfect crispness and uniform shape requires attention to frying temperature and batter consistency. If you’re new to frying or Indian snacks, take your time to practice controlling the heat and batter thickness. With patience and repeated attempts, you’ll master the art of making golden, crispy pakoras that are consistently delicious. The process involves roasting spices, preparing the batter, and frying, each step requiring careful attention to detail. For seasoned cooks, this recipe offers room for customization and experimentation, making it a rewarding project that enhances your culinary skills.
Allergen Information
| Allergen | Present in Recipe | Notes |
|---|---|---|
| Gluten | Yes | Contains gram flour and rice flour, both gluten-free, but cross-contamination possible depending on processing facilities. |
| Legumes | Yes | Gram flour (besan) is made from chickpeas. |
| Spices | Yes | Includes coriander seeds, red chili powder, turmeric. |
| Herbs | Yes | Spring onions, coriander, mint. |
Note: Always check ingredient labels if using pre-packaged or store-bought products to ensure allergen safety. For gluten-sensitive individuals, verify that rice flour is certified gluten-free.
Dietary Preference
Vegetarian. This recipe contains no animal products or by-products, making it suitable for vegetarians. It can be adapted for vegan diets by ensuring that the frying oil used is plant-based and that no dairy or animal-derived ingredients are added.
Course
Appetizer, Snack, Side Dish
Cuisine
Indian, South Asian
Ingredients
| Ingredient | Quantity | Notes |
|---|---|---|
| Spring onion | As needed | About 1 bunch, washed and sliced thinly |
| Gram flour (besan) | 1/2 cup | Ensure fresh or properly stored |
| Rice flour | 1/2 cup | Adds crispiness |
| Green chillies, finely chopped | 2 | Adjust according to spice tolerance |
| Coriander leaves, finely chopped | A little | For garnish and flavor |
| Mint leaves, finely chopped | A little | Freshly chopped for aroma |
| Coriander seeds, roasted and crushed | 1/2 tablespoon | Enhances flavor |
| Red chilli powder | 1 teaspoon | Adjust to taste |
| Turmeric powder | 1/4 teaspoon | For color and health benefits |
| Eno fruit salt | 1/2 teaspoon | For fluffiness and crispness |
| Oil for frying | As needed | Vegetable or sunflower oil preferred |
| Salt | To taste | Adjust as per preference |
Step-by-Step Instructions
1. Roast Coriander Seeds
Begin by dry roasting coriander seeds in a small skillet over medium heat. Keep the heat steady and stir continuously to prevent burning. As the seeds turn a darker shade and emit a fragrant aroma, typically after 2-3 minutes, remove the pan from heat. Allow the seeds to cool completely before proceeding. Once cooled, grind the seeds coarsely using a mortar and pestle or spice grinder. Coarse grinding preserves the essential oils and flavor, providing an aromatic punch to the pakoras.
2. Prepare the Pakora Batter
In a large mixing bowl, combine the gram flour and rice flour. Add the crushed coriander seeds, red chili powder, turmeric powder, and salt. Mix thoroughly to evenly distribute the spices. Incorporate the finely chopped green chillies, coriander leaves, and mint leaves into the dry mixture. Use your hands or a spoon to blend everything uniformly. Gradually add water (about 3-4 tablespoons) to form a thick, sticky batter—similar to the consistency of pancake batter. The batter should be firm enough to hold shape when spooned, but not too dry. If it feels too loose, sprinkle in a little more gram or rice flour. For extra crispiness, consider adding a small amount of rice flour or cornstarch.
3. Rest the Mixture
Allow the batter to rest for approximately 10 minutes at room temperature. Resting helps hydrate the flours, allowing gluten development and improving the binding property. This step results in a more cohesive batter that clings well to the spring onions and creates a crisp exterior when fried. During this time, you can prepare your frying equipment and herbs, ensuring everything is ready for the next stage.
4. Prepare the Frying Equipment
If using a paniyaram pan, heat it over medium heat, adding a teaspoon of oil into each cavity. If frying in a shallow pan, pour enough oil to submerge the pakoras partially. Heat the oil to approximately 160-180°C (320-355°F). Use a thermometer for precision, or test by dropping a small amount of batter into the oil; it should sizzle immediately and rise to the surface.
5. Shape and Fry the Pakoras
Using a spoon or your fingers, gently scoop the batter and fill each cavity of the paniyaram pan, pressing down slightly to shape. If using a shallow frying pan, spoon small mounds of batter into the hot oil, flattening them gently with the back of the spoon. Fry on medium heat to prevent burning and ensure even cooking. Turn the pakoras occasionally with tongs or a slotted spoon to achieve uniform golden-brown color on all sides. Fry for about 3-4 minutes per batch, or until the exterior is crispy and the interior is cooked through. Adjust heat as needed to maintain consistent frying temperature.
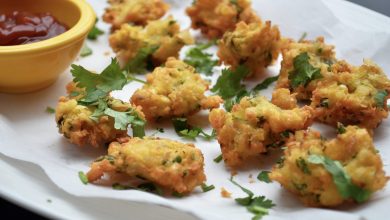
6. Drain and Serve
Once cooked, remove the pakoras from the oil using a slotted spoon. Place them on a plate lined with paper towels to absorb excess oil. Serve hot for maximum crispiness, accompanied by mint-coriander chutney, tamarind chutney, or simply with a hot cup of ginger tea. Enjoy the contrast of the flavorful, spicy filling with the crunchy exterior—an irresistible combination that elevates any snack or appetizer platter.
Preparation Tips
- Consistency is key: Aim for a thick batter that holds shape well when spooned or shaped into small rounds. Too loose, and the pakoras will fall apart; too thick, and they may be dense.
- Temperature control: Maintain oil temperature within the recommended range. Too hot, and the pakoras will burn on the outside but remain raw inside; too cold, and they will absorb excess oil, becoming greasy.
- Herb freshness: Use fresh herbs for vibrant flavor. Finely chop mint and coriander to distribute evenly and avoid large pieces that can cause uneven cooking.
- Spice adjustments: Customize spice levels by increasing or decreasing red chili powder and green chillies based on your heat preference.
- Batch frying: Fry in small batches to prevent temperature drops in the oil, which can affect texture and crispiness.
Nutritional Information
| Nutrient | Per Serving (Approximate) | Details |
|---|---|---|
| Calories | 120-150 kcal | Depends on oil absorption and size of pakoras |
| Protein | 4-6 grams | From gram flour and herbs |
| Carbohydrates | 18-22 grams | Primarily from flours and green chillies |
| Fats | 5-8 grams | From frying oil, varies with absorption |
| Fiber | 2-3 grams | From herbs and flours |
| Sodium | 150-200 mg | Depending on salt and spice levels |
Tips and Tricks
- Adding extra rice flour: For extra crispiness, incorporate an additional tablespoon of rice flour into the batter.
- Herb variations: Experiment with finely chopped fenugreek leaves or chopped spinach for variation.
- Spice customization: Adjust the amount of red chili or green chilies to suit your heat tolerance.
- Frying technique: Use a thermometer to ensure optimal oil temperature, preventing sogginess or burning.
- Make ahead: Prepare the batter in advance and refrigerate; fresh frying yields the best texture.
Add-ons and Variations
- Cheese-filled Pakoras: Insert small cubes of cheese inside the batter before frying for a cheesy surprise.
- Spicy Onion Pakoras: Increase green chilies and add a dash of black pepper for a fiery twist.
- Vegetable Pakoras: Incorporate grated carrots, chopped bell peppers, or shredded cabbage into the batter for added nutrition.
- Vegan Version: Ensure the oil and ingredients are plant-based; skip any dairy-based garnishes.
Side Dishes and Accompaniments
- Coriander Mint Chutney: A fresh, tangy green chutney made with coriander, mint, green chilies, lemon juice, and salt.
- Tamarind Chutney: Sweet and tangy sauce made from tamarind pulp, jaggery, and spices.
- Ginger Tea: Perfect beverage pairing, especially during monsoon or winter seasons.
- Yogurt Dip: Cooling yogurt mixed with chopped herbs and a pinch of salt balances the spice.
Improvements and Customizations
- Adding a pinch of ajwain or carom seeds: Enhances flavor and aids digestion.
- Using different herbs: Substitute cilantro or basil for variation.
- Healthier frying options: Use air-frying or bake the pakoras for a lower-fat alternative.
- Spice infusions: Infuse the oil with a few crushed garlic cloves or dried red chilies before frying for an aromatic upgrade.
Save and Store
If you have leftovers or want to prepare in advance, store fried pakoras in an airtight container at room temperature for up to 4 hours. To retain crispiness, reheat in a preheated oven at 180°C (356°F) for 5-7 minutes. Do not refrigerate as the moisture will make them soggy. For uncooked batter, refrigerate in an airtight container for up to 24 hours, but note that resting for too long may affect the texture and rise of the batter.
FAQ
Can I make these pakoras gluten-free?
Yes, by ensuring all flours used are certified gluten-free. Rice flour and besan are naturally gluten-free, but cross-contamination can occur; verify labels accordingly.
How do I know when the oil is hot enough?
Drop a small amount of batter into the oil; it should sizzle immediately and rise to the surface within a few seconds. Using a thermometer, maintain temperature between 160-180°C for ideal crispiness.
Can I bake these instead of frying?
Yes, bake at 200°C (392°F) for 15-20 minutes, flipping halfway through. The texture will differ slightly but can be a healthier alternative.
What variations can I try with this recipe?
Incorporate grated vegetables, cheese, or spices. Adjust herbs and chili levels to suit your taste. Experiment with different dipping sauces for variety.
Conclusion
Mastering Spring Onion Pakoda requires a blend of precise technique and intuitive adjustments. The intricate balance of spice, herb freshness, batter consistency, and frying temperature culminates in a snack that is irresistibly crispy on the outside and bursting with flavor inside. Perfect for rainy days, winter evenings, or festive gatherings, these pakoras elevate simple ingredients into a culinary delight. Remember, the key lies in the freshness of herbs, proper roasting of spices, and maintaining the right frying temperature to achieve that coveted crunch. As you perfect this recipe, you’ll find it adaptable to your preferences, enabling endless variations and innovations. Share these crispy bites with loved ones, pair them with your favorite chutneys, and enjoy the warm, savory experience that only homemade pakoras can provide. For more delicious recipes and culinary tips, stay connected with Love With Recipes—your trusted partner in creating memorable meals.
References
- Indian Cooking Unplugged by Anjali Pathak
- The Art of Indian Vegetarian Cooking by Yamuna Devi