Introduction
Indulging in a classic cookie recipe that evokes nostalgic memories and offers a delightful snack experience is truly a timeless pleasure. The Old Fashioned Vanilla Wafers, as featured on Love With Recipes, embody simplicity, elegance, and a comforting flavor profile that appeals to all ages. These cookies are reminiscent of childhood afternoons spent dipping wafers into a tall glass of milk, savoring the subtle sweetness and tender, melt-in-your-mouth texture. Adapted from the renowned My Most Favorite Dessert Company, this recipe combines classic ingredients with a straightforward process to deliver perfect wafers every time. Whether you’re seeking a quick treat for a family gathering, a nostalgic gift, or a delightful accompaniment to your afternoon tea, these vanilla wafers are a superb choice. Their delicate crunch, infused with hints of citrus zest, elevates them beyond ordinary cookies, making each bite a moment of joy and remembrance.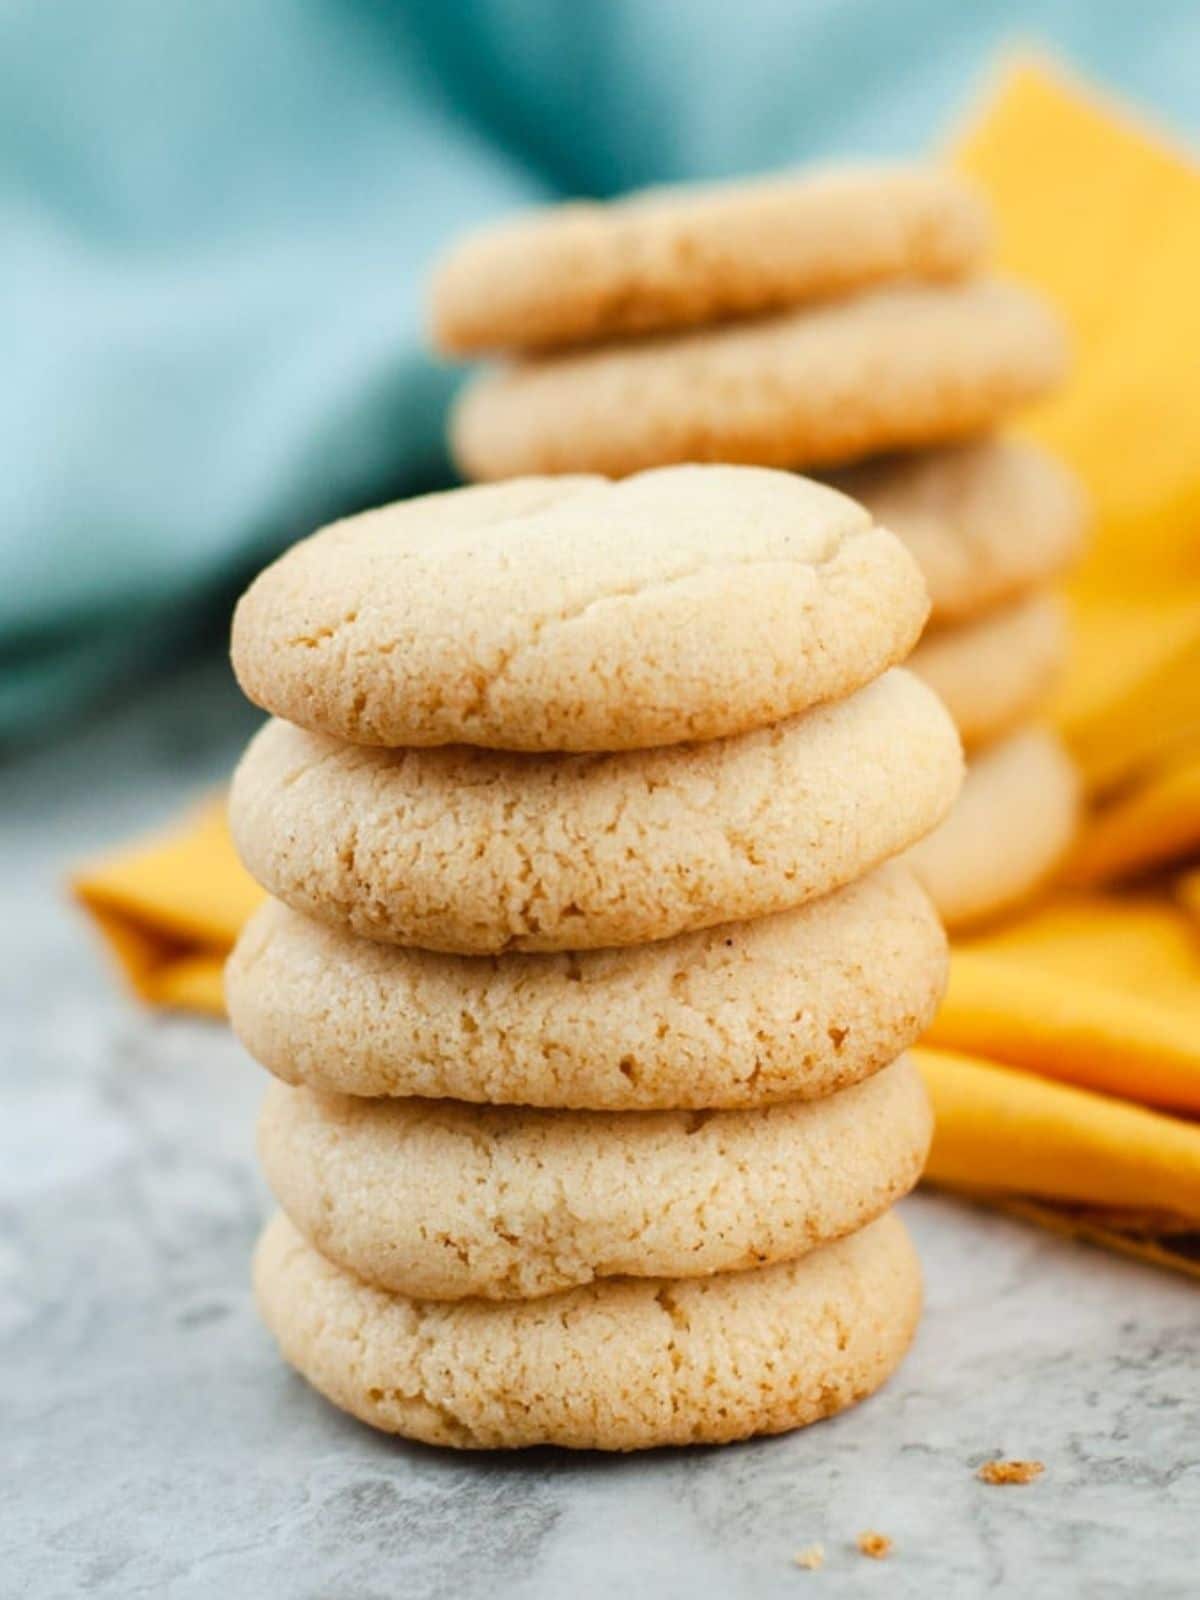
Time
Preparation and baking time for these nostalgic vanilla wafers are approximately 25-30 minutes. This includes about 10 minutes for mixing and shaping the dough, 7 minutes for baking each batch, and additional time for cooling and storage. The entire process is designed to be swift, making it an excellent choice for a quick homemade treat or last-minute dessert idea. The minimal active time involved allows bakers to enjoy the process without tedious steps, ensuring a satisfying experience from start to finish.
Needed Equipment
- Oven: A standard convection or conventional oven capable of maintaining accurate temperature settings
- Mixing bowls: At least two, preferably stainless steel or glass for durability and ease of cleaning
- Electric mixer: Handheld or stand mixer with beaters for creaming and mixing ingredients effectively
- Measuring cups and spoons: For precise measurement of ingredients, especially liquids and zest
- Parchment paper or silicone baking mats: To prevent sticking and ensure even baking
- Baking sheets: Two large, preferably rimmed for stability and even heat distribution
- Cooling racks: Wire racks to allow air circulation around the wafers and prevent sogginess
- Cookie scoop or teaspoon: To portion the dough uniformly
- Zester or microplane: For finely grating orange and lemon zest
- Spatula: For scraping down the bowl and transferring dough if necessary
- Kitchen scale (optional): For precise measurement of ingredients, especially when baking for consistency
Tags
Cookies, Classic, Nostalgic, Kid-Friendly, Quick & Easy, Dessert, Snack, Baked Goods, Homemade, Traditional, Family Favorite
Serving Size
Each serving consists of approximately 3 wafers, with the recipe yielding about 4 dozen (48) cookies. This means that the total batch provides enough for a small gathering or to enjoy over several days. When serving, consider pairing with milk, tea, or coffee for a perfect accompaniment. The wafers also serve well as a base for ice cream sandwiches or as a crunchy topping for desserts like trifles or parfaits, allowing versatility in presentation and flavor pairing.
Difficulty Level
This recipe is categorized as easy, suitable for beginner bakers or those with minimal baking experience. The steps involve standard mixing, portioning, and baking techniques that are straightforward to follow. The use of common ingredients and minimal equipment make this recipe accessible for all home cooks. Additionally, the process is forgiving, with clear instructions on mixing and baking times, ensuring successful results even for novices.
Allergen Information
| Allergen | Contains |
|---|---|
| Gluten | Yes, from cake flour |
| Eggs | Yes |
| Dairy | Contains margarine (may contain dairy derivatives) |
| Tree Nuts/Peanuts | None specified; check margarine ingredients |
| Sulfites | None |
Note: For those with specific allergies or sensitivities, substitute margarine with plant-based butter alternatives or ensure the margarine used is free from dairy derivatives. Cake flour can be replaced with gluten-free baking flour for gluten-free versions.
Dietary Preference
This recipe is suitable for omnivorous diets. To adapt for vegan preferences, replace the egg with a flaxseed or chia seed substitute and ensure the margarine is vegan-friendly. For low-sugar or keto diets, adjustments in sugar content and flour type may be necessary, though these modifications could alter the traditional flavor and texture.
Course
Snack, Dessert, Kid-Friendly Treat
Cuisine
American, Nostalgic, Classic Baking
Ingredients
Ingredient Details and Substitutions
| Ingredient | Quantity | Notes/Substitutions |
|---|---|---|
| Unsalted margarine | 1/4 cup (56 grams) | Can substitute with vegan margarine or unsalted butter for richer flavor |
| Sugar | 1/2 cup (100 grams) | Granulated sugar recommended; can use coconut sugar for a different flavor profile |
| Egg | 1 large | Vegan substitute: 1 tablespoon ground flaxseed + 3 tablespoons water, mixed and set for 5 minutes |
| Vanilla extract | 1 teaspoon | Pure vanilla essence enhances flavor; optional vanilla bean paste for depth |
| Orange zest | 1 teaspoon | Freshly grated from organic orange for best flavor |
| Lemon zest | 1/4 teaspoon | Freshly grated from organic lemon; optional for added citrus aroma |
| Cake flour | 3/4 cup (90 grams) | All-purpose flour can be used; for gluten-free, substitute with gluten-free baking blend |
Instructions
Step-by-step Baking Process
Preparation Phase
Begin by setting your oven to preheat at 375°F (190°C). Proper temperature control is crucial for achieving the perfect texture—just the right balance between tender and crisp. Line your baking sheets with parchment paper or silicone baking mats to prevent sticking and facilitate easy removal of the wafers after baking. Prepare all your ingredients beforehand, ensuring they are measured accurately for consistency and success.
Mixing the Base
In a large mixing bowl, combine the unsalted margarine and sugar. Use an electric mixer set to low speed to blend these ingredients until they form a pale, fluffy mixture. This creaming process, although brief, is vital for incorporating air into the dough, which contributes to the wafer’s light texture. Scrape down the sides of the bowl periodically with a spatula to ensure even mixing.
Incorporating Eggs and Flavor
Add the egg to the mixture, beating on medium speed until fully incorporated. Follow this by adding the vanilla extract, orange zest, and lemon zest. These citrus elements bring a bright, fresh flavor that complements the vanilla and enhances the cookie’s nostalgic appeal. Be sure to mix thoroughly so that the zest is evenly dispersed throughout the dough, avoiding pockets of zest that could result in uneven flavor.
Adding the Flour
Gradually add the cake flour to the wet mixture on low speed. Do this in stages, about a quarter at a time, to prevent flour from flying out of the bowl and to ensure thorough blending. The dough should come together into a soft, pliable consistency. Do not overmix, as this can develop gluten and make the wafers tough. The dough should be easy to scoop but hold its shape well.
Portioning the Dough
Using a teaspoon or small cookie scoop, portion the dough onto the prepared baking sheets. Space each dollop about 2 inches apart to allow for spreading during baking. If you prefer uniform cookies, you can roll the dough into small balls and gently flatten them with the back of a spoon or your fingers. The goal is to create thin, even wafers that bake uniformly.
Baking
Place the baking sheets in the preheated oven and bake for approximately 7 minutes. Keep an eye on them; the wafers should be lightly browned along the edges but not burnt. The baking time can vary slightly depending on your oven’s accuracy and the thickness of your cookies. Rotate the sheets halfway through baking to promote even coloration. Once baked, remove the wafers and transfer them immediately to cooling racks to crisp up as they cool.
Cooling and Storage
Allow the wafers to cool completely on the wire racks. This step is essential for achieving the perfect crispness and preventing sogginess. Once cooled, carefully layer them in airtight containers, separating layers with parchment paper if necessary. Proper storage keeps the wafers fresh and crunchy for up to a week, though they are best enjoyed within a few days for optimal texture.
Preparation Tips
- Use fresh citrus zest for a vibrant flavor; zest just before mixing to preserve aroma.
- Ensure the margarine is softened but not melted for easier creaming.
- For uniform wafers, weigh the dough portions rather than estimate by volume.
- If you prefer a more pronounced citrus flavor, increase the zest slightly or add a splash of orange or lemon juice to the dough.
- Experiment with different types of flour for varying textures—almond flour for a nutty twist or gluten-free blends for allergy-friendly options.
- Adjust baking time based on your oven’s performance; keep a close eye after 6 minutes to prevent over-browning.
- For a decorative touch, sprinkle a tiny pinch of colored sugar or edible glitter on top before baking.
Nutritional Information
| Nutrient | Per Serving (3 wafers) | Per Batch (48 wafers) |
|---|---|---|
| Calories | 414.3 kcal | approximately 6,290 kcal |
| Fat | 24.2 g | around 367 g |
| Saturated Fat | 4.7 g | about 71 g |
| Cholesterol | 52.9 mg | about 803 mg |
| Sodium | 18.7 mg | roughly 283 mg |
| Carbohydrates | 45.5 g | around 690 g |
| Fiber | 0.5 g | about 8 g |
| Sugar | 25.3 g | approximately 384 g |
| Protein | 3.8 g | about 58 g |
Tips and Tricks
- Enhance Flavor: Add a pinch of cinnamon or nutmeg to the dough for a warm spice note that complements vanilla and citrus.
- Texture Variations: For a chewier wafer, add a tablespoon of cornstarch to the flour mixture.
- Color Play: Incorporate a few drops of food coloring into the dough for fun, colorful wafers suitable for themed parties.
- Uniformity: Chill the dough for 15-20 minutes before portioning; this prevents spreading and makes handling easier.
- Alternative Flavors: Swap vanilla extract for almond or lemon extract for a different aromatic profile.
- Batch Scaling: Double or triple the recipe easily by maintaining ingredient ratios, ensuring consistent results.
- Presentation: Decorate cooled wafers with drizzle of melted chocolate or a dusting of powdered sugar for an elegant finish.
Add-ons
- Chocolate coating: Dip or drizzle wafers with melted dark or white chocolate for a decadent twist.
- Frosting: Sandwich two wafers with vanilla, chocolate, or lemon frosting for a delightful sandwich cookie.
- Fruits: Serve wafers alongside fresh berries or citrus segments to add a fruity contrast.
- Ice Cream Sandwiches: Use wafers as a base for homemade ice cream sandwiches, pressing softened ice cream between two wafers and freezing until firm.
Side Dishes
- Milk: Classic accompaniment, hot or cold, to enhance the wafers’ nostalgic appeal.
- Tea or Coffee: Perfect for pairing, especially with a hint of vanilla or citrus in your beverage.
- Fruit Compote: Serve alongside a warm fruit compote for a comforting dessert combo.
- Yogurt Parfaits: Layer crushed wafers with Greek yogurt and fresh fruits for a nutritious treat.
Improvements and Variations
- Flavor Infusions: Incorporate other extracts like coconut, rum, or maple for unique flavor profiles.
- Texture Adjustments: To make the wafers more tender, reduce baking time slightly; for crunchier wafers, bake a minute longer.
- Alternative Sweeteners: Use honey or maple syrup to reduce refined sugar content, adjusting baking time accordingly.
- Decorative Touches: Use stamped cookie cutters or embossing tools before baking for decorative patterns.
- Healthier Version: Substitute part of the sugar with natural sweeteners, increase fiber by adding oats or ground nuts.
Save and Store
Allow the wafers to cool completely before storing. Keep them in an airtight container at room temperature for up to one week. For longer storage, freeze in a single layer on a baking sheet, then transfer to an airtight container or zip-top bag. Properly stored, they can last up to one month in the freezer. To re-crisp frozen wafers, warm them lightly in a preheated oven at 350°F (175°C) for 5 minutes before serving.
FAQ
Can I make these wafers gluten-free?
Yes, substitute the cake flour with a gluten-free baking blend. Ensure the blend contains xanthan gum or add a small amount (about 1/4 teaspoon per cup of flour) to mimic the elasticity of gluten.
Can I use butter instead of margarine?
Absolutely. Using butter will yield a richer flavor and slightly different texture. Soften the butter to room temperature before creaming with sugar for best results.
Can I add chocolate or other flavorings?
Yes, stir in mini chocolate chips, cocoa powder, or flavor extracts during the mixing stage to customize your wafers.
How do I prevent the wafers from spreading too much?
Chill the dough for 15-20 minutes before portioning, or slightly flatten the dough portions to ensure they bake evenly and maintain their shape.
What if my wafers turn out soft or soggy?
Ensure proper cooling on wire racks and store them in airtight containers only after completely cooled. Overbaking slightly can also help achieve crispness.
Conclusion
Creating homemade Old Fashioned Vanilla Wafers is a rewarding baking project that fills your home with nostalgic aromas and produces irresistibly delicate cookies. Their simple ingredient list, quick preparation, and versatile flavor profile make them a perfect treat for all occasions. Whether enjoyed with a glass of milk, used as a base for creative desserts, or shared with friends and family, these wafers bring a comforting sense of tradition and joy. Remember, the key to perfection lies in precise measurement, gentle mixing, and attentive baking. Experiment with flavor variations and presentation styles to make this classic recipe uniquely yours. Share the love of baking by storing leftovers properly and exploring new ways to enjoy these timeless cookies. For more delightful recipes like this, visit Love With Recipes, your trusted platform for homemade culinary inspiration.
References
- My Most Favorite Dessert Company – Original Vanilla Wafers Recipe
- Food Science and Baking Principles – Understanding Cookie Texture and Baking Techniques