
Introduction
When it comes to cooking a whole turkey that is both impressively flavorful and uniquely memorable, few methods stand out quite like the Trash Can Turkey technique. This innovative approach, rooted in outdoor culinary traditions and popularized by Boy Scouts and camping enthusiasts, involves roasting a turkey upright beneath a metal trash can, effectively creating a natural convection oven. The result is a supremely moist, tender, and flavorful bird with a crispy exterior, perfect for celebrating holidays such as Thanksgiving or Christmas, or for making a statement at any large gathering or outdoor event.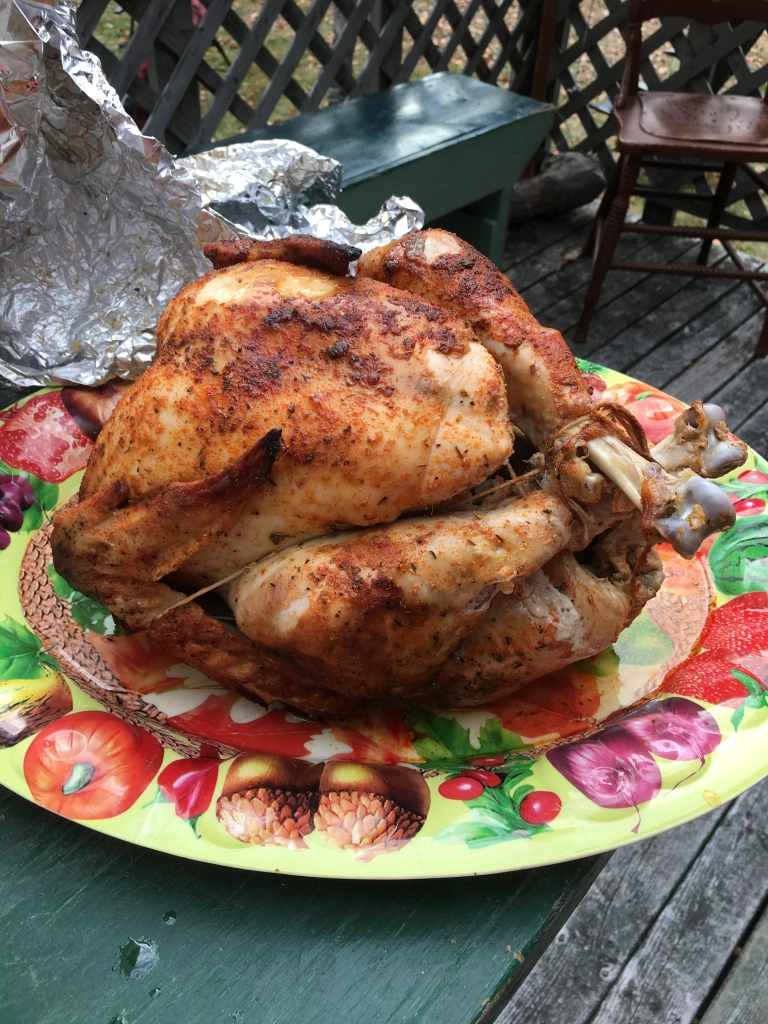
Love With Recipes, your trusted culinary companion, encourages you to explore this extraordinary cooking method which combines the thrill of outdoor cooking with the satisfaction of a perfectly cooked turkey. The process involves meticulous preparation, careful setup, and attentive monitoring, but the end result is well worth the effort. This guide provides a comprehensive, step-by-step breakdown of the Trash Can Turkey recipe, enriched with detailed tips, scientific insights, and safety considerations to ensure a successful and enjoyable cooking experience.
Time
Preparation and Marination Time
Initial preparation of the turkey and seasoning rub takes approximately 30 minutes, which includes mixing spices, trimming, and rinsing the bird. Marination or dry brining, if done, should be at least 4 hours, preferably overnight, to allow the flavors to penetrate deeply into the meat, resulting in a more flavorful and moist turkey.
Cooking Time
- Active cooking time: approximately 1.5 to 2 hours depending on the size of the turkey and environmental conditions.
- Total estimated time, including prep and marination: roughly 6 hours, with some variations based on specific circumstances.
Overall Time
From start to finish, including prep, marination, setup, and cooking, plan for about 6 hours, making this a suitable method for a day-long outdoor celebration or special event planning.
Needed Equipment
Essential Tools and Equipment
- Heavy-duty aluminum foil: To create a stable cooking surface and protect the ground.
- Wood or metal stake: Minimum 1-inch diameter, approximately 20 inches long, to serve as the upright support for the turkey.
- Large outdoor grill or fire pit: For safely lighting and maintaining charcoal.
- Charcoal briquettes or lump charcoal: Approximately 20 pounds, depending on the size of the turkey and desired temperature.
- Match or lighter: To ignite the charcoal.
- Long-handled tongs and heat-resistant gloves: For handling hot coals, turkey, and equipment safely.
- Thermometer (instant-read or probe type): To monitor internal temperature of the turkey.
- Meat thermometer probe: Optional but recommended for precise cooking.
- Carving knife and cutting board: For serving the cooked turkey.
- Large container or resealable plastic bag: For marinating or resting the turkey.
- Cleaning supplies and safety gear: Including fire extinguisher, to ensure a safe cooking environment.
Optional but Useful Accessories
- Spray bottle with water: To control flare-ups and manage temperature.
- Extra charcoal briquettes: For maintaining consistent heat during long cooking periods.
- Outdoor canopy or tent: To shield the cooking setup from wind and weather.
- Meat injector: To enhance flavor infusion if desired.
Tags
Outdoor Cooking, Barbecue, Thanksgiving, Christmas, Camping, Unique Recipes, Boy Scout Recipes, Turkey, Roast, Grilling, Smoked, Special Occasion
Serving Size
Approximate servings from a 20-pound turkey range from 12 to 15 people, depending on portion sizes and accompanying side dishes. For larger gatherings, consider preparing multiple turkeys or adjusting the size of the bird accordingly.
Difficulty Level
Intermediate. This recipe requires outdoor cooking skills, safety precautions with hot coals, and some mechanical setup with stakes and a trash can. Previous experience with grilling or outdoor roasting will facilitate a smoother process, though detailed instructions and safety tips provided here aim to guide novices confidently through the process.
Allergen Information
This recipe contains common allergens such as garlic and mustard. Be sure to inform guests if these ingredients are part of the seasoning rub, and modify accordingly for allergy-sensitive individuals.
Dietary Preference
This dish is poultry-based and not suitable for vegetarians or vegans. It is naturally gluten-free, provided no gluten-containing additives are used in the seasoning rub. For low-sodium options, reduce the salt content and seasonings as needed.
Course
Main Course / Entree
Cuisine
American Outdoor/Traditional American
Ingredients
Seasoning Rub
| Ingredient | Quantity | Notes |
|---|---|---|
| Poultry seasoning | 2 tablespoons | Mix with other spices for flavor |
| Coarse salt | 2 tablespoons | Enhances flavor and helps with moisture retention |
| Dry mustard | 1 tablespoon | Optional but adds a subtle pungency |
| Black pepper | 1 tablespoon | Freshly ground preferred |
| Garlic powder | 1.5 tablespoons | For depth of flavor |
Turkey
| Ingredient | Quantity | Notes |
|---|---|---|
| Whole turkey | Approximately 20 pounds | Thoroughly thawed if frozen |
| Olive oil | 1/4 cup | For skin crispiness and seasoning adherence |
Instructions
1. Prepare the Seasoning Rub
Begin by creating a balanced seasoning mixture that will impart flavor and aid in moisture retention. In a small mixing bowl, combine 2 tablespoons of poultry seasoning, 2 tablespoons of coarse salt, 1 tablespoon of dry mustard, 1 tablespoon of black pepper, and 1.5 tablespoons of garlic powder. Stir thoroughly until all ingredients are evenly distributed. This blend forms the core flavor profile for your Turkey, providing savory, aromatic, and slightly spicy notes that complement the natural taste of the bird.
2. Prep the Turkey
- Gently remove the giblets, neck, and any other innards from the turkey’s cavities. Save these for gravy or stock if desired, or discard if not needed.
- Trim excess fat around the cavity openings and any visible fat deposits on the skin to promote even cooking and prevent flare-ups.
- Thoroughly rinse the turkey inside and out using cold water, ensuring all residual feathers, blood, and debris are eliminated. Pat dry with paper towels, especially the skin, to facilitate even seasoning and browning.
3. Season the Turkey
- Rub approximately 1 tablespoon of the seasoning mixture inside the neck cavity, ensuring an even coating.
- Similarly, apply 2 tablespoons of seasoning inside the main body cavity.
- Brush or massage the outside of the turkey with 1/4 cup of olive oil, covering all surfaces for crispness and flavor adherence.
- Sprinkle the remaining seasoning rub over the entire exterior, massaging gently to distribute evenly.
4. Marinate the Turkey
Place the seasoned turkey into a large container or resealable plastic bag. Cover tightly or seal and refrigerate for at least 4 hours, ideally overnight. Marination allows the spices to penetrate deeply, resulting in a more flavorful and juicy outcome. The cold environment also helps to tenderize the meat and improve overall texture.
5. Prepare the Cooking Area
- Identify a flat, open outdoor space at least 4 feet in diameter, preferably on dirt rather than grass to minimize fire hazards and ensure stability.
- Lay heavy-duty aluminum foil over the ground, creating a barrier that protects the underlying surface and facilitates clean-up.
6. Set Up the Support Stake
- Drive a sturdy wood or metal stake into the center of the prepared foil-covered circle. Use a mallet if necessary to ensure stability. The stake should be at least 1 inch in diameter and approximately 20 inches long, with about 16 inches protruding above ground level.
- Ensure the stake is firmly embedded and vertical, as it will support the weight of the turkey during roasting.
7. Prepare the Charcoal
- Light about 20 pounds of charcoal using a chimney starter or traditional lighter method until the coals are glowing red and covered in a light ash.
- Arrange the charcoal in a pile or in designated areas to facilitate even heat distribution.
8. Position the Turkey
- Using long-handled tongs and heat-resistant gloves, carefully lift the turkey by the legs or cavity and position it upright onto the stake, ensuring it is centered and stable.
- The neck end should be at the top, with the tail end approximately 6 inches above ground to allow even airflow and heat circulation.
9. Cover with Trash Can
- Place a clean, 30-gallon metal trash can over the upright turkey, aligning it centrally on the foil base. The can should rest on the ground, enclosing the bird entirely.
- The lid of the trash can should be sealed or left slightly ajar if needed for ventilation, but ideally, it should contain the heat and moisture inside for efficient roasting.
10. Cook the Turkey
- Spread about one-third of the hot charcoal briquettes evenly across the top of the trash can lid or directly on the can if designed for such use. This provides the necessary heat from above.
- Distribute the remaining charcoal around the outer sides of the trash can, building a ring approximately 3-4 inches high. This setup ensures even heat distribution and consistent cooking from all sides.
- Maintain the heat by periodically adding more charcoal as needed. The goal is to sustain a temperature of roughly 325°F (163°C). Use a thermometer to verify internal temperatures and avoid overcooking or undercooking.
11. Monitoring and Adjustments
Regularly check the temperature readings using a probe thermometer inserted into the thickest part of the turkey’s breast. Be cautious when opening or adjusting the setup, using long tongs or heat-resistant gloves to prevent burns.
If the temperature drops below the target, carefully add more charcoal, distributing it evenly to maintain a consistent cooking environment. If it rises too high, partially lift the trash can or remove some coals temporarily to reduce heat.
12. Finishing the Roast
- Cook the turkey for approximately 1.5 to 2 hours, or until the internal temperature reaches 165°F (74°C) in the breast or 170°F (77°C) in the thigh.
- Use a meat thermometer for accuracy, and avoid opening the trash can frequently to preserve heat.
13. Removing and Resting
- Once cooked, carefully remove the hot coals and ash from the top and sides of the trash can using long tongs and heat-resistant gloves. Be extremely cautious, as these materials will be very hot.
- Lift the trash can off the turkey, ensuring minimal movement to prevent tearing the skin or losing juices.
- Transfer the turkey to a large platter or carving station, tent loosely with aluminum foil, and allow it to rest for 10-15 minutes. Resting helps redistribute juices and enhances tenderness.
14. Serving
Carve the turkey into slices, serve on a warmed platter, and enjoy the succulent, flavorful results of this unique outdoor cooking method. Pair with your favorite sides and enjoy a festive, memorable meal.
Preparation Tips
- Ensure the turkey is fully thawed before starting to avoid uneven cooking or safety hazards.
- Use a meat thermometer to monitor internal temperature precisely, especially since outdoor conditions can affect cooking times.
- Adjust the amount of charcoal based on the size of your turkey and ambient weather conditions like wind or temperature.
- Practice safety at all times; keep a fire extinguisher or water source nearby in case of flare-ups.
- Secure the stake firmly in the ground to prevent tipping or shifting during cooking.
Nutritional Information
| Nutrient | Per Serving (approximate for 15 servings) |
|---|---|
| Calories | 350-400 kcal |
| Protein | 45-50 grams |
| Fat | 15-20 grams |
| Carbohydrates | 0-2 grams |
| Sodium | 700-900 mg |
| Cholesterol | 150-170 mg |
Tips and Tricks
- Use a dual probe thermometer setup: one for monitoring internal meat temperature, another for ambient temperature within the trash can to optimize heat control.
- If weather conditions are windy or cold, create a windbreak or shield around your setup to maintain consistent heat.
- Pre-cook the turkey’s seasoning rub in a small pan to deepen flavors and then apply it to the raw bird for enhanced taste.
- Experiment with different spice blends such as smoked paprika, cumin, or herbs de Provence for personalized flavor profiles.
- For extra crispy skin, increase the olive oil application and ensure the skin is dry before roasting.
Add-ons
- Inject marinade or flavored butter into the turkey via a meat injector for additional moisture and flavor.
- Stuff the turkey with herbs, citrus, or aromatics for added fragrance and taste during roasting.
- Finish with a glaze made from honey, maple syrup, or balsamic vinegar during the last 30 minutes for a caramelized exterior.
Side Dishes
- Classic mashed potatoes with gravy
- Cranberry sauce
- Stuffing or dressing
- Roasted seasonal vegetables
- Sweet potato casserole
- Green bean casserole
- Fresh bread or rolls
Improvements and Variations
- Use a convection fan or portable outdoor heater to regulate temperature in less predictable weather.
- Opt for different wood chips or chunks added to the charcoal for smoky flavor infusion.
- Experiment with brining the turkey beforehand for even more moisture retention and flavor depth.
- Modify the size and shape of the trash can to accommodate larger or smaller birds.
Save and Store
Leftover turkey can be stored in airtight containers in the refrigerator for up to 4 days. For longer storage, vacuum-seal and freeze for up to 3 months. Reheat in the oven or microwave, ensuring it reaches 165°F (74°C) before serving again.
FAQ
Is this method safe for all outdoor environments?
Yes, provided you follow safety guidelines, use non-flammable surfaces, and keep a fire extinguisher nearby. Avoid windy days or flammable surroundings.
Can I use a different size turkey?
Yes, adjust the cooking time accordingly—generally, about 15-20 minutes per pound at 325°F. Smaller turkeys will cook faster, larger ones may require additional coals or extended time.
What if I don’t have a stake?
You can improvise with a sturdy metal rod or pole, or set the turkey on a roasting spit designed for outdoor use.
Can I cook multiple turkeys at once?
It’s challenging due to space and heat limitations and safety concerns. It’s best to cook one turkey at a time or use multiple setups with caution.
Conclusion
The Trash Can Turkey method combines outdoor adventure, culinary ingenuity, and festive celebration into one unforgettable experience. Its unique cooking technique ensures a juicy, flavorful bird with crispy skin, making it the centerpiece of any holiday feast or outdoor gathering. With proper safety measures, precise temperature monitoring, and a little patience, you can master this impressive technique and create memories that will last a lifetime. Remember, practice makes perfect—so don’t hesitate to try this method ahead of your big celebration to refine your skills and enjoy a truly spectacular meal.
For additional insights and detailed safety guidelines, consult outdoor cooking resources such as the National Fire Protection Association (NFPA) or outdoor cooking expert blogs. Love With Recipes is dedicated to bringing you high-quality, tested recipes and culinary innovations—happy cooking and happy holidays!