
Introduction
The allure of perfectly cooked pork baby back ribs is undeniable. Their tender, fall-off-the-bone texture combined with smoky, savory flavors makes them a perennial favorite for gatherings, family dinners, or even a cozy weeknight treat. At Love With Recipes, we understand that cooking ribs can seem daunting, but with the right techniques, ingredients, and patience, you can achieve restaurant-quality results right in your own kitchen or backyard grill. This comprehensive guide will walk you through every facet of preparing, cooking, and serving the ultimate favorite baby back ribs—delivering a flavor experience that’s deep, satisfying, and utterly irresistible.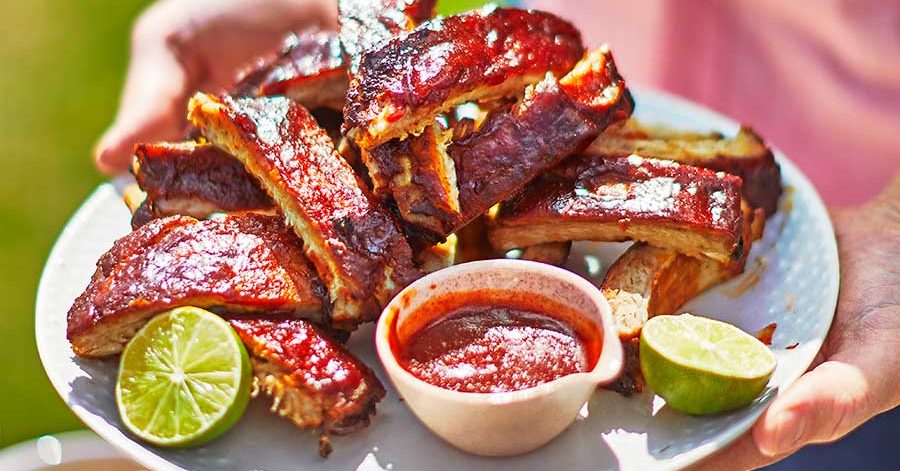
From the initial preparation to the final smoky char, this recipe has been meticulously curated to maximize flavor, tenderness, and presentation. Whether you are a seasoned pitmaster or a home cook eager to elevate your culinary repertoire, this detailed walkthrough ensures each step is clear, precise, and supported by expert tips.
Remember, the journey to perfect ribs is as rewarding as the taste itself. The aroma filling your kitchen during the slow roasting, the sizzle of the grill, and the sticky, sweet glaze all contribute to an unforgettable dining experience. So, gather your ingredients, prepare your equipment, and dive into this ultimate rib recipe—your taste buds will thank you.
Time
Preparation Time: 10 minutes
Cooking Time: 3 hours
Total Time: approximately 3 hours 10 minutes
Needed Equipment
- Deep roasting pan or large baking dish with high sides
- Heavy-duty aluminum foil (preferably heavy-gauge)
- Barbecue grill (charcoal or gas)
- Tongs or grilling spatula
- Basting brush or silicone pastry brush
- Meat thermometer (optional but recommended)
- Cutting board
- Sharp chef’s knife or boning knife
- Kitchen tongs
- Heat-resistant gloves (optional but useful)
- Serving platter or large tray
Tags
#Pork #BabyBackRibs #BBQ #Grilling #SlowCooking #MeatLovers #SummerGrill #WeeknightDinner #EasyRecipe #FamilyFavorite
Serving Size
This recipe yields approximately 2 to 3 racks of baby back ribs, serving 4-6 people generously. Adjust quantities based on your guest list or appetite size.
Difficulty Level
Intermediate — Requires some familiarity with oven roasting, grilling, and handling meat, but overall straightforward with clear instructions.
Allergen Information
| Allergen | Present | Notes |
|---|---|---|
| Soy | No | Unless barbecue sauce contains soy-based ingredients |
| Gluten | No | Unless barbecue sauce contains gluten |
| Garlic | Yes | Fresh garlic cloves used in the recipe |
| Ginger | Yes | Ginger ale contains ginger, check labels if gluten-free |
Dietary Preference
This recipe is suitable for omnivores and can be modified for specific dietary needs by choosing gluten-free barbecue sauces or reducing added salt. It is not vegetarian or vegan.
Course
Main Course — Perfect for a hearty dinner or special occasion.
Cuisine
American Barbecue, Southern, Comfort Food
Ingredients
| Quantity | Ingredient |
|---|---|
| 1-2 | Garlic cloves, peeled and smashed |
| 6 | Pork baby back ribs (about 2-3 pounds) |
| 2 cups | Ginger ale (preferably a natural, non-diet type) |
| To taste | Salt (preferably kosher or sea salt) |
| To taste | Black pepper, freshly ground |
| As desired | Barbecue sauce (store-bought or homemade)* |
*Optional: For a homemade barbecue sauce, see the Add-ons section below.
Instructions
Step 1: Initial Preparation and Oven Setup
Begin by preheating your oven to 300°F (150°C). This temperature is ideal for slowly rendering the connective tissues within the ribs, ensuring tender, juicy meat that easily pulls away from the bone. While the oven preheats, prepare your ribs by removing the thin membrane on the underside of each rack—this is essential for optimal tenderness and flavor absorption. To do this, slide a sharp paring knife or your fingers under the membrane at one end of the rack, and gently lift. Use a paper towel to grip and peel it away completely. This step might seem minor, but it significantly improves the final texture.
Step 2: Arranging the Ribs
Place the cleaned pork ribs, bone side down, in a deep roasting pan or a large baking dish. Ensure the pan has high sides to contain the juices and prevent spillage during cooking. Spread the ribs out evenly, making sure they are not overcrowded, which could hinder heat circulation and even cooking.
Step 3: Seasoning the Ribs
Generously season the ribs with salt and freshly ground black pepper. Use your hands to massage the seasoning into the meat and into the crevices between the bones. This basic seasoning forms the foundation for flavor, but feel free to add additional spices like smoked paprika, onion powder, or cayenne pepper if you desire a more complex flavor profile.
Step 4: Adding the Flavor Enhancers
Pour 2 cups of ginger ale evenly over the ribs, ensuring they are submerged or at least well-coated. The ginger ale not only imparts a subtle sweetness but also acts as a tenderizer, breaking down muscle fibers and connective tissue, resulting in fall-off-the-bone tenderness. Add the smashed garlic cloves to the pan for aromatic infusion. Cover the entire pan tightly with heavy-duty aluminum foil, sealing the edges well to trap steam and flavors during cooking.
Step 5: Slow Roasting
Place the covered pan into the preheated oven. Bake for approximately 3 hours, maintaining a consistent temperature of 300°F (150°C). During this slow cooking process, the ribs will become incredibly tender, and the flavors will meld beautifully. Do not open the foil during the first two hours to preserve moisture and heat, and only uncover near the end if you wish to add a glaze or crust.
Step 6: Resting and Cooling
After the cooking time, carefully remove the pan from the oven and allow the ribs to rest for about 10-15 minutes. Resting helps juices redistribute within the meat, ensuring each bite is moist and flavorful. During this time, you can prepare your grill for finishing touches.
Step 7: Preheating the Grill
Preheat your grill to medium-high heat (around 375-400°F or 190-200°C). Clean the grill grates with a wire brush and lightly oil them to prevent sticking. If using charcoal, arrange the coals to create a two-zone fire—one side with hot coals and the other cooler. This allows for direct and indirect cooking zones.
Step 8: Grilling the Ribs
Using tongs, transfer the ribs from the roasting pan to the grill, placing them bone side down on the hot side. Grill for 15-20 minutes, turning occasionally, until a beautiful caramelized crust forms. During this process, brush the ribs generously with barbecue sauce, applying multiple layers to build a sticky, flavorful glaze. Avoid flipping or moving the ribs too often to develop a consistent char.
Step 9: Final Touches and Serving
Once the ribs are beautifully caramelized and have a slight char, remove them from the grill. Let them rest for 5 minutes before slicing. Use a sharp knife to cut between the bones, creating individual ribs. Serve immediately on a platter with extra barbecue sauce on the side and your favorite accompaniments.
Preparation Tips
- Membrane Removal: Removing the silvery membrane on the underside of the ribs ensures better flavor penetration and tenderness.
- Seasoning: For a more flavorful crust, consider applying a dry rub 30 minutes before roasting, or marinate the ribs overnight in your favorite marinade.
- Ginger Ale Choice: Use a natural, non-diet ginger ale for the best flavor and tenderization effect. The carbonation and sugar work together to tenderize the meat and add a touch of sweetness.
- Foil Sealing: Ensure the foil is tightly sealed to trap steam, which facilitates even cooking and tenderization.
- Grill Temperature: Maintain consistent grill temperature to prevent burning or undercooking.
Nutritional Information
| Nutrient | Amount per Serving (approx.) |
|---|---|
| Calories | 550 kcal |
| Protein | 40 g |
| Fat | 35 g |
| Carbohydrates | 20 g |
| Sugar | 10 g |
| Sodium | 900 mg |
Note: Nutritional values vary depending on the specific barbecue sauce used and portion sizes.
Tips and Tricks
- Marinate for Extra Flavor: Marinate the ribs overnight with spices, herbs, or a tangy vinegar-based marinade for added depth.
- Use a Meat Thermometer: Insert a meat thermometer into the thickest part of the meat; ideal internal temperature for tender ribs is around 190-200°F (88-93°C).
- Adjust Sweetness: Modify the amount of ginger ale or barbecue sauce to suit your sweetness preference.
- Smoking Option: For a smoky flavor, add wood chips (hickory, applewood) to your grill or smoker during the finishing stage.
- Flavor Variations: Experiment with different spice rubs, such as cumin, chili powder, or brown sugar.
Add-ons
- Homemade barbecue sauce (see below)
- Coleslaw
- Grilled corn on the cob
- Crispy baked potatoes or French fries
- Pickles and sliced red onions
Side Dishes
Complement your ribs with classic sides such as creamy coleslaw, baked beans, cornbread, or roasted vegetables. For a lighter option, serve a fresh green salad with vinaigrette. These sides balance the richness of the meat and complete your meal.
Improvements
- Adjust Cooking Times: For extra tenderness, extend roasting time by 15-30 minutes, checking for desired doneness.
- Enhance Flavor: Marinate the ribs in a dry rub or marinade for 24 hours prior to cooking for an even more flavorful outcome.
- Experiment with Glazes: Try different glazes, such as honey mustard or spicy chipotle, during the final grilling stage.
- Use a Smoker: Incorporate smoking for more complex smoky flavors and aroma.
Save and Store
Leftover ribs can be stored in an airtight container in the refrigerator for up to 3 days. For longer storage, wrap tightly in plastic wrap and freeze for up to 3 months. Reheat gently in the oven at 250°F (120°C), covered with foil, to prevent drying out. Reapply barbecue sauce during reheating if desired.
FAQ
Can I prepare these ribs in advance?
Yes, you can slow-cook the ribs a day ahead, then refrigerate. Reheat on the grill or in the oven, finishing with a quick glaze of barbecue sauce for a freshly grilled appearance.
Can I use other types of ribs?
Absolutely. While this recipe is optimized for pork baby back ribs, it can be adapted for spare ribs or even beef ribs with adjustments to cooking time and seasoning.
Is it necessary to grill after oven roasting?
Grilling adds a smoky flavor and caramelized crust, but you can skip this step if you prefer oven-only ribs. Just brush with sauce and broil for a few minutes to achieve a similar effect.
Conclusion
Achieving tender, flavorful ribs is a rewarding experience that combines patience, proper technique, and quality ingredients. By slow-roasting in the oven and finishing on the grill, you develop depth of flavor, juicy meat, and a perfect crust. Whether entertaining guests or enjoying a cozy family dinner, these favorite baby back ribs promise a memorable meal. Remember, the key is to balance moisture, seasoning, and heat to unlock the full potential of this beloved dish. At Love With Recipes, we hope this detailed guide helps you master the art of rib cooking, bringing joy and satisfaction to your table with every bite.