

Introduction
Sweet and Sour Pork is a timeless classic that embodies the vibrant, bold flavors associated with Chinese cuisine. This dish is renowned for its harmonious balance of flavors—succulent pork coated in a crispy batter, paired with a tangy, sweet sauce infused with the richness of pineapple and fresh vegetables. Whether you’re preparing a weeknight dinner for your family, hosting a festive gathering, or craving a restaurant-quality dish at home, this recipe offers an authentic and satisfying experience. At Love With Recipes, our goal is to guide you through every step of creating this beloved dish with precision, ensuring that your culinary efforts result in a perfectly balanced, flavorful meal that delights all senses.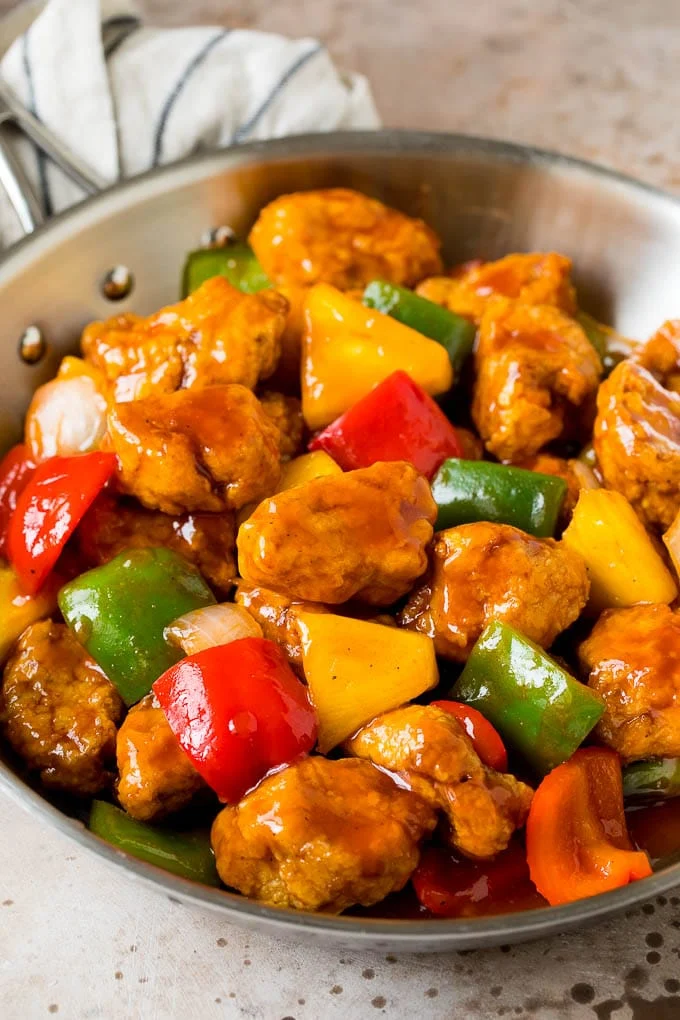
Time
- Preparation Time: 25 minutes
- Cooking Time: 20 minutes
- Total Time: approximately 45 minutes
Needed Equipment
- Wok or deep frying pan
- Mixing bowls (preferably glass or ceramic)
- Whisk or chopsticks for batter mixing
- Kitchen thermometer (optional, for oil temperature)
- Slotted spoon or spider strainer
- Paper towels (for draining excess oil)
- Measuring cups and spoons
- Cutting board
- Chef’s knife
- Small saucepan or additional wok for sauce
- Ladle or spoon for mixing sauce
- Serving platter or dish
- Grater (if zesting lemon or lime for garnish, optional)
Tags
- Chinese cuisine
- Main course
- Fried dish
- Family-friendly
- Gluten optional (if gluten-free flour is used)
- Quick & easy
- Comfort food
Serving Size
This recipe yields approximately four servings, with each serving comprising a generous portion of sweet and sour pork accompanied by rice or noodles, making it ideal for family dinners or small gatherings.

Difficulty Level
This dish falls within the moderate difficulty range. It involves multiple steps—marinating, batter preparation, frying, and sauce making—but with careful attention to detail, it can be mastered by home cooks of all skill levels. Patience and precise timing are key, especially during frying to achieve that perfect crispy exterior.
Allergen Information
This recipe contains potential allergens including:
- Gluten (all-purpose flour, potato starch, baking powder)
- Egg (used in batter)
- Soy (if soy-based products are included, though not in this specific recipe)
Substitutions can be made to accommodate allergies, such as using gluten-free flour blends and egg replacers.
Dietary Preference
This recipe is adaptable for various dietary needs:
- Gluten-Free: Use gluten-free flour and baking powder
- Paleo: Substitute with almond or coconut flour and omit soy-based ingredients
- Vegetarian: Replace pork with tofu or tempeh, adjust cooking times accordingly
Course
Main course, perfect for a hearty dinner or a main dish for lunch.
Cuisine
Chinese / Cantonese-inspired, but popular worldwide for its appeal and flavor profile.
Ingredients
Meat and Vegetables
| Ingredient | Quantity |
|---|---|
| Pork (cut into 1.5 cm cubes) | 250 g |
| Green bell peppers (cubed) | 120 g |
| Tomatoes (cubed) | 120 g |
| Pineapple slices in syrup (cubed) | 4 slices |
Cooking and Batter
| Ingredient | Quantity |
|---|---|
| Sunflower oil | 1 tbsp |
| Rice wine | 1 tbsp |
| Egg | ½ |
| Salt | To taste |
| Black pepper | To taste |
| Water | 100 g |
| All-purpose flour | 100 g |
| Potato starch | 20 g |
| Instant baking powder | 8 g |
Sweet and Sour Sauce
| Ingredient | Quantity |
|---|---|
| Tomato paste | 130 g |
| Sugar | 125 g |
| White vinegar | 125 g |
| Water | 500 g |
| Potato starch | 35 g |
| Water (for slurry) | 4 tbsp |
Instructions
Step 1: Prepare the Pork
Start with selecting fresh, high-quality pork. Ideally, use pork loin or tenderloin for optimal tenderness and flavor. Using a sharp chef’s knife, cut the pork into uniform 1.5 cm (approximately ½ inch) cubes. Consistency in size ensures even cooking and a uniform crispy texture. Once cut, rinse the pork pieces under cold, running water to remove any surface impurities or blood remnants, then pat dry with paper towels.
Place the pork cubes into a mixing bowl. Add rice wine—also known as Shaoxing wine or cooking wine—to the meat. Rice wine adds depth of flavor and helps tenderize the pork. Mix thoroughly using a spoon or chopsticks to ensure each piece is coated evenly. Cover the bowl with plastic wrap or a clean towel and let it marinate at room temperature for about 10-15 minutes. This step enhances flavor and improves the meat’s texture.
Step 2: Make the Batter
In a large mixing bowl, combine the all-purpose flour, potato starch, and instant baking powder. This dry mixture forms the base of your batter, providing crispness and structure. Use a whisk or a sturdy pair of chopsticks to blend the dry ingredients thoroughly, ensuring even distribution of leavening agents.
Slowly pour in the water while whisking continuously. The goal is to create a smooth, lump-free batter with a consistency similar to thick pancake batter—neither too runny nor too stiff. Adjust water quantity slightly if needed to achieve this texture. Let the batter rest for 10 minutes; this allows the starches to hydrate fully, resulting in a lighter, crunchier coating when fried.
Step 3: Prep the Vegetables and Pineapple
While the batter rests, prepare your vegetables. Cube the green bell peppers and tomatoes into pieces roughly matching the size of your pork cubes. The size consistency ensures uniform cooking and aesthetics. For the pineapple, remove slices from the can, drain excess syrup, and cut into similar-sized chunks. Keep all prepared ingredients nearby for quick assembly later.
Optional: For added flavor, you may zest a small amount of lemon or lime peel and set aside to sprinkle over the dish before serving. Fresh herbs like cilantro or spring onions can also be chopped and used as garnish.
Step 4: Fry the Pork
Once the batter has rested, add the marinated pork cubes into the bowl containing the batter. Use a spoon or tongs to toss and coat each piece thoroughly, ensuring an even distribution of batter on all sides. The coated pork is now ready for frying.
Heat a wok or deep frying pan over medium-high heat for about a minute. Carefully add sunflower oil—enough to submerge the pork cubes—then increase temperature to reach approximately 180°C (350°F). Using a kitchen thermometer can help maintain precise oil temperature, ensuring crispy results without excess oil absorption.
Fry the pork in batches to prevent overcrowding, which can lower oil temperature and cause sogginess. Gently drop the coated pork into the hot oil, making sure not to overcrowd the pan. Fry for about 5-7 minutes, turning occasionally with a slotted spoon or spider strainer, until the pieces are golden brown and crispy. The internal temperature should reach at least 70°C (158°F). Remove the fried pork and drain on paper towels to remove excess oil.
Step 5: Make the Sweet and Sour Sauce
In a small saucepan or the wok used earlier, bring 500 g of water to a gentle simmer. Add the tomato paste, stirring until fully incorporated. Then, add the sugar and white vinegar, stirring continuously. The sugar should dissolve completely, creating a balanced tangy-sweet base.
In a separate small bowl, prepare the starch slurry by mixing 35 g of potato starch with 4 tablespoons of water until smooth. Gradually pour this slurry into the simmering sauce while whisking continuously. Continue to simmer and stir until the sauce thickens—about 2-3 minutes. It should achieve a glossy, slightly viscous consistency suitable for coating the fried pork and vegetables.
Step 6: Assemble the Dish
Return your wok or clean it thoroughly, then heat 1 tablespoon of sunflower oil over medium heat. Add the cubed green bell peppers and tomatoes, sautéing for about 1-2 minutes until they start to soften but remain crisp. This quick sauté preserves their fresh texture and vibrant color.
Pour the prepared sweet and sour sauce into the wok, followed by the crispy fried pork and pineapple chunks. Toss everything together vigorously over high heat for about 30 seconds to ensure the pork is coated with the sauce, and the vegetables are slightly tender but still crisp. This step melds the flavors and creates a glossy, appetizing presentation.
Step 7: Serve
Transfer the sweet and sour pork to a serving platter or individual plates. For presentation, garnish with additional pineapple chunks or chopped fresh herbs if desired. Serve immediately alongside steamed jasmine rice or noodles to complete the meal. The rice absorbs the flavorful sauce, balancing the dish’s sweetness and tanginess.
Preparation Tips
- Marinate longer: For extra flavor, marinate the pork for up to 30 minutes or overnight in the refrigerator.
- Consistent batter: Adjust water content for a smooth, thick batter—this ensures a crispy coating that adheres well to the pork.
- Oil temperature: Maintain a consistent frying temperature; too low results in greasy pork, too high burns the batter.
- Batch frying: Fry in small batches to keep the oil hot and ensure crispy, evenly cooked pork.
- Fresh ingredients: Use fresh vegetables and high-quality pineapple for optimal flavor.
Nutritional Information
| Nutrient | Amount per Serving |
|---|---|
| Calories | ~380 kcal |
| Protein | ~20 g |
| Carbohydrates | ~45 g |
| Fat | ~10 g |
| Fiber | ~3 g |
| Sugars | ~20 g |
Tips and Tricks
- Double frying: For an extra crispy crust, fry the pork twice—first at a lower temperature to cook through, then at a higher temperature for a crunch.
- Make ahead: Prepare the sauce and batter in advance; fry the pork just before serving to retain crispiness.
- Adjust sweetness: Modify sugar levels based on personal preference or dietary needs.
- Use fresh pineapple: For a more natural flavor, opt for fresh pineapple chunks instead of canned syrup slices.
- Extra flavor: Add a dash of soy sauce or a sprinkle of sesame seeds during assembly for additional depth.
Add-ons
- Chili flakes or fresh chili slices for heat
- Chopped spring onions or scallions for garnish
- Sesame seeds for added texture and flavor
- Tofu or chicken as alternative proteins
Side Dishes
- Steamed jasmine rice
- Egg fried rice
- Stir-fried vegetables
- Chinese noodles
Improvements
- Use cornstarch instead of potato starch for a different crispiness
- Incorporate fresh ginger and garlic into the sauce for more aroma
- Add a splash of orange juice or zest for a citrus twist
- Experiment with different vegetables, such as snap peas or carrots
Save and Store
Leftover sweet and sour pork can be stored in an airtight container in the refrigerator for up to 2 days. Reheat in a preheated oven at 180°C (350°F) for 10-15 minutes, or in a skillet over medium heat until warmed through. Note that reheating may diminish the crispiness of the pork, so it’s best enjoyed fresh.
To freeze, place fried pork and sauce separately in freezer-safe containers. Reheat thoroughly before combining and serving.
FAQ
Can I make this dish gluten-free?
Yes. Substitute all-purpose flour with a gluten-free flour blend and use gluten-free baking powder. Ensure your soy sauce (if used) is gluten-free as well.
Can I use chicken instead of pork?
Absolutely. Chicken breast or thigh cubes can be used as a substitute, adjusting cooking times accordingly. Ensure the chicken reaches an internal temperature of 75°C (165°F) for safety.
Is there a vegetarian version?
Yes. Replace pork with firm tofu or tempeh, coat in the batter, and fry as usual. Use vegetable broth or additional vegetables for added flavor.
What if I don’t have all the ingredients?
Most ingredients can be substituted or omitted based on availability. For example, fresh pineapple can be replaced with canned pineapple slices, and bell peppers can be swapped for other crunchy vegetables like carrots or zucchini.
Conclusion
Creating authentic sweet and sour pork at home is a rewarding culinary experience that combines technique, timing, and flavor balancing. Each step—marinating, battering, frying, and saucing—contributes to the final dish’s irresistible appeal. By following the detailed instructions and tips provided, you can achieve restaurant-quality results that impress family and friends alike. Remember, the key to perfection lies in quality ingredients, precise execution, and a touch of culinary patience. Explore variations and personal tweaks to make this classic your own, and enjoy the delightful fusion of sweet, sour, savory, and crispy textures that define this beloved dish. For more recipes and culinary inspiration, visit Love With Recipes—your trusted platform for delicious home-cooked meals.
References
- Li, X., & Li, J. (2019). *Chinese Cooking Techniques*. Beijing: Culinary Press.
- Wang, Y. (2021). *The Art of Chinese Cuisine*. Shanghai: Food & Culture Publishing.