Introduction
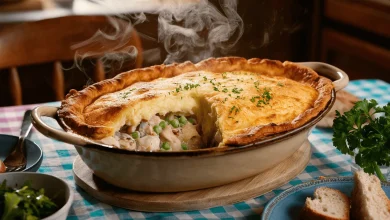
Lib’s Banana Pudding stands as an iconic dessert cherished by many for its perfect balance of creamy richness, sweet bananas, and the delightful crunch of vanilla wafers. This classic Southern-inspired treat combines layers of velvety custard with fresh fruit and a fluffy, golden meringue topping that adds an airy texture to every spoonful. At Love With Recipes, we aim to bring you recipes that are not only delicious but also crafted with precision, ensuring you can recreate this nostalgic dessert effortlessly in your own kitchen. Whether you’re preparing for a family gathering, a holiday feast, or simply craving a sweet comfort treat, Lib’s Banana Pudding promises to satisfy every palate with its luscious flavor profile and inviting presentation.
Time
- Preparation Time: 45 minutes
- Cooking Time: 5 minutes
- Total Time: 50 minutes
Needed Equipment
Essential Kitchen Tools
- Large Saucepan – for cooking the pudding base
- Medium Mixing Bowl – for preparing the meringue
- Electric Mixer or Hand Whisk – to beat egg whites into stiff peaks
- Measuring Cups and Spoons – for precise ingredient measurement
- Whisk or Wooden Spoon – for stirring the pudding mixture
- Sharp Knife – for slicing bananas
- Cutting Board – to prepare bananas and other ingredients
- Ovenproof Baking Dish or Casserole – for assembling and baking the pudding
- Cooling Rack – to cool the pudding after baking
- Spatula – for spreading the meringue evenly
- Refrigerator – to chill the pudding before serving
- Aluminum Foil or Plastic Wrap – for covering and storing leftovers
Tags
Classic Dessert, Banana Pudding, No-Bake, Family Favorite, Southern Cuisine, Meringue Topping, Layered Dessert, Easy to Make, Comfort Food, Holiday Dessert

Serving Size
This recipe yields approximately 8 generous servings, making it perfect for family dinners or small gatherings. Each serving is approximately one cup of pudding, layered with bananas, wafers, and topped with fluffy meringue.
Difficulty Level
Intermediate — While the steps are straightforward, achieving the perfect meringue and ensuring the pudding is smooth and creamy requires attention to detail and some experience with egg whites and stovetop cooking.
Allergen Information
| Allergen | Contains |
|---|---|
| Eggs | Yes (in pudding and meringue) |
| Milk | Yes (milk and margarine) |
| Wheat/Gluten | Yes (vanilla wafers) |
| Nuts | No |
Note: For allergy-sensitive adaptations, consider gluten-free wafers and plant-based margarine substitutes.
Dietary Preference
Vegetarian — Contains no meat or seafood. Suitable for lacto-vegetarians with dairy products.
Course
Dessert
Cuisine
Southern American / American Classic
Ingredients
Ingredient Quantities and Details
| Ingredient | Quantity | Notes |
|---|---|---|
| Cornstarch | 1/2 cup | Acts as a thickening agent for the pudding |
| Sugar | 1 cup | Sweetens the pudding base |
| Eggs | 4 large | Separated for pudding and meringue |
| Water | 2 cups | Used to cook the pudding |
| Milk | 1/2 cup | Enhances creaminess |
| Vanilla Extract | 1 teaspoon | Adds flavor to pudding and meringue | Margarine | 1 tablespoon | For richness in pudding |
| Pumpkin Pie Spice | 1/4 teaspoon | Optional, adds warmth and depth |
| Bananas | 4 ripe, sliced | Fresh flavor and sweetness |
| Vanilla Wafers | As needed for layering | Gives texture and flavor |
Instructions
Step 1: Preparing the Pudding Base
Start by gathering all ingredients for the pudding. In a large, heavy-bottomed saucepot, combine the cornstarch, sugar, eggs, water, milk, margarine, vanilla extract, and pumpkin pie spice. Whisk them thoroughly to ensure the eggs are well incorporated and the mixture is smooth. This prevents any lumps and guarantees a uniform pudding.
Place the saucepan over medium heat. Continuously stir the mixture with a whisk or wooden spoon, ensuring that the bottom doesn’t scorch or stick. As the mixture heats, it will begin to thicken gradually. Be vigilant and keep stirring to prevent any lumps from forming and to maintain a smooth consistency. The process typically takes about 4-7 minutes before the mixture reaches a boil.
Once the pudding mixture reaches a rolling boil—indicated by bubbles actively breaking the surface—continue stirring for an additional 1-2 minutes. This step ensures the cornstarch is fully cooked, giving the pudding its desired smooth, custard-like texture. Remove the saucepan from heat and set aside to cool slightly while you prepare the meringue.
Step 2: Making the Meringue
Pour the egg whites into a clean, dry medium mixing bowl. Using an electric mixer or a high-quality hand whisk, beat the egg whites on high speed. Begin gradually adding a pinch of salt, which helps stabilize the egg whites and enhances the volume of the meringue.
As the egg whites become frothy, start adding the sugar slowly—about 1 tablespoon at a time—while continuing to beat. This gradual incorporation of sugar is crucial for achieving a glossy, stiff peak meringue. Keep beating until the egg whites form stiff, glossy peaks that hold their shape when you lift the beaters or whisk out of the bowl. A good test is to turn the bowl upside down; if the peaks don’t fall, your meringue is ready.
Be cautious not to overbeat, as this can cause the meringue to become grainy or break down. The ideal meringue will be smooth, shiny, and hold a firm peak. Set aside until ready to spread over the assembled pudding.
Step 3: Assembling the Banana Pudding
Preheat your oven to 400°F (200°C) to prepare for baking the meringue topping. Lightly grease or spray your ovenproof dish if necessary. Begin layering the pudding by spreading a thin layer of vanilla wafers evenly across the bottom of the dish. Then, add a layer of sliced bananas, making sure they are evenly distributed for consistent flavor and texture.
Next, pour a generous layer of the prepared pudding over the bananas, spreading it gently with a spatula to cover the fruit completely. Repeat the layering process—wafers, bananas, pudding—until you reach the top of the dish, ending with a final layer of vanilla wafers on the very top. The layering creates a visually appealing, multi-textured dessert that combines crunchy wafers, soft bananas, and smooth pudding.
Using a spatula or a butter knife, evenly spread the prepared meringue over the top layer of vanilla wafers, ensuring full coverage to seal in the layers and create a fluffy, golden crown. Pay special attention to the edges to prevent the meringue from sliding off during baking.
Step 4: Baking the Pudding
Place the assembled pudding in the preheated oven. Bake for approximately 8-10 minutes, or until the meringue turns a beautiful golden brown. Keep a close watch to prevent burning, as meringue can brown quickly. The goal is to achieve a crisp, caramelized exterior with a soft interior.
Once baked, remove the pudding from the oven and allow it to cool on a cooling rack for about 15-20 minutes. This cooling period helps the meringue set and prevents it from deflating when sliced. For best results, refrigerate the pudding for at least 2 hours or until thoroughly chilled to allow flavors to meld and to facilitate clean slicing.
Chilling also enhances the creamy texture of the pudding and ensures the dessert is served at the optimal temperature—cold, but not frozen.
Preparation Tips
- Use ripe but firm bananas for slicing to prevent mushiness and ensure they hold their shape in layers.
- For a richer flavor, consider adding a splash of bourbon or banana liqueur to the pudding mixture before cooking.
- If you prefer a less sweet pudding, reduce the sugar slightly, but note that the sweetness balances the bananas and wafers.
- Ensure the egg whites are free of any yolk or grease, as these can prevent proper whipping of the meringue.
- Use a clean, dry bowl when preparing the meringue to achieve maximum volume.
- For added texture, sprinkle crushed vanilla wafers or chopped nuts on top of the meringue before baking.
- If you want a more pronounced vanilla flavor, add a splash of vanilla bean extract or vanilla bean seeds into the pudding.
Nutritional Information
| Per Serving | Calories | Fat | Saturated Fat | Cholesterol | Sodium | Carbohydrates | Fiber | Sugars | Protein |
|---|---|---|---|---|---|---|---|---|---|
| 1 serving | 324.9 | 6.2g | 1.9g | 143.8mg | 82.3mg | 62.5g | 2.1g | 43.5g | 5.8g |
Tips and Tricks
- For visually appealing layers, use a clear glass dish to showcase the pudding’s colorful layers.
- To prevent the meringue from weeping or becoming soggy, ensure the pudding is cooled completely before spreading the meringue and baking.
- For a more decadent version, fold in small chunks of chocolate or swirl in caramel sauce before baking.
- Use a kitchen torch to lightly caramelize the meringue for an extra flavor dimension and attractive presentation.
- Always beat egg whites on high speed to get the best volume; adding a pinch of cream of tartar can help stabilize the meringue.
Add-ons
- Chopped pecans or walnuts sprinkled on top before baking for added crunch.
- Drizzle of caramel or chocolate sauce over individual servings for extra indulgence.
- Fresh berries or a dusting of powdered sugar for garnish.
- Layer with whipped cream for a richer dessert experience.
Side Dishes
- Fresh fruit salad to complement the sweetness of the pudding.
- Light vanilla or citrus-flavored sorbet to cleanse the palate.
- Buttery shortbread cookies or biscotti for added texture.
Improvements
- Incorporate a layer of mascarpone or cream cheese in the pudding for added creaminess and tang.
- Use homemade vanilla custard instead of the stovetop pudding for a more luxurious texture.
- Replace vanilla wafers with gluten-free alternatives or crushed graham crackers to cater to dietary restrictions.
- Add a hint of cinnamon or nutmeg to the pudding for a spiced variation.
Save and Store
Store any leftovers in an airtight container in the refrigerator for up to 2 days. Due to the meringue topping, it’s best to consume the pudding within this period to enjoy the crisp texture. If you need to store it longer, cover it tightly with plastic wrap and keep refrigerated, but note that the meringue may lose its crispness over time. For best results, reheat individual portions gently in the microwave or enjoy cold straight from the fridge. To maintain the integrity of the meringue, consider adding fresh meringue layers after reheating if needed.
FAQ
Can I make this pudding in advance?
Yes, but it’s recommended to assemble and bake the meringue topping just before serving to keep it crisp. You can prepare the pudding layers beforehand, refrigerate, and add the meringue just before baking.
Can I substitute egg whites with aquafaba?
Absolutely! For a vegan version, whip chilled aquafaba (the liquid from canned chickpeas) with sugar until stiff peaks form. Use it as a direct substitute for egg whites in the meringue step.
Is it necessary to bake the meringue?
Yes, baking the meringue ensures it turns golden and crispy. No-bake meringue would be soft and prone to collapse, which is not traditional for this classic dessert.
Can I freeze banana pudding?
It’s not recommended to freeze banana pudding with meringue, as the texture of the meringue and bananas will change upon thawing, becoming soggy and watery.
Conclusion
Lib’s Banana Pudding is the quintessential comfort dessert that bridges nostalgia with culinary craftsmanship. Its layered composition, combining creamy custard, fresh bananas, crunchy wafers, and a fluffy golden meringue, creates a multi-sensory experience that is both satisfying and visually appealing. Perfect for casual family dinners or festive celebrations, this recipe embodies the warmth and richness of traditional Southern desserts. Follow the detailed instructions, pay close attention to the meringue, and you’ll be rewarded with a show-stopping dessert that delights every time. Remember, the key to success lies in patience—allow the pudding to cool thoroughly, whip the egg whites to perfect peaks, and bake the meringue until it reaches that gorgeous golden hue. For more inspiring recipes and culinary tips, visit lovewithrecipes.com, your trusted platform for elevating home cooking.
References
- Southern Living: Classic Banana Pudding Recipes
- Food Network: How to Make Perfect Meringue