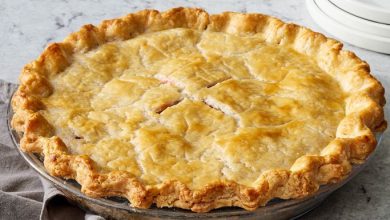
Golden Flakes: The Ultimate Flaky Lard Pie Crust Recipe 🥧
Miracle Flaky Lard Pie Crust 🥧
Description: For years, I wondered why people raved about lard pastry. Mine was either falling-apart-tender or flaky and tough. But I’m glad to have persevered because a lard crust made well has no equal. It is more tender, more flaky, and more crisp than any other and doesn’t shrink even if baked only an hour after mixing. It also browns less fast than a butter crust, making it convenient for pies that require longer baking. Lard crust is ideal for savory pastries. You can use half butter, but it is not quite as light, though very close, and for savory food, I prefer the flavor of all lard. Pastry flour produces the most tender crust. I like to roll out the dough on whole wheat flour for extra texture and flavor, which is compatible with the lard flavor. The success of this crust depends on the quality and temperature of the lard. Adapted from Rose Levy Beranbaum’s The Pie & Pastry Bible.
- Cook Time: 1 hour 15 minutes (freezer/refrigeration time)
- Prep Time: 30 minutes
- Total Time: 1 hour 45 minutes
- Recipe Category: Dessert
- Keywords: Weeknight, < 4 Hours
- Yield: 1 9-inch pie shell
Ingredients:
| Quantity | Ingredient |
|---|---|
| 1 1/3 | cups all-purpose flour |
| 1/2 | teaspoon salt |
| 1/8 | teaspoon baking powder |
| 1/2 | tablespoon cider vinegar |
| 1/4 | cup whole wheat pastry flour |
| 4 | ounces lard |
| 2 | tablespoons wheat flour |
Nutritional Information (per serving):
- Calories: 1640.9
- Fat Content: 104.3g
- Saturated Fat Content: 40.5g
- Cholesterol Content: 97.4mg
- Sodium Content: 1214.7mg
- Carbohydrate Content: 153.7g
- Fiber Content: 4.9g
- Sugar Content: 0.7g
- Protein Content: 17g
Instructions:
- Place a medium mixing bowl in the freezer to chill.
- Place the flour, salt, and baking powder in a reclosable gallon-size freezer bag, and whisk them together.
- Using a melon baller, scoop 1/2-1 inch balls of the lard directly into the flour, shaking the bag occasionally to distribute and cover them with the flour.
- If the room is warm and the lard starts getting very soft, place the bag in the freezer for about 10 minutes before proceeding.
- If it is still firm but squishable once it’s all been added, using a rolling pin, roll together the lard and flour until the lard is in thin flakes.
- Place the bag in the freezer for at least 30 minutes.
- Empty the flour mixture into the cold bowl, scraping the sides of the bag to release all of it. Set the bag aside.
- Sprinkle on the ice water and vinegar, tossing gently with a rubber spatula to incorporate it evenly.
- Spoon the mixture back into the plastic bag (if using caul fat, which is softer, the dough will already hold together, so it’s easier to empty it out onto a piece of plastic wrap and knead it lightly from the outside of the wrap).
- Holding both ends of the bag opening with your fingers, knead the mixture by alternately pressing it, from the outside of the bag, with the knuckles and heels of your hands until the mixture holds together in one piece and feels slightly stretchy when pulled.
- Sprinkle the dough on both sides with a little whole wheat flour, wrap it with plastic wrap, flatten into a disc, and refrigerate for at least 45 minutes, preferably overnight.
- STORAGE: Refrigerated up to 3 days; frozen, up to 3 months.
- NOTE: When rolling the dough, roll it directly on the counter or on plastic wrap. Sprinkle both sides of the dough and the counter or plastic wrap amply with whole wheat flour as needed to keep it from sticking. (The whole wheat flour will not toughen it and will give it extra crunch and a lovely, wheaty flavor.)
- POINTERS FOR SUCCESS: Pay particular attention to temperature, keeping the lard well-chilled. When mixing the lard flakes/flour mixture with the liquid, stir gently so as to maintain large flakes of lard.


