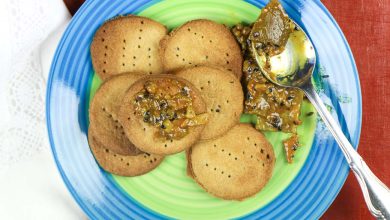
Osmania Biscuits Recipe
Osmania biscuits are a beloved delicacy often associated with the vibrant culture of Hyderabad, Telangana. Named after the last ruler of Hyderabad, Mir Osman Ali Khan, these biscuits are an integral part of the city’s heritage. Served at Irani cafés with a steaming cup of Irani chai, they offer a delightful balance of sweetness and saltiness that distinguishes them from other biscuits. These biscuits are typically enjoyed during tea time, and their crisp, buttery texture makes them an irresistible treat. The good news is, you can now recreate this iconic snack at home with a simple recipe that delivers the same irresistible taste. Serve them alongside Irani Chai and Karachi Biscuits for an authentic experience that will transport you straight to the bustling streets of Hyderabad.
Cuisine: Andhra
Course: Snack
Diet: Vegetarian
Ingredients for Osmania Biscuits
| Ingredient | Quantity |
|---|---|
| Unsalted Butter | 200 grams |
| Vivatta Maida (All-purpose flour) | 260 grams |
| Milk Powder | 3 tablespoons |
| Soy Flour (toasted, optional) | 1 tablespoon |
| Salt | 1 teaspoon |
| Sugar | 100 grams |
| Baking Powder | 2 teaspoons |
| Milk (for brushing before baking) | As needed |
Preparation Time: 20 minutes
Cooking Time: 25 minutes
Total Time: 45 minutes
Yield: Approx. 20-25 biscuits
Instructions for Making Osmania Biscuits
Step 1: Prepare the Baking Sheets
To begin with, line two baking sheets with parchment paper and set them aside. This ensures that the biscuits do not stick to the tray during baking.
Step 2: Sift the Dry Ingredients
In a large bowl, sift together the all-purpose flour (Vivatta Maida), baking powder, and salt. This will ensure an even distribution of the ingredients and will give the biscuits a light and airy texture.
Step 3: Cream the Butter
Using a silicone or rubber spatula, cream the unsalted butter until softened. The butter should be pliable and smooth, without being melted.
Step 4: Combine the Dry Ingredients with the Butter
Gradually add the sifted flour mixture to the creamed butter. It is important to add the flour a little at a time to prevent lumps from forming. Using your fingers can help, but avoid using the heel of your palm, as it can warm the butter and disturb the texture of the dough.
Step 5: Knead the Dough
Once all the flour has been incorporated, knead or massage the mixture gently to incorporate air into the dough. This step is crucial as it helps create the light and flaky texture of the biscuits. The dough should become pale and soft after a couple of minutes of kneading.
Step 6: Add the Final Ingredients
Now, add the milk powder, soy flour, and powdered sugar to the dough. Continue kneading the dough for another couple of minutes until the ingredients are well combined.
Step 7: Chill the Dough (Optional)
If the dough is too sticky to handle, refrigerate it for a few minutes to firm it up. This will make it easier to roll out the dough.
Step 8: Roll Out the Dough
Once the dough is ready, divide it into two equal portions. Lightly dust your work surface with flour and roll out one portion of dough to a thickness of approximately ¼ inch. Use a round cookie cutter (about 3 inches in diameter) to cut out biscuits. Place the biscuits onto the prepared baking sheets, ensuring that they are spaced evenly apart.
Step 9: Brush with Milk
Using a soft brush, lightly brush the tops of the biscuits with milk. This gives them a beautiful golden finish when baked.
Step 10: Refrigerate Before Baking
Place the baking sheets with the biscuits into the refrigerator while you preheat your oven. This helps the biscuits maintain their shape during baking.
Step 11: Preheat the Oven
Preheat your oven to 200°C (392°F). Ensure that the oven is fully heated before placing the biscuits inside.
Step 12: Bake the Biscuits
Bake the biscuits for 20-25 minutes, or until they turn a golden brown color. Keep an eye on them to prevent overbaking. The biscuits should have a crisp exterior and a soft interior.
Step 13: Cool the Biscuits
Once baked, remove the biscuits from the oven and transfer them to a wire rack to cool completely. This will ensure they stay crisp.
Step 14: Store and Serve
Once cooled, store the Osmania biscuits in an airtight container. They will stay fresh for up to two weeks, depending on weather conditions. These biscuits are best enjoyed with a hot cup of Irani Chai.
Serving Suggestions
Osmania biscuits are traditionally enjoyed with Irani chai, the famous tea served in Hyderabadi cafés. The biscuits’ slight sweetness and saltiness perfectly complement the rich, spiced chai, making it an ideal snack for evening tea time. You can also serve them alongside Karachi Biscuits for a varied treat. Whether you’re enjoying them alone or with friends, Osmania biscuits will always remind you of the charming Irani cafés of Hyderabad.