
Introduction
Welcome to Love With Recipes, where culinary delights are crafted to bring joy, comfort, and a touch of sophistication to your table. Today, we delve into the art of creating an irresistible confection known as Chocolate Coconut Peaks. This recipe is a celebration of textures and flavors, combining the tropical sweetness of coconut with the rich decadence of chocolate, all housed in a charming peak-shaped form. Perfect for festive occasions, holiday gatherings, or an everyday indulgence, these peaks are simple yet elegant, requiring minimal ingredients and effort but delivering maximum flavor.
The beauty of Chocolate Coconut Peaks lies in their versatility. They can be enjoyed as a standalone treat or dressed up further with additional toppings or coatings. Originally inspired by a nostalgic MilNot can recipe, this version elevates the concept with homemade touches and a more refined presentation. Whether you’re a seasoned baker or a beginner looking to impress, this recipe offers a delightful journey into confectionery craftsmanship. As always, remember that the key to perfect peaks is patience and attention to detail, ensuring each piece is a miniature masterpiece of taste and texture.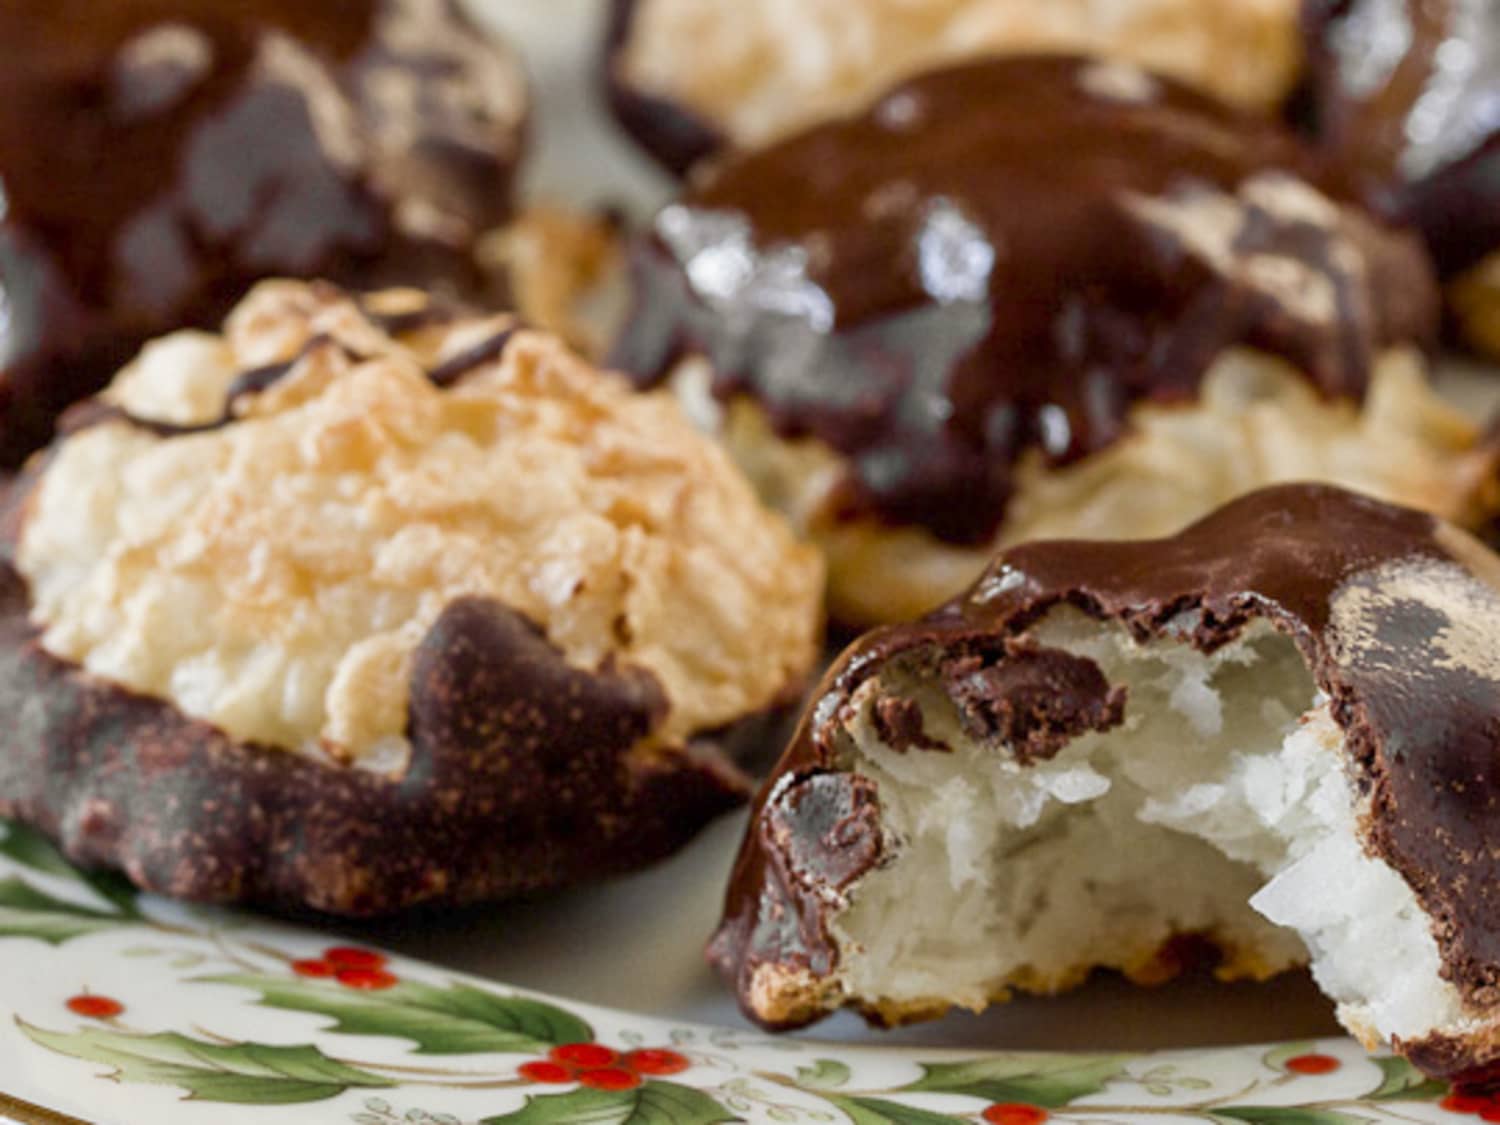
Estimated Time
The total active preparation time for Chocolate Coconut Peaks is approximately 30 minutes. This includes melting, mixing, shaping, and coating. It’s important to note that the overall process extends beyond this, as chilling times are essential for setting the peaks and the chocolate coating. Expect an additional 1-2 hours of refrigeration to achieve the best results. While the active work is quick, the waiting ensures that each peak holds its shape and the chocolate sets properly, resulting in a professional-looking, delicious treat.
Needed Equipment
- Heavy-bottomed 1½-quart saucepan
- Wooden spoon or heat-resistant spatula
- Measuring cups and spoons (¼ cup, ¾ cup, teaspoon)
- Mixing bowls (preferably glass or stainless steel)
- Wax paper or parchment paper
- Baking sheet or tray for shaping peaks
- Microwave-safe bowl or double boiler for melting chocolate
- Small teaspoon or cookie scoop for shaping
- Cooling rack (optional but recommended)
- Refrigerator for chilling
- Silicone spatula or rubber scraper
- Fine mesh strainer or sifter (for confectioners’ sugar)
- Small fork or dipping tool for coating peaks in chocolate
Tags
Christmas, Holiday, Candy, Coconut, Chocolate, Easy Recipes, No-Bake, Festive Treats, Dessert, Party Food, Homemade Candies, Quick & Simple
Serving Size
Each serving consists of one Coconut Peak, approximately 36 peaks in total, making it ideal for sharing or enjoying as a personal indulgence. This recipe yields enough to serve a small gathering or to keep on hand for several days of sweet enjoyment.
Difficulty Level
Intermediate. While the steps are straightforward, achieving the perfect peaks requires careful handling of the mixture and patience during the chilling process. Basic familiarity with melting chocolate and working with confectionery ingredients will be beneficial.
Allergen Information
| Allergen | Present in Recipe | Notes |
|---|---|---|
| Milk | Yes | Butter, evaporated milk, chocolate chips contain dairy |
| Tree Nuts | No | Contains coconut, which is a seed, not a nut |
| Gluten | No | Ingredients are gluten-free |
| Soy | Possible | Check chocolate chips for soy lecithin if soy allergy is a concern |
Dietary Preference
Vegetarian. This recipe contains no animal-derived ingredients other than dairy, making it suitable for lacto-vegetarians. It can be made vegan by substituting dairy components with plant-based alternatives.
Course
Sweet Treat / Dessert / Candy
Cuisine
American / Festive Confectionery
Ingredients
| Quantity | Ingredient |
|---|---|
| ¼ cup | Butter (unsalted preferred) |
| 2 cups | Confectioners’ sugar (powdered sugar) |
| ¼ cup | Evaporated milk |
| ½ teaspoon | Pure vanilla extract |
| 7 ounces | Flaked coconut (unsweetened or sweetened based on preference) |
| ¾ cup | Semi-sweet chocolate chips |
Step-by-Step Instructions
1. Melting the Butter
Begin by placing the butter in a heavy-bottomed saucepan. Turn the heat to low and allow the butter to melt slowly. It’s crucial to do this gently to prevent burning or browning the butter prematurely, which could alter the flavor profile of your Peaks. Stir occasionally with a wooden spoon or spatula to promote even melting.
2. Achieving a Golden Hue
Once the butter is fully melted, increase the heat slightly to medium-low. Continue cooking, stirring gently, until the butter develops a deep golden color and a nutty aroma. This step, known as browning butter, adds a rich depth of flavor to your coconut peaks. Be vigilant, as the butter can quickly go from golden to burnt. Remove from heat promptly once the desired color and aroma are achieved.
3. Incorporating Dry Ingredients
Carefully take the saucepan off the heat. Using a silicone spatula or wooden spoon, gradually add the confectioners’ sugar, evaporated milk, and vanilla extract. Mix thoroughly to combine all ingredients into a smooth, cohesive mixture. The mixture will be thick but pliable, with a glossy appearance. This step is essential for developing the base of your peaks.
4. Adding the Coconut
Fold in the flaked coconut, ensuring it is evenly distributed throughout the mixture. The coconut adds texture and flavor, transforming the mixture into a tropical-inspired confection. For a more intense coconut flavor, consider toasting the coconut lightly before adding it to the mixture, but ensure it cools sufficiently to prevent melting the other ingredients.
5. Shaping the Peaks
Using a small teaspoon or cookie scoop, dollop spoonfuls of the mixture onto sheets of wax paper or parchment paper. Shape each dollop into a small cone or peak, pressing gently to form a distinct point at the top. The peaks should be uniform in size for aesthetic appeal. For best results, work quickly before the mixture begins to set or become sticky.
6. Cooling and Setting
Place the shaped peaks in the refrigerator to chill for approximately 30 minutes to 1 hour. This cooling period allows the peaks to firm up, making them easier to handle for the next steps. If you prefer a softer bite, reduce the chilling time slightly; for a firmer peak, extend the refrigeration.
7. Melting the Chocolate
While the peaks are cooling, melt the semi-sweet chocolate chips. You can do this in a microwave-safe bowl by heating in 20-second intervals, stirring between each, until smooth and fully melted. Alternatively, use a double boiler: place the chocolate in a heatproof bowl over simmering water, stirring constantly until melted. Be cautious to avoid water contact with the chocolate, which can cause it to seize.
8. Coating the Peaks
Once the coconut peaks are firm, dip the bottoms into the melted chocolate, ensuring they are well-coated. Use a small fork or dipping tool for precision. Place the coated peaks back on the wax paper. For an extra touch, you can twirl the tops of the peaks in the remaining chocolate or drizzle additional chocolate over the peaks for decorative effect.
9. Final Chill and Setting
Transfer the tray to the refrigerator and chill for an additional 30 minutes or until the chocolate is fully set and firm. If ambient conditions are warm, this step is vital to maintain the shape and texture of your Peaks. For longer storage, keep the peaks in an airtight container in the refrigerator, which helps preserve their appearance and freshness.
Preparation Tips
- Use high-quality semi-sweet chocolate for a balanced sweetness and smooth melt.
- Toasting the coconut before mixing enhances flavor depth and adds a slightly caramelized note.
- Work swiftly when shaping the peaks to prevent the mixture from becoming too sticky or hardening prematurely.
- If the mixture is too soft to shape, refrigerate it for 10-15 minutes before proceeding.
- For a vegan version, substitute butter with coconut oil and use dairy-free chocolate chips.
Nutritional Information
| Nutritional Component | Amount per Serving (1 Peak) |
|---|---|
| Calories | 79.7 kcal |
| Total Fat | 4.6 g |
| Saturated Fat | 3.4 g |
| Cholesterol | 3.9 mg |
| Sodium | 25.8 mg |
| Total Carbohydrates | 10.3 g |
| Dietary Fiber | 0.7 g |
| Sugars | 8.9 g |
| Protein | 0.7 g |
Tips and Tricks
- Chill the mixture before shaping if it feels too sticky or soft for precise forming.
- Use a silicone spatula for mixing, as it resists sticking and makes folding ingredients easier.
- To achieve a shiny chocolate coating, temper the chocolate or add a tiny amount of paraffin wax during melting.
- For variation, sprinkle finely chopped nuts or edible glitter on the peaks before the chocolate sets.
- Store leftovers in an airtight container in the refrigerator to maintain freshness and prevent melting.
Add-ons and Variations
- Drizzle with white chocolate for a contrasting flavor and appearance.
- Add a dash of peppermint extract to the coconut mixture for a holiday twist.
- Incorporate chopped dried fruits like cranberries or apricots for added texture and flavor.
- Use dark chocolate instead of semi-sweet for a more intense cocoa flavor.
- Top peaks with a small edible pearl or gold leaf for a luxurious presentation.
Side Dishes
While Chocolate Coconut Peaks are standalone confections, they pair beautifully with:
- Fresh berries (strawberries, raspberries)
- Vanilla or coconut-flavored ice cream
- Light fruit salads with citrus dressing
- Hot beverages like coffee, espresso, or hot cocoa
Improvements and Variations
Experimentation can elevate this simple recipe into a gourmet treat:
- Adding a hint of spice: Incorporate a pinch of cinnamon or nutmeg into the coconut mixture for a warm, aromatic touch.
- Alternative coatings: Instead of chocolate, dip peaks in white chocolate or caramel for diverse flavor profiles.
- Decorative touches: Use piping bags to create intricate patterns or peaks with remaining chocolate or icing.
- Texture enhancement: Mix in crushed cookies or pretzels for crunch.
Save and Store
Proper storage ensures your Chocolate Coconut Peaks remain fresh and visually appealing:
- Store in an airtight container, layered with parchment or wax paper to prevent sticking.
- Keep refrigerated for up to one week for the best texture and flavor.
- If you need to store longer, freeze the peaks in a sealed container for up to one month. Thaw in the refrigerator before serving.
Frequently Asked Questions (FAQ)
Can I make these peaks vegan?
Yes. Substitute butter with coconut oil or vegan margarine, and use dairy-free chocolate chips. Ensure the coconut is unsweetened and check labels for allergen information.
Can I speed up the chilling process?
For quicker setting, place the peaks in the freezer for about 15-20 minutes. However, be cautious not to freeze them too long, as this can affect texture and coating adhesion.
Is it necessary to temper the chocolate?
Tempering yields a glossy, firm chocolate coating that snaps when broken. While not mandatory, it enhances appearance and texture, especially for presentation purposes.
What variations can I try?
Adding flavorings like almond or peppermint extract, incorporating chopped nuts, or experimenting with different types of chocolate can personalize your Peaks to suit your taste and occasion.
Conclusion
Crafting Chocolate Coconut Peaks is a rewarding experience that combines simple ingredients with a touch of culinary finesse. Their charming peaks and luscious chocolate coating make them a standout treat for any celebration or casual gathering. As with all good recipes, attention to detail and patience during the chilling processes will reward you with peaks that are as beautiful as they are delicious. These treats exemplify how minimal effort can produce maximum delight, embodying the spirit of festive baking. Remember, practice makes perfect, and each batch you make will be better than the last. Share these with loved ones or keep them as a secret indulgence—either way, they are sure to become a favorite, especially when enjoyed alongside friends or family.
References
- FoodNetwork. “Chocolate Coconut Candy.” https://www.foodnetwork.com/recipes
- TheSpruceEats. “How to Make Perfect Chocolate Coating.” https://www.thespruceeats.com

