
Introduction
At the heart of every comforting home-cooked meal lies a classic banana bread, warm from the oven, filled with the sweet aroma of ripe bananas and the nutty crunch of walnuts. Memaw’s Banana Bread, a treasured recipe passed down through generations, embodies warmth, nostalgia, and culinary perfection. This recipe, shared on Love With Recipes, offers a detailed, step-by-step guide to create a moist, flavorful loaf that balances richness with just the right amount of sweetness, making it an ideal treat for breakfast, brunch, or a cozy snack. From the choice of ingredients to baking techniques, every detail is designed to ensure that your banana bread turns out tender, aromatic, and irresistibly delicious, elevating your baking skills to a new level of excellence.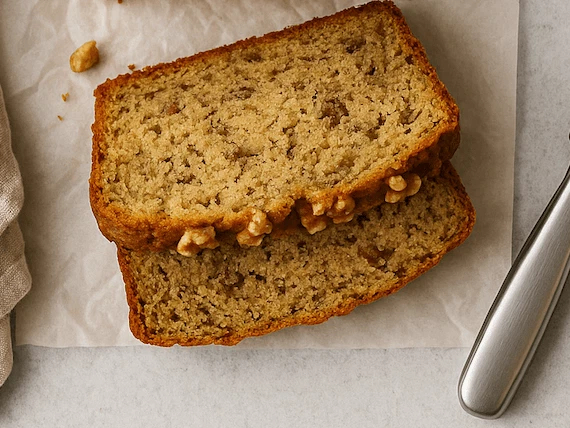
Time
- Preparation Time: 15 minutes
- Cooking Time: 1 hour 15 minutes
- Total Time: 1 hour 30 minutes
While the active prep is minimal, the extended baking and cooling periods are essential to achieving the perfect loaf. Patience is key to allowing flavors to meld and ensuring the bread is baked thoroughly without over-drying.
Needed Equipment
- Standard loaf pan (9×5 inches)
- Mixing bowls (large and medium)
- Electric hand mixer or stand mixer with paddle attachment
- Measuring cups and spoons
- Silicone spatula or rubber scraper
- Cooling rack
- Non-stick cooking spray or butter for greasing
- Toothpick or cake tester
- Fine grater (optional, for zesting bananas or adding flavor)
- Kitchen scale (optional, for precise measurement)
Tags
- Banana Bread
- Homemade Baking
- Comfort Food
- Breakfast
- Snacks
- Nutty Bakes
- Family Recipes
- Easy Baking
Serving Size
This recipe yields approximately 16 slices, making it ideal for family gatherings, brunch, or meal prep. Each slice is roughly 1 inch thick, providing a hearty, satisfying portion that pairs perfectly with coffee, tea, or milk.
Difficulty Level
Intermediate. While the ingredients are straightforward, attention to detail during mixing, folding, and baking is essential to achieve the ideal moistness and texture. This recipe is suitable for home bakers with some experience in basic baking techniques.
Allergen Information
| Allergen | Present in Recipe |
|---|---|
| Gluten | Yes (all-purpose flour) |
| Nuts | Yes (walnuts) |
| Dairy | Yes (butter, heavy cream) |
| Eggs | Yes (egg and egg whites) |
If you have nut allergies or dairy sensitivities, consider substituting walnuts with seeds such as sunflower or pumpkin seeds, and replacing butter and cream with dairy-free alternatives like coconut oil and coconut cream.
Dietary Preference
Vegetarian. This recipe contains no meat products, making it suitable for vegetarians. For vegan adaptations, substitute eggs with flaxseed or chia seed gel, and use plant-based butter and cream alternatives.
Course
- Breakfast
- Snack
- Dessert
Cuisine
American classic, comfort food, home baking
Ingredients
Complete Ingredient List
| Quantity | Ingredient |
|---|---|
| 1 cup | Butter |
| 1 cup | Sugar |
| 1 cup | Light brown sugar |
| 1 | Egg |
| 2 | Egg whites |
| 1 tsp | Vanilla extract |
| 2 cups | Mashed bananas (ripe bananas, about 4-5 medium bananas) |
| 1 1/2 cups | All-purpose flour |
| 1 3/4 tsp | Baking soda |
| 1 tsp | Salt |
| 1/2 tsp | Baking powder |
| 1/4 cup | Heavy cream |
| 1/2 cup | Chopped walnuts |
Instructions
Step 1: Prepare Your Workspace and Oven
Before beginning, ensure your oven is functioning correctly and set it to 350°F (175°C). Position an oven rack in the center to promote even baking. Lightly grease your loaf pan with non-stick cooking spray or butter, ensuring all corners and sides are coated to prevent sticking. For additional ease of removal, you may line the pan with parchment paper, cut to fit the bottom and sides, secured with a light spray of cooking spray.
Step 2: Creaming the Butter
Using a large mixing bowl, add 1 cup of softened butter. Using an electric hand mixer or a stand mixer fitted with a paddle attachment, beat the butter on medium speed. Continue until the butter becomes light and fluffy, which typically takes about 2-3 minutes. Properly creamed butter creates a tender crumb and helps incorporate sugar evenly. During this process, periodically scrape down the sides of the bowl with a silicone spatula to ensure uniform mixing.
Step 3: Incorporate Sugars
Add 1 cup of sugar and 1 cup of light brown sugar to the creamed butter. Mix on medium speed until the mixture is smooth, creamy, and slightly increased in volume. This step is crucial for developing the sweetness and moistness of the bread. The sugars work to aerate the batter, contributing to a light texture. Be attentive to the consistency—aim for a smooth, airy mixture without lumps.
Step 4: Add Eggs and Vanilla
Crack 1 whole egg into the mixture and add 2 egg whites, ensuring to avoid shells. Add 1 teaspoon of vanilla extract for depth of flavor. Beat the mixture on medium-high speed for about 30 seconds, until fully incorporated and the mixture appears uniform and slightly pale. Proper blending ensures the eggs provide structure and moisture without overworking the batter.
Step 5: Incorporate Mashed Bananas
Add 2 cups of mashed bananas—ripe bananas mashed until smooth with a fork or potato masher. Increase the mixer speed to high and beat for about 30 seconds, ensuring the bananas are fully integrated into the batter. The bananas should blend seamlessly, imparting moisture, sweetness, and flavor. Ripe bananas are key; they should be heavily speckled or blackened on the peel, indicating maximum sugar content and natural sweetness.
Step 6: Mix Dry Ingredients
In a separate medium bowl, combine 1 1/2 cups of all-purpose flour, 1 3/4 teaspoons of baking soda, 1 teaspoon of salt, and 1/2 teaspoon of baking powder. Stir with a whisk or fork until all dry ingredients are evenly distributed. This ensures consistent leavening and seasoning throughout the batter, preventing clumps and pockets of unmixed baking soda or salt.
Step 7: Combine Wet and Dry Ingredients
Reduce the mixer speed to low. Gradually add the dry ingredient mixture to the banana mixture in three additions, alternately with 1/4 cup of heavy cream. Begin and end with the dry ingredients, adding about a third of the flour mixture, then a splash of cream, and so on. Mix each addition just until incorporated—overmixing can lead to a dense loaf. This technique, known as “alternating wet and dry,” promotes a tender crumb and prevents gluten overdevelopment.
Step 8: Fold in Walnuts
Using a silicone spatula or rubber scraper, gently fold in 1/2 cup of chopped walnuts. Distribute evenly throughout the batter without overmixing to maintain a light, airy structure. The walnuts add texture and flavor, complementing the sweetness of the bananas.
Step 9: Transfer Batter to Loaf Pan
Pour the batter into the prepared loaf pan, using the spatula to spread evenly to the edges. Lightly tap the pan on the counter to settle the batter and eliminate air bubbles. Smooth the top with the spatula for a uniform appearance. This step helps the loaf bake evenly and develop a pleasant crust.
Step 10: Bake to Perfection
Place the loaf pan in the preheated oven on the center rack. Bake for approximately 1 hour and 15 minutes, but start checking around the 1-hour mark. Insert a toothpick or cake tester into the center of the loaf; if it comes out clean, the bread is ready. The top should be golden brown, and the edges may slightly pull away from the sides of the pan. If the top browns too quickly, tent with aluminum foil to prevent burning while the interior finishes baking.
Step 11: Cooling and Resting
Remove the bread from the oven and allow it to cool in the pan on a wire rack for 10 minutes. This brief rest stabilizes the crumb structure and makes handling easier. Afterward, carefully invert the bread onto the wire rack and let it cool completely. For optimal flavor and texture, wrap the cooled loaf in plastic wrap and let it sit overnight at room temperature. This resting period allows the flavors to meld and the crumb to soften, resulting in a more cohesive and flavorful loaf.
Preparation Tips
- Use very ripe bananas for maximum sweetness and moisture. Overripe bananas with blackened peels are ideal.
- Ensure butter is softened to room temperature for easier creaming and better incorporation of sugars.
- For a more intense banana flavor, reserve some mashed bananas to swirl into the batter before baking.
- If nuts are a concern, substitute walnuts with seeds or omit altogether for nut-free versions.
- Always measure ingredients accurately for consistent results; use a kitchen scale for best precision.
Nutritional Information
| Nutrient | Per Serving (approximate) |
|---|---|
| Calories | 193.3 kcal |
| Total Fat | 8.4 grams |
| Saturated Fat | 4.3 grams |
| Cholesterol | 33 mg |
| Sodium | 199.8 mg |
| Total Carbohydrates | 27.2 grams |
| Dietary Fiber | 0.9 grams |
| Sugars | 14.8 grams |
| Protein | 3 grams |
Tips and Tricks
- For an extra moist loaf, add a tablespoon of applesauce or Greek yogurt to the batter.
- To enhance banana flavor, toast the walnuts before folding them into the batter for added aroma and crunch.
- Use a cake tester or toothpick to check for doneness; avoid overbaking to prevent dryness.
- Wrap the cooled bread tightly in plastic wrap and store at room temperature for up to 3 days.
- Freeze individual slices or whole loaf for extended storage; wrap tightly in plastic wrap and aluminum foil, then thaw at room temperature.
Add-ons
- Chocolate chips (dark, milk, or white) for a decadent twist
- Dried fruits such as cranberries, raisins, or chopped dates
- Spices like cinnamon, nutmeg, or cardamom for added warmth
- Coconut flakes for tropical flavor
Side Dishes
- Fresh fruit salad
- Yogurt or Greek yogurt for a protein boost
- Butter or cream cheese spread for added richness
- Warm buttered or honey-drizzled slices
Improvements
- Incorporate sour cream or buttermilk instead of heavy cream for tanginess and tenderness.
- Replace some of the flour with whole wheat flour for added fiber and a nutty flavor.
- Add a teaspoon of espresso powder to intensify the banana flavor and add depth.
- Use browned butter in the creaming process for a richer, nutty aroma.
Save and Store
Once cooled completely, store the banana bread tightly wrapped in plastic wrap or in an airtight container at room temperature for up to 3 days. For longer storage, freeze slices or the entire loaf wrapped in plastic wrap and then placed in a freezer-safe container or bag. Proper wrapping prevents freezer burn and maintains freshness. When ready to serve, thaw at room temperature or reheat gently in the microwave for a few seconds.
FAQ
Can I make this banana bread dairy-free?
Absolutely. Substitute the butter with coconut oil or dairy-free margarine, and replace heavy cream with coconut milk or almond milk. Keep in mind that the texture may vary slightly, but the flavor will remain delicious.
How ripe should the bananas be?
Use very ripe bananas with heavily speckled or blackened peels. The riper, the sweeter and more flavorful the bread will be.
Can I add chocolate chips?
Yes, fold in about 1/2 to 1 cup of chocolate chips along with the walnuts for a chocolaty variation.
Is it possible to make this vegan?
Yes. Replace eggs with flaxseed or chia seed gel (1 tablespoon ground flaxseed or chia seed mixed with 3 tablespoons water per egg), and use plant-based butter and dairy alternatives.
Conclusion
Memaw’s Banana Bread is a timeless recipe that combines simplicity with rich, comforting flavors. Its moist crumb, enhanced by ripe bananas and crunchy walnuts, makes it an all-time favorite for any baking enthusiast. Whether enjoyed fresh from the oven or the next day after resting, this loaf offers a perfect balance of sweetness and texture that appeals to all ages. The detailed instructions and tips provided ensure that even novice bakers can achieve bakery-quality results. Remember, the secret to perfect banana bread lies in selecting the right ripeness of bananas, careful mixing, and patience during baking and cooling. With this comprehensive guide, you are well-equipped to create a memorable, delicious banana bread that will surely become a family staple. Happy baking, and enjoy sharing this delightful treat with loved ones!
References
- Joy of Baking: Classic Banana Bread Recipe
- Serious Eats: The Science of Banana Bread