
Introduction
Welcome to Love With Recipes, your trusted culinary companion dedicated to bringing you the most delicious, innovative, and wholesome recipes. Today, we dive into a savory, aromatic delight that combines the irresistible flavors of garlic, fresh herbs, and pepperoni into a warm, crusty bread. This Garlic Herb Pepperoni Bread, crafted specifically for your bread machine, is perfect for sharing at gatherings, elevating your snack game, or simply indulging in a comforting homemade treat. The recipe balances the richness of cheese, the boldness of herbs, and the savory punch of pepperoni, creating a bread that’s both flavorful and versatile. Whether you’re a seasoned baker or a novice exploring the art of bread-making, this comprehensive guide will take you through every step in meticulous detail, ensuring perfect results every time.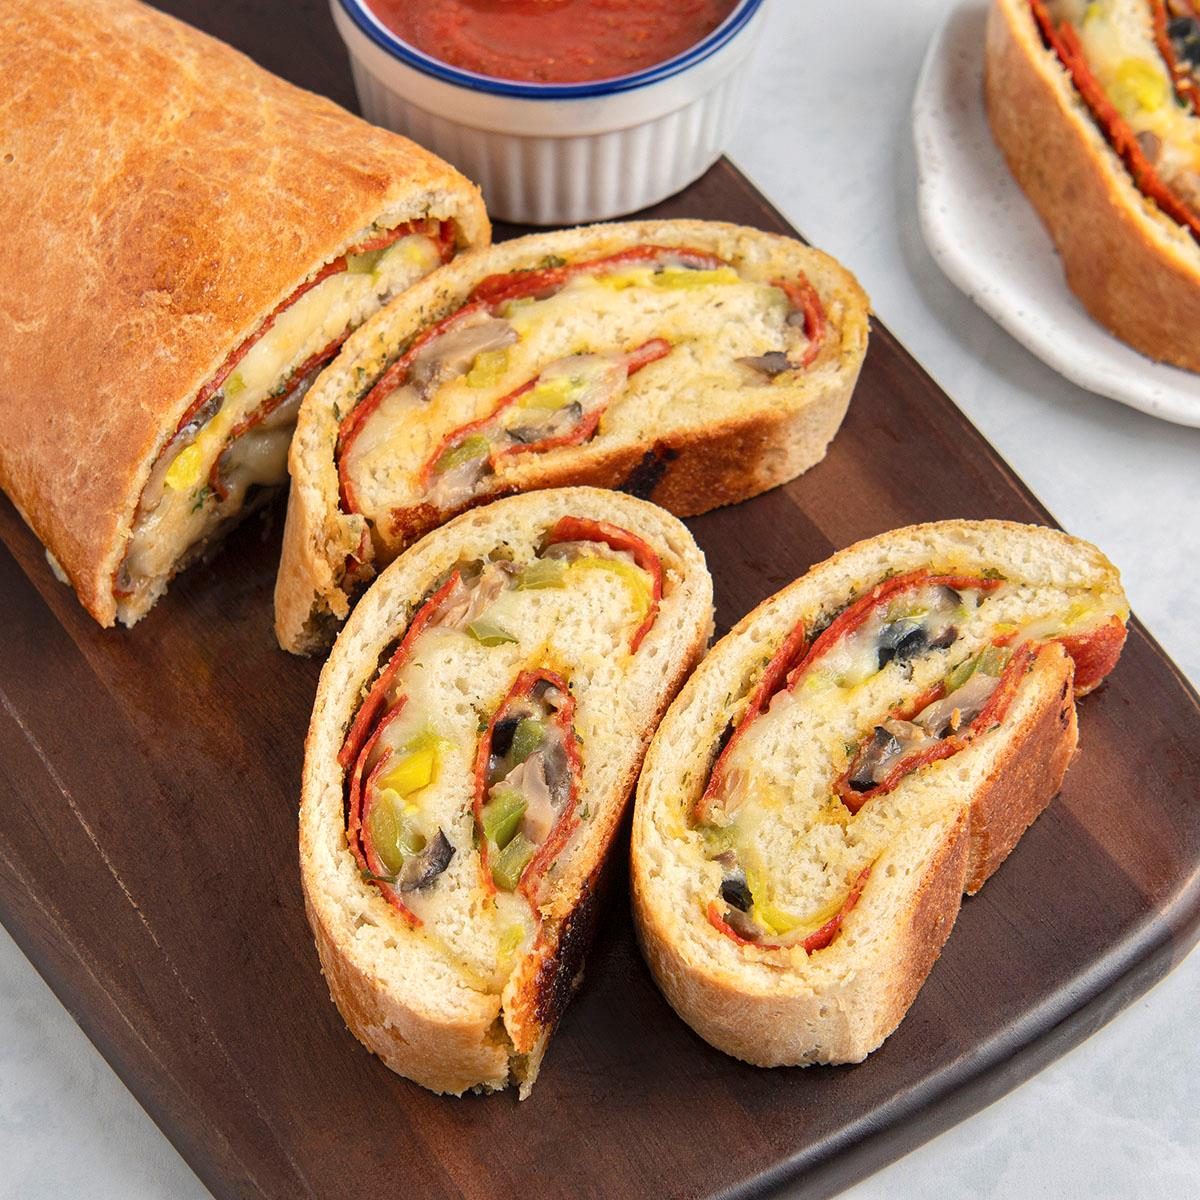
Time
This recipe requires approximately 2 hours and 50 minutes from start to finish. The process involves a brief preparation phase, a bread machine cycle, and optional oven finishing for a crustier exterior. The total time breakdown is as follows:
- Prep Time: 5 minutes
- Bread Machine Mixing & Rising: Approximately 2 hours (depending on machine cycle)
- Baking & Cooling: 30-35 minutes baking + 10-15 minutes cooling
Patience is key; allowing proper rising times ensures a light, airy crumb and a well-developed flavor profile.
Needed Equipment
- Bread Machine: Essential for kneading, rising, and initial baking if using the machine’s cycle.
- Loaf Pan: For shaping and baking the bread if opting for oven finishing.
- Mixing Bowls: For handling dough and preparing toppings.
- Silicone Spatula or Dough Scraper: To manipulate dough and incorporate ingredients.
- Kitchen Scale: For precise measurement of ingredients, especially cheese and herbs.
- Measuring Cups and Spoons: For liquids and small ingredient measurements.
- Pastry Brush: To add butter or egg wash if desired for finishing.
- Oven (Optional): For finishing or crust enhancement.
- Cooling Rack: To cool the bread evenly after baking.
- Aluminum Foil or Plastic Wrap: For storage and to cover the dough during rising.
Tags
Artisan Bread, Bread Machine Recipe, Savory Bread, Cheesy Bread, Pepperoni Bread, Quick Bread, Homemade Bread, Party Snack, Comfort Food, Baked Goods
Serving Size
This recipe yields one loaf weighing approximately 1.5 pounds (about 680 grams), which is suitable for serving 6-8 slices depending on thickness. Ideal for sharing among family or friends or for enjoying as a hearty snack over multiple days.
Difficulty Level
This recipe is rated as Moderate. While utilizing a bread machine simplifies the process, shaping and finishing may require basic baking skills. The ingredient measurements are straightforward, but attention to rising times and oven finishing enhances the final product.
Allergen Information
| Allergen | Contains |
|---|---|
| Gluten | Yes |
| Milk | Yes (mozzarella and Parmesan cheeses) |
| Eggs | No |
| Nuts | No |
| Soy | No |
Note: Adjust cheese types if you have allergies or sensitivities. Use dairy-free cheese alternatives if necessary.
Dietary Preference
This recipe is suitable for omnivorous diets. It is not gluten-free or vegan due to the presence of wheat, cheese, and pepperoni. For a vegetarian version, omit the pepperoni and add additional herbs or vegetables for flavor.
Course
Main Course / Snack / Appetizer
Cuisine
American / Italian-inspired comfort food
Ingredients in Tables
Dry Ingredients
| Ingredient | Amount | Notes |
|---|---|---|
| Bread Flour | 3 cups (360 grams) | Use high-quality bread flour for best gluten development |
| Sugar | 1 tablespoon (12 grams) | Feeds the yeast and enhances browning |
| Salt | 1 teaspoon (6 grams) | For flavor enhancement |
| Garlic Powder | 1/2 to 1 teaspoon (adjust to taste) | For aromatic flavor |
| Dried Basil | 1/2 to 1 teaspoon (adjust to taste) | Adds herbal aroma |
| Yeast (Bread Machine) | 1.5 teaspoons (7 grams) | Active dry or instant yeast |
Wet Ingredients & Fillings
| Ingredient | Amount | Notes |
|---|---|---|
| Water | 1 cup (240 ml) | Warm, about 110°F (43°C) |
| Light Olive Oil | 1/4 cup (60 ml) | For moisture and flavor |
| Shredded Mozzarella Cheese | 1 cup (113 grams) | Adds gooey texture and flavor |
| Grated Parmesan Cheese | 1/4 cup (25 grams) | For added sharpness and saltiness |
| Pepperoni Slices | 1/2 cup (about 50 grams) | Chopped or sliced, optional but recommended |
Instructions
Step 1: Preparing the Ingredients
Begin by organizing all your ingredients. Measure the bread flour, sugar, salt, garlic powder, dried basil, and yeast precisely. Prepare the cheeses by shredding and grating if they are not pre-packaged. Slice the pepperoni into small, bite-sized pieces to ensure even distribution throughout the dough. Warm the water to about 110°F (43°C); it should feel comfortably warm to the touch but not hot enough to scald. This temperature activates the yeast effectively without killing it.
Step 2: Adding Ingredients to the Bread Machine
Follow your specific bread machine’s instructions for ingredient placement. Typically, the wet ingredients go in first: water and olive oil. Pour these into the bread pan. Next, add the dry ingredients: bread flour, sugar, salt, garlic powder, and dried basil. Make a small well in the center of the dry ingredients and add the yeast there, ensuring it does not come into direct contact with the salt or liquids initially. This preserves yeast activity and ensures a proper rise.
Step 3: Selecting the Cycle and Starting the Machine
Insert the bread pan into your machine, select the “White Bread” cycle or equivalent, which includes kneading, rising, and baking phases. Start the cycle and monitor for any issues during kneading. The machine will take roughly 1.5 to 2 hours depending on your model and settings.
Step 4: Incorporating Cheese and Pepperoni
Some bread machines allow for adding mix-ins during the kneading phase. If yours does, add the shredded cheeses and sliced pepperoni at this stage. If not, wait until the initial kneading phase completes, then open the lid carefully and fold in the cheese and pepperoni manually with a spatula or spoon. Close the lid and continue with the cycle.
Step 5: Completion of the Bread Machine Cycle
Once the machine signals the end of the cycle, carefully remove the bread pan. The dough should have doubled in size, be smooth, and elastic. If you prefer a crustier loaf, proceed with oven baking; otherwise, you can enjoy the bread straight from the machine.
Step 6: Shaping for Oven Finish (Optional)
If you desire a more artisanal, crusty finish, turn the dough out onto a lightly floured surface. Gently punch it down to remove excess air, then shape it into a loaf by rolling it into a log shape. Tuck the ends under and ensure the seam is underneath. Place the shaped dough into a greased loaf pan, brushing the top with a little olive oil or beaten egg for a shiny crust.
Step 7: Second Rise
Cover the shaped loaf with a damp towel or lightly oiled plastic wrap. Let it rise in a warm, draft-free environment for about 45 minutes, or until approximately doubled in size.
Step 8: Baking the Bread
Preheat your oven to 350°F (175°C). Once the dough has risen, remove the cover and place the loaf in the oven. Bake for 30-35 minutes, or until the crust turns a rich golden brown and the loaf sounds hollow when tapped. For a crustier exterior, you can brush the top with butter or egg wash during the last 5 minutes of baking.
Step 9: Cooling and Resting
Immediately transfer the finished loaf to a cooling rack. Allow it to rest for at least 10-15 minutes before slicing. This resting period helps the crumb set and enhances flavor development.
Preparation Tips
- Use Fresh Yeast: Always check the expiration date of your yeast; fresh yeast ensures active fermentation and good rise.
- Adjust Herbs and Seasonings: Feel free to modify the garlic and basil quantities to suit your taste—more herbs add flavor depth, while less keeps it subtle.
- Cheese Variations: Incorporate different cheeses like cheddar, gouda, or pepper jack for variety.
- Pepperoni Alternatives: For a vegetarian version, substitute pepperoni with sautéed vegetables or olives.
- Oven Crust Enhancement: For a crunchier crust, bake on a preheated pizza stone or baking sheet.
Nutritional Information
| Nutrient | Per Serving (approximate) |
|---|---|
| Calories | 280 kcal |
| Protein | 12 grams |
| Carbohydrates | 35 grams |
| Fat | 10 grams |
| Saturated Fat | 4 grams |
| Sodium | 550 mg |
| Fiber | 2 grams |
Note: Exact nutritional values depend on specific ingredient brands and quantities used.
Tips and Tricks
- Rest the Dough: Allow the dough to rest for a few minutes after mixing to let the gluten relax, making shaping easier.
- Herb Infusion: Mix herbs into the cheese for an even more flavorful bite.
- Cheese Melting: For a gooey top, sprinkle additional shredded cheese on the loaf during the last 5 minutes of baking.
- Storage: Keep leftovers in an airtight container or wrapped tightly in plastic wrap. Reheat in the oven for best texture.
Add-ons
- Fresh herbs like parsley or oregano for added freshness
- Red pepper flakes for a spicy kick
- Sautéed garlic or caramelized onions for deeper flavor
- Sun-dried tomatoes or olives for Mediterranean flair
Side Dishes
- Fresh mixed greens salad with vinaigrette
- Marinara or marinara dipping sauce
- Roasted vegetables such as zucchini, peppers, or eggplant
- Antipasto platter with cured meats, cheeses, and olives
Improvements
- Incorporate a sourdough starter for a tangy twist
- Use whole wheat or multigrain flour for added fiber
- Add chopped herbs or chives into the dough for a fresh flavor
- Drizzle with garlic butter before serving for extra richness
Save and Store
Wrap cooled bread tightly in plastic wrap or store in an airtight container to preserve freshness. It can be kept at room temperature for up to 2 days, but for longer storage, freeze slices or the entire loaf. Wrap well in plastic wrap and then foil, and store in the freezer for up to 3 months. To reheat, thaw at room temperature or in the refrigerator, then warm in the oven or toaster oven until heated through and crispy.
FAQ
Can I use all-purpose flour instead of bread flour?
While bread flour provides higher gluten content for better rise and texture, all-purpose flour can be used as a substitute. The bread may be slightly less airy but still delicious.
Can I make this without a bread machine?
Absolutely. Mix the ingredients by hand or using a stand mixer, knead until elastic, and allow to rise in a warm spot. Proceed with shaping, rising, and baking as described.
Is it possible to make this gluten-free?
Yes, but you need a gluten-free bread flour blend and specific adjustments for rising. Using xanthan gum can help mimic gluten’s elasticity.
Can I add more toppings?
Yes, feel free to customize with additional ingredients like jalapeños, cooked bacon, or herbs for extra flavor and texture.
Conclusion
This Garlic Herb Pepperoni Bread offers a harmonious blend of savory flavors, aromatic herbs, and gooey cheese, all wrapped in a crusty, tender loaf. Its versatility makes it suitable for breakfast, lunch, dinner, or snacks, and the ease of using a bread machine simplifies the process for home bakers. Whether enjoyed warm or toasted, this bread is sure to become a favorite in your household. For more delicious recipes and culinary inspiration, stay connected with Love With Recipes, your go-to platform for culinary excellence.
References
- King Arthur Flour. (n.d.). How to Make Perfect Bread at Home. Retrieved from https://www.kingarthurbaking.com
- Williams Sonoma. (2020). The Art of Bread Baking. Retrieved from https://www.williams-sonoma.com