Authentic Italian Ciabatta Bread Recipe
Ciabatta Bread Recipe
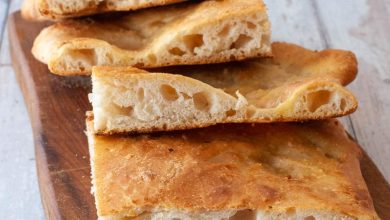
Ciabatta is a traditional Italian bread known for its rustic appearance, light, airy texture, and crisp crust. It’s perfect for sandwiches or served alongside hearty soups and stews. The key to achieving the perfect ciabatta lies in the technique, which includes using a poolish (a type of preferment), handling the dough gently, and allowing for proper fermentation. This detailed recipe walks you through every step to create a delicious loaf of ciabatta, ideal for any meal.
Ingredients
| Ingredient | Quantity |
|---|---|
| Manitoba flour | 200g |
| 00 flour | 100g |
| Water | 300ml |
| Dry active yeast | 2g |
| Manitoba flour (for second dough) | 400g |
| 00 flour (for second dough) | 200g |
| Water | 350ml |
| Dry active yeast | 3g |
| Malt | 10g |
| Salt | 20g |
| Semolina flour (for dusting) | q.b. |
Instructions
Step 1: Prepare the Poolish
Start by preparing the poolish, a very hydrated starter that will help develop the bread’s characteristic texture. Begin by dissolving the dry active yeast in the 300 ml of water. If you prefer, you can substitute the dry yeast with 6g of fresh yeast. Once the yeast is dissolved, mix it with both the 00 flour and the Manitoba flour. Gradually add the liquid to the flour, pouring it in slowly while mixing with a wooden spoon. Continue mixing until the ingredients are combined into a rough dough.
Cover the bowl with plastic wrap and let the dough ferment at room temperature for about 3 hours. During this time, the poolish will expand and bubble, becoming slightly darker in color as the fermentation progresses.
Step 2: Make the Dough
After 3 hours, the poolish should be full of air bubbles and visibly risen. Now, it’s time to prepare the second dough. Begin by dissolving the dry yeast and malt (or sugar, as a substitute) in the 350 ml of water. While the yeast mixture is activating, sift together the Manitoba and 00 flours.
In a stand mixer, add the poolish and the sifted flour. If you don’t have a stand mixer, you can mix the ingredients in a large bowl using a spoon until well combined. Once the dry ingredients are mixed, gradually add the yeast mixture, stirring continuously. This will help integrate the wet and dry ingredients.
Step 3: Knead the Dough
After all ingredients are combined, switch to the dough hook attachment of your stand mixer (or continue by hand if necessary). Knead the dough for about 5 minutes on medium speed. This helps develop the gluten and gives the dough its signature elastic texture. Once the dough has come together and is well-kneaded, add the salt. Continue kneading for another 5 minutes until the dough is smooth and elastic.
Once kneaded, transfer the dough to a lightly greased bowl or leave it in the mixing bowl. Cover the dough with plastic wrap and let it rise at room temperature for about 1 hour, ideally in a warm environment between 24°C and 25°C (75°F to 77°F). The dough should double in size during this time.
Step 4: Shape the Dough
After the dough has risen, lightly flour your work surface with semolina flour. Carefully turn the dough out onto the floured surface. Gently stretch the dough into a rectangular shape, being careful not to deflate the gas bubbles formed during fermentation.
Now, fold the dough. To do this, bring the edges of the dough in towards the center, one side at a time, forming a rectangle. Then, fold the bottom of the dough up towards the top, forming a slightly thicker rectangle. Be sure to handle the dough gently, as overworking it can result in a dense texture.
Step 5: Let the Dough Rise Again
Transfer the shaped dough to a well-floured surface and sprinkle the top with more semolina flour. Cover the dough loosely with plastic wrap to prevent the surface from drying out. Allow the dough to rise for another 1 to 1.5 hours until it has visibly increased in size.
Step 6: Shape the Loaves
After the second rise, take one piece of dough at a time. Gently turn it over and stretch it out with your hands to form a long, narrow loaf. Be sure not to deflate the air bubbles inside. Place the formed loaves on a semolina-dusted baking sheet or pizza stone, ensuring there is enough space between them for expansion.
Step 7: Preheat the Oven
While the dough is resting, preheat your oven to 240-250°C (464-482°F) if you are using a static oven, or 220-230°C (428-446°F) for a convection oven. The high temperature is essential for achieving a crispy crust and soft, airy interior.
Step 8: Bake the Ciabatta
Once your oven has reached the correct temperature, place the baking sheet or pizza stone with the loaves inside. Bake the ciabatta loaves for 20 to 25 minutes, or until they are golden brown and have a hollow sound when tapped on the bottom. If you prefer a slightly darker crust, you can bake for an additional 5 minutes, but be careful not to burn them.
Step 9: Cool the Bread
After baking, remove the ciabatta loaves from the oven and let them cool on a wire rack for at least 30 minutes. This cooling period allows the structure to set and enhances the flavor.
Tips and Variations
- Malt Substitution: If you don’t have malt, you can substitute it with sugar or honey. This will still provide a slightly sweet flavor to the bread.
- Flour Types: While the traditional recipe uses Manitoba and 00 flours, you can experiment with different flours to alter the texture and flavor. For example, whole wheat flour can add a nuttier taste, though it will affect the crumb structure.
- Storage: Ciabatta is best enjoyed fresh on the day it’s baked. However, you can store it in a paper bag at room temperature for a day or two. For longer storage, slice the bread and freeze it.
This ciabatta recipe is perfect for both beginners and experienced bakers alike. Its delicious crust, airy texture, and versatile flavor make it ideal for many meals. Whether you’re using it for sandwiches, dipping in olive oil, or serving alongside soups, this ciabatta is sure to become a staple in your bread-baking repertoire.