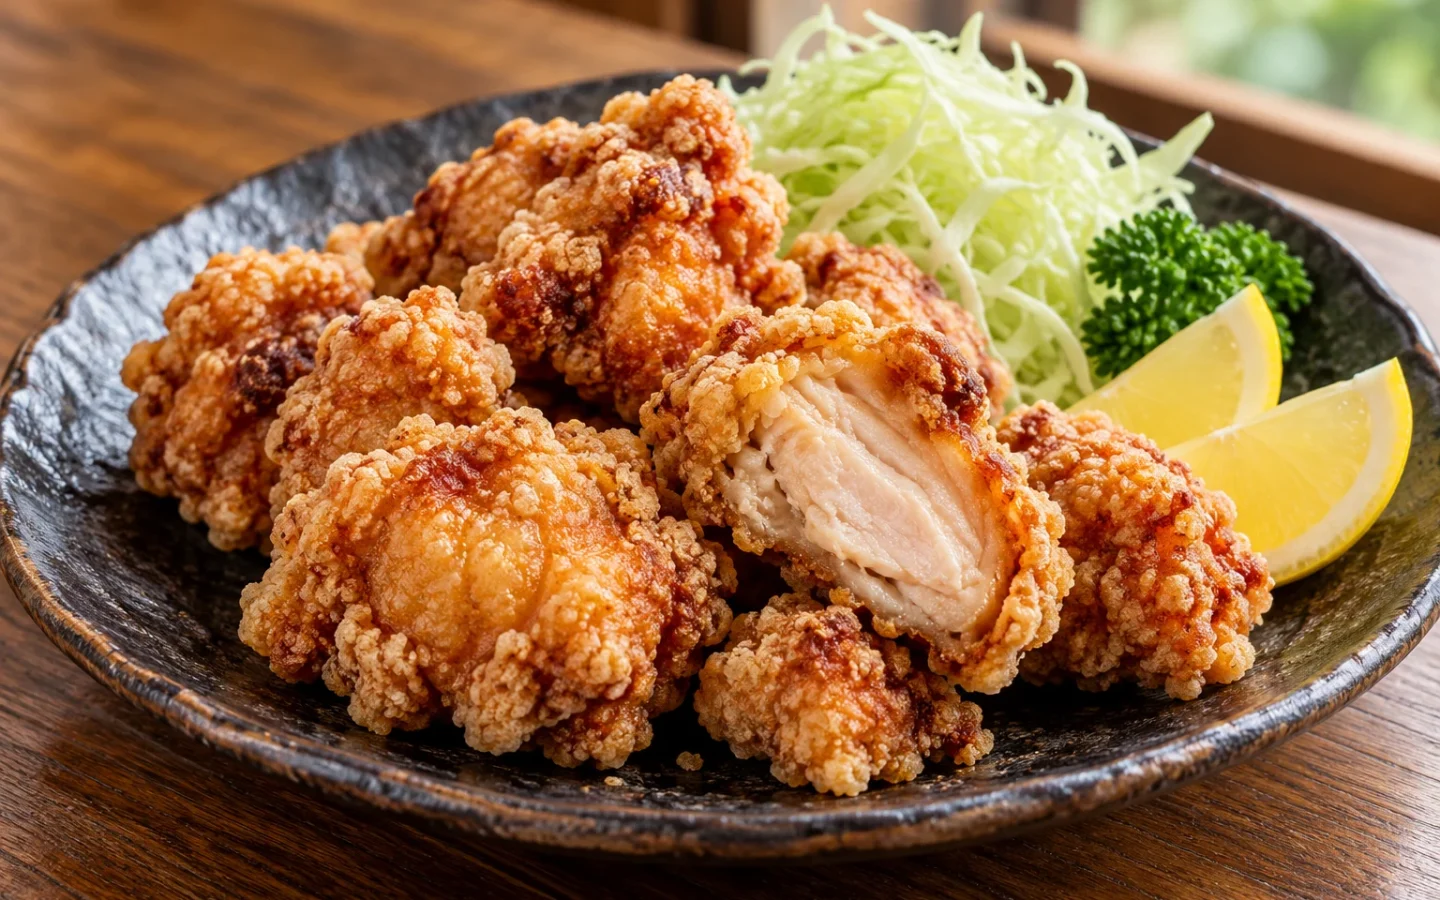
Juicy soy-ginger chicken thighs in a remarkably crisp potato-starch shell, fried in small batches and finished with lemon.
Introduction
Karaage is Japanese fried chicken defined by small, juicy pieces and a thin, craggy coating rather than a thick blanket of batter. The chicken is seasoned from within with soy, sake, ginger, and garlic, then coated in potato starch immediately before frying. Good karaage tastes savory even before lemon reaches it.
Boneless thigh stays moist under high heat and its irregular shape creates crisp ridges. A short marinade seasons without drawing excessive water from the meat. Potato starch fries especially brittle, while two-stage frying lets the center cook gently before a brief hotter finish drives moisture from the crust. A useful way to judge karaage is to listen as well as look. The sound should change from an active watery bubbling during the first fry to a finer, sharper crackle during the second. That change signals less surface moisture. Color is secondary because soy-marinated chicken browns readily; a dark exterior can appear before the center is safe. Temperature, bubbling behavior, and an internal reading together give a more reliable result than color alone. If preparing several batches, let the oil recover fully and keep first-fried pieces in a single layer so their steam can escape. For consistent results, record the ingredient brand, cookware size, actual heat level, and final cooking time on the first attempt. Those observations make the next batch more useful than changing several variables from memory.
This guide is designed for a home cook who wants more than a short ingredient list. It explains what to look for, why the sequence matters, where substitutions are reasonable, and where they change the character of the dish. Read the method once before heating the pan, measure everything, and use the visual and sensory cues alongside the clock.
Japanese food is not one fixed set of restaurant dishes. It includes regional traditions, home cooking, modern adaptations, and careful seasonal choices. This recipe stays close to the technique and flavor structure associated with the dish while using measurements and safety guidance that work in a contemporary home kitchen.
Time, Serving Size and Recipe Facts
| Detail | Value |
|---|---|
| Preparation time | 25 minutes |
| Cooking time | 20 minutes |
| Total time | 45 minutes |
| Serving size | 4 servings |
| Difficulty level | Intermediate |
| Course | Main course or appetizer |
| Cuisine | Japanese |
| Allergen information | Soy; gluten if standard soy sauce is used |
| Dietary preference | Dairy-free; gluten-free with certified tamari and verified starch |
Timing note: The total assumes ingredients are measured and the main accompaniment is ready when cooking begins. Knife speed, stove power, cookware, ingredient temperature, and batch size can change the clock. Use doneness, texture, aroma, and safe internal temperature as the final tests rather than treating a minute count as a guarantee.
Needed Equipment
Good equipment makes the method easier, but specialist purchases are not required. Choose cookware large enough to avoid crowding and use a stable cutting surface. A thermometer is especially valuable because color alone cannot verify safe doneness.
- Heavy deep pot or Dutch oven
- Deep-fry thermometer
- Wire rack and sheet pan
- Large bowl
- Tongs or spider strainer
- Instant-read thermometer
Set every tool out before starting. This mise en place is not cosmetic: several Japanese techniques move quickly once heat is applied, and pausing to search for a strainer or serving bowl can turn a delicate texture into an overcooked one. Keep raw-protein tools away from garnishes and ready-to-eat foods.
Tags and Recipe Classification
Tags: Japanese Recipes, Chicken Karaage, Japanese Fried Chicken, Izakaya Food, Crispy Chicken.
This is a intermediate Japanese main course or appetizer recipe. The labels help readers understand the cooking context; they do not replace checking every packaged ingredient when allergies or medical dietary needs are involved.
Ingredients
| Ingredient | Amount | Preparation and purpose |
|---|---|---|
| Boneless skinless chicken thighs | 1½ lb / 680 g | Cut into 1½-inch pieces |
| Japanese soy sauce | 2 tbsp / 30 ml | Tamari if needed |
| Sake | 2 tbsp / 30 ml | Unsalted |
| Fresh ginger | 1 tbsp grated | Include the juice |
| Garlic | 1 small clove grated | Do not overuse |
| Sugar | 1 tsp | Balances the marinade |
| Fine salt | ¼ tsp | Optional depending on soy |
| Potato starch | 1 cup / 140 g | Katakuriko style coating |
| Neutral frying oil | About 6 cups / 1.4 L | Rice bran or canola |
| Lemon and cabbage | For serving | Fresh contrast |
How to shop and measure
Weighing key ingredients gives the most repeatable result, especially for flour, rice, meat, and concentrated seasonings. Tablespoons are level US tablespoons. Choose fresh ingredients with clean aromas and intact texture, check dates on refrigerated products, and read labels for hidden allergens. Soy sauces, miso, curry roux, dashi powders, noodles, sauces, and vinegars can differ substantially in sodium, sweetness, and additives.
Prepare every cut as described before cooking. Uniform pieces reach doneness together, while random sizes force a choice between undercooking the largest and overcooking the smallest. When making a substitution, preserve the ingredient’s function—salt, sweetness, acidity, fat, body, or aroma—instead of matching only its color.
Instructions
-
1. Cut evenly
Trim loose fat and cut thigh meat into compact, similar pieces. Uniform size prevents small pieces drying while large centers remain underdone.
What to watch: Work by appearance and texture as well as time. If the pan behaves faster than described, lower the heat or move it briefly off the burner; if moisture is accumulating instead of evaporating, avoid crowding and allow the cookware to recover its heat.
-
2. Mix the marinade
Combine soy sauce, sake, ginger, garlic, sugar, and salt in a nonreactive bowl until the sugar dissolves.
What to watch: Work by appearance and texture as well as time. If the pan behaves faster than described, lower the heat or move it briefly off the burner; if moisture is accumulating instead of evaporating, avoid crowding and allow the cookware to recover its heat.
-
3. Marinate briefly
Massage in the chicken, cover, and refrigerate 20 to 30 minutes. Longer is not automatically better because salty liquid can make the surface wet and dense.
What to watch: Work by appearance and texture as well as time. If the pan behaves faster than described, lower the heat or move it briefly off the burner; if moisture is accumulating instead of evaporating, avoid crowding and allow the cookware to recover its heat.
-
4. Drain and blot
Lift chicken from the marinade and blot lightly. It should remain seasoned and tacky but should not drip liquid into the starch.
What to watch: Work by appearance and texture as well as time. If the pan behaves faster than described, lower the heat or move it briefly off the burner; if moisture is accumulating instead of evaporating, avoid crowding and allow the cookware to recover its heat.
-
5. Coat in starch
Toss a few pieces at a time in potato starch, pressing into folds. Shake off loose powder and fry promptly before the coating hydrates completely.
What to watch: Work by appearance and texture as well as time. If the pan behaves faster than described, lower the heat or move it briefly off the burner; if moisture is accumulating instead of evaporating, avoid crowding and allow the cookware to recover its heat.
-
6. Heat the oil
Heat at least 1½ inches of oil to 325°F / 163°C. Keep the pot less than half full and position the thermometer away from its base.
What to watch: Work by appearance and texture as well as time. If the pan behaves faster than described, lower the heat or move it briefly off the burner; if moisture is accumulating instead of evaporating, avoid crowding and allow the cookware to recover its heat.
-
7. First fry
Fry in small batches for 3 to 4 minutes, turning gently. Maintain roughly 315–325°F / 157–163°C and transfer pale pieces to a rack.
What to watch: Work by appearance and texture as well as time. If the pan behaves faster than described, lower the heat or move it briefly off the burner; if moisture is accumulating instead of evaporating, avoid crowding and allow the cookware to recover its heat.
-
8. Rest between fries
Let each batch rest 3 minutes. Carryover heat moves toward the center while escaping steam begins drying the shell.
What to watch: Work by appearance and texture as well as time. If the pan behaves faster than described, lower the heat or move it briefly off the burner; if moisture is accumulating instead of evaporating, avoid crowding and allow the cookware to recover its heat.
-
9. Second fry
Raise oil to 365°F / 185°C and refry for 45 to 75 seconds until crisp and golden. Verify chicken reaches 165°F / 74°C.
What to watch: Work by appearance and texture as well as time. If the pan behaves faster than described, lower the heat or move it briefly off the burner; if moisture is accumulating instead of evaporating, avoid crowding and allow the cookware to recover its heat.
-
10. Drain and serve
Drain on a wire rack, season only if needed, and serve immediately with lemon and cabbage. Do not cover hot karaage.
What to watch: Work by appearance and texture as well as time. If the pan behaves faster than described, lower the heat or move it briefly off the burner; if moisture is accumulating instead of evaporating, avoid crowding and allow the cookware to recover its heat.
Food-safety checkpoint: Keep raw meat, poultry, seafood, and eggs separated from ready-to-eat ingredients. Wash hands and utensils after contact, and verify safe doneness with a clean food thermometer where applicable. The USDA lists 165°F / 74°C for poultry and 145°F / 63°C plus a three-minute rest for whole cuts of pork and beef.
Preparation Tips and Troubleshooting
Preparation is easier when you separate decisions from execution. Taste sauces before they touch raw ingredients, arrange components in the order used, and keep a small amount of hot water or unsalted stock available for controlled adjustments. The goal is not to improvise constantly but to notice what the food is doing.
- Kitchen note: Coat only the batch that is ready to enter the oil.
- Kitchen note: Potato starch makes a brittle shell; a half starch, half flour blend makes a slightly sturdier crust.
- Kitchen note: Skim browned crumbs between batches so they do not attach and taste bitter.
- Kitchen note: A rack preserves the underside better than a flat bed of paper towels.
- Kitchen note: Keep pieces irregular but similar in weight for a natural craggy surface.
Seasoning should be corrected in small steps. Salt and soy sauce are difficult to remove, sugar can quickly hide savory nuance, and excess liquid changes texture. Add a teaspoon, mix fully, taste, and only then decide whether another adjustment is needed.
Nutritional Information
The following values are an estimate per serving, including the principal accompaniment when listed. Actual nutrition changes with brands, trimming, absorbed frying oil, portion size, and optional garnishes. It is not medical advice.
| Nutrient | Estimated amount per serving |
|---|---|
| Calories | 520 calories |
| Protein | 35 g |
| Carbohydrates | 32 g |
| Total fat | 28 g |
| Saturated fat | 6 g |
| Sodium | 790 mg |
| Dietary fiber | 1 g |
| Sugars | 3 g |
For sodium management, compare labels on soy sauce, miso, roux, stock, noodles, and prepared sauces. For a more precise personal calculation, weigh the finished recipe and enter the exact brands and consumed portion into a verified nutrition database or consult a qualified dietitian.
Tips and Tricks for Better Results
The first attempt establishes your baseline; the second can be tuned to your stove and ingredients. Record the pan size, heat level, ingredient brand, and actual cooking time. That small kitchen note is more useful than changing several variables at once.
Serve the dish in warmed or appropriately cool tableware as the recipe demands, wipe plate edges, and add delicate garnishes at the final second. Presentation should support eating quality: crisp food stays uncovered, noodles move to the table immediately, and rice bowls are assembled only when every component is ready.
Add-ons and Variations
These additions are optional. Make the core recipe once before using multiple variations, then choose one change that preserves its balance.
- Add a small pinch of white pepper or yuzu zest to the marinade.
- Serve with Japanese mayonnaise and shichimi as optional condiments.
- Use karaage in a bento only after it has cooled enough to prevent condensation.
When adding a watery vegetable, cook it separately or reduce the main liquid slightly. When adding a salty prepared ingredient, reduce soy sauce or miso first. A variation succeeds when it respects texture and seasoning, not simply when more ingredients fit in the pan.
Side Dishes and Menu Ideas
Build the meal around contrast: pair a rich or fried dish with something crisp and acidic; pair a light soup with rice and a substantial protein. Suitable companions include:
- Steamed rice
- Shredded cabbage
- Cucumber sunomono
- Miso soup
For a multi-dish meal, keep portions modest and avoid repeating the same dominant seasoning in every bowl. Rice, soup, pickles, and a simply dressed vegetable can make the table feel complete without competing with the main recipe.
How to Improve the Recipe Next Time
If the result was technically cooked but not exciting, diagnose it in order. First check salt, then acidity or sweetness, then aroma, and finally texture. A bland dish often needs a precise seasoning correction; a heavy dish may need an acidic side; a dull aroma may simply mean the finishing garnish was added too early.
Change only one major variable on the next attempt. Use a wider pan for better evaporation, a smaller pot for deeper poaching liquid, a sharper knife for cleaner cuts, or a thermometer for tighter doneness control. Repetition with notes produces a personal, reliable version without abandoning the dish’s underlying method.
Save, Store and Reheat
Karaage is best straight from the rack. Cool leftovers promptly and refrigerate in a shallow container for up to 3 days. Reheat on a rack in a 400°F / 205°C oven or air fryer until the center is steaming and the crust has revived; microwaving makes the coating soft. Freeze cooled pieces in one layer, then bag for up to 1 month and reheat from frozen. Never save marinade that touched raw chicken unless it is boiled thoroughly as a separate sauce.
Use clean containers, label them with the date, and refrigerate promptly rather than waiting for food to become completely cold on the counter. Reheating cannot reverse toxins that may form during unsafe storage. When in doubt about time, temperature, odor, or handling history, discard the food.
Frequently Asked Questions
Why is my karaage not crisp?
Wet chicken, hydrated coating, crowded oil, or low temperature are the usual causes. Blot lightly, coat just before frying, and work in small batches.
Can I use chicken breast?
Yes, but cut it slightly larger and monitor temperature carefully because lean breast loses moisture sooner than thigh.
Is double-frying necessary?
No, but it gives a drier, longer-lasting crust while allowing the first fry to cook the center more gently.
Can I use cornstarch?
Cornstarch works, though potato starch generally produces larger, more brittle flakes. A blend is a practical substitute.
Why does the coating fall off?
The surface may be dripping wet or the pieces may have been disturbed before the crust set. Drain the marinade and leave chicken alone during the first minute.
Can karaage be prepared ahead?
Marinate and drain in advance, but coat and fry near service. For parties, complete the first fry, then perform the hot second fry just before eating.
Can I double the recipe?
Usually, but do not simply crowd twice as much into the same cookware. Work in batches where browning or frying is involved, choose a wider pot for simmered dishes, and recheck reduction time, seasoning, and safe doneness. Rice and garnishes can be scaled separately.
How do I know the result is ready without relying only on time?
Use the recipe’s sensory cues: color, aroma, bubbling pattern, resistance to a knife, coating consistency, and internal temperature. Clocks describe an expected range; ingredients and equipment decide the actual finish.
Conclusion
Japanese Chicken Karaage: Extra Crisp and Juicy becomes dependable when its small decisions are made deliberately: appropriate ingredients, organized preparation, controlled heat, restrained seasoning, and service at the right moment. Follow the full method the first time, then use the troubleshooting notes to adapt it intelligently to your kitchen.
Most importantly, treat the recipe as food rather than a performance. Taste carefully, cook safely, and share it while its defining textures are at their best.
References and Further Reading
- Ministry of Agriculture, Forestry and Fisheries of Japan: Washoku guide
- Japan National Tourism Organization: Japanese gastronomy
- USDA FSIS: Safe minimum internal temperature chart
References support cultural and safety context. Recipe quantities, method, testing notes, and nutrition estimates are presented as an original editorial guide for Love With Recipes.