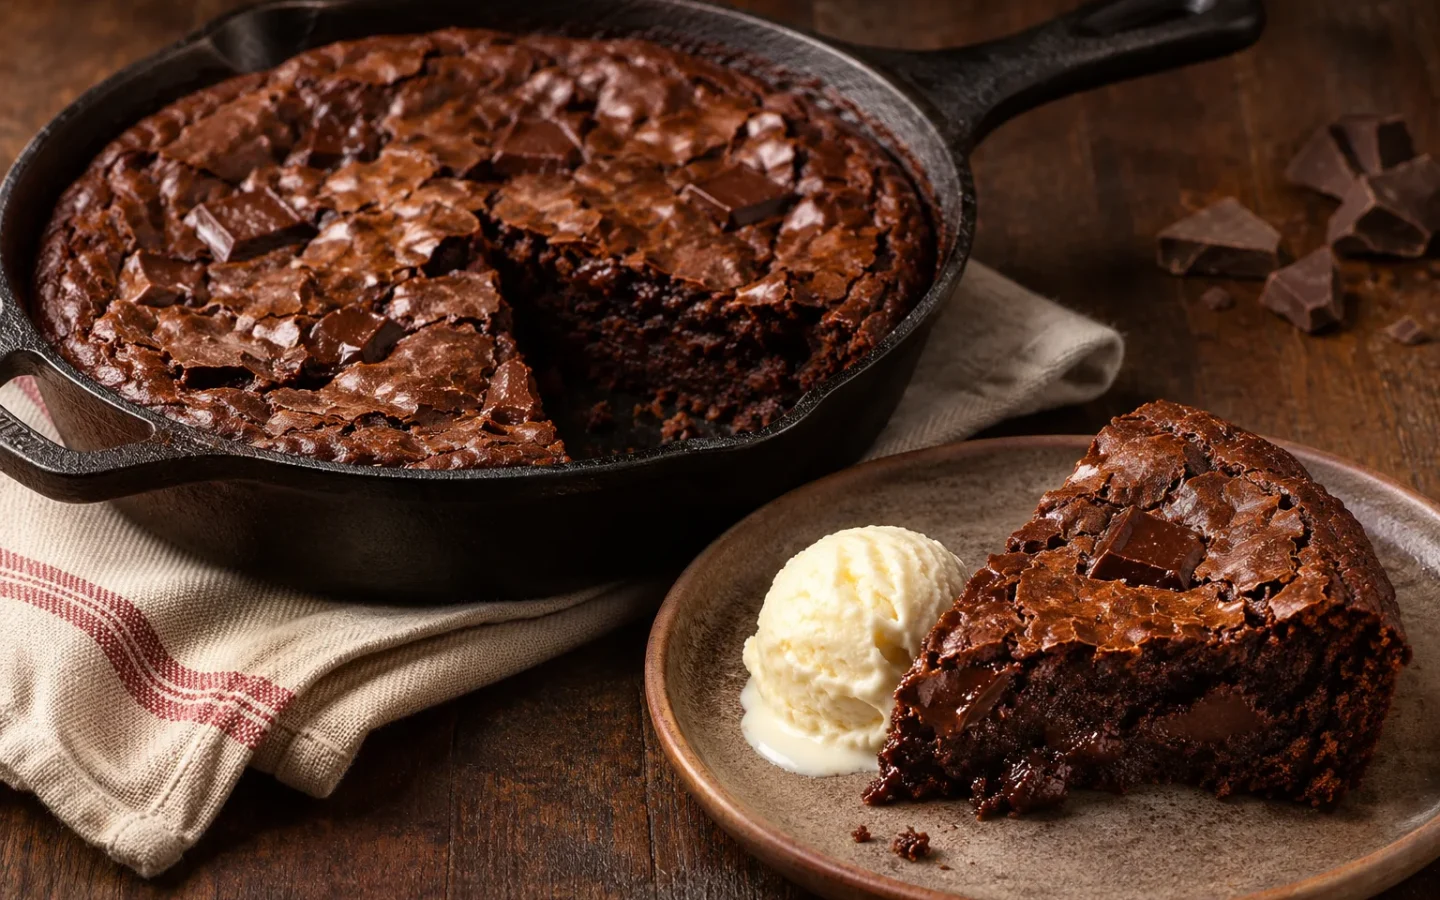
A one-pan cast-iron brownie with a glossy crackled surface, chewy edge, and dense fudgy center made without a separate mixing bowl.
Introduction
A skillet brownie recipe condenses melting, mixing, baking, and serving into one pan. One-pan desserts and skillet bakes were among the comfort-food formats performing strongly on Instagram and TikTok in November 2026. The appeal is obvious: molten-looking chocolate, a dramatic round pan, and fewer dishes. The technique still demands precision because cast iron retains heat and continues cooking the brownie after it leaves the oven.
This version targets a genuine fudgy texture rather than raw batter. Melted dark chocolate and cocoa provide depth, brown sugar retains moisture, and a modest flour quantity gives enough structure to slice after cooling. Whisking sugar into warm butter helps dissolve crystals, while vigorously whisking the eggs creates the thin glossy top. The skillet is cooled slightly before eggs enter so they emulsify instead of scrambling.
The recipe is designed for a 10-inch cast-iron skillet. A larger pan makes a thinner, faster brownie; a smaller pan creates a deeper center that needs longer and can overcook at the edge. The method includes temperature cues, a metal-pan alternative, serving options, and a clear distinction between a moist crumb and unsafe or unappealing liquid batter.
Time
| Stage | Duration |
|---|---|
| Preparation time | 18 minutes |
| Cooking time | 24 minutes |
| Cooling time | 25 minutes |
| Total time | 67 minutes |
Active preparation takes about 18 minutes. Baking normally takes 22 to 27 minutes, followed by at least 25 minutes of cooling for clean wedges. A brownie served warm after 10 minutes will be softer and spoonable. Cast iron continues transferring stored heat, so the center should leave the oven around 190°F to 195°F / 88°C to 91°C. Do not wait for a completely dry tester, which signals a cakier result.
Needed equipment
| Tool | Why it helps |
|---|---|
| 10-inch well-seasoned cast-iron skillet | Moves from stovetop to oven and creates a chewy edge. |
| Heatproof whisk | Dissolves sugar and aerates eggs directly in the warm pan. |
| Flexible silicone spatula | Folds flour cleanly without scraping seasoning or overmixing. |
| Digital kitchen scale | Controls the small flour quantity that separates fudgy from cakey. |
| Instant-read thermometer | Identifies the baked center more reliably than a wet chocolate-coated toothpick. |
| Heatproof trivet and oven mitts | Cast-iron handles remain dangerously hot long after baking. |
Tags
Skillet Brownie, One Pan Dessert, Chocolate, Cast Iron Baking, Fudgy Brownies.
These tags describe the technique, central ingredients, and serving context. They are navigation aids, not guarantees for medical dietary needs; packaged products must still be checked individually.
Serving Size
This recipe yields 10 wedges. Scale ingredients by weight where possible, and remember that pan area, batch size, chilling capacity, and cooking time may need to change when doubling the recipe.
Difficulty Level
Easy. The detailed method identifies the moments that require attention so a first-time cook can understand both the action and the intended result.
Allergen Information
Wheat, milk, and egg; chocolate may contain soy, milk, or tree-nut cross-contact depending on the label Ingredient formulas and cross-contact warnings vary by country and manufacturer. For a serious allergy, read every current label, use clean equipment, and avoid substitutions with uncertain production histories.
Dietary Preference
Vegetarian; not vegan; can be adapted with a tested gluten-free cup-for-cup flour blend
Course
Dessert.
Cuisine
American-inspired baking. This label describes the recipe’s culinary frame and inspiration without claiming that a modern adaptation represents every regional or traditional version.
Ingredients
| Ingredient | Amount | Selection and purpose |
|---|---|---|
| Unsalted butter | 170 g / 3/4 cup | Melt gently in the skillet; reserve a small amount for greasing the sides. |
| Dark chocolate | 140 g / 5 oz | Use 60-to-70-percent chocolate, finely chopped for even melting. |
| Dutch-process cocoa powder | 35 g / 1/3 cup | Adds dark color and rounded cocoa flavor. |
| Espresso powder | 1 tsp | Optional; deepens chocolate without obvious coffee flavor. |
| Granulated sugar | 150 g / 3/4 cup | Supports the glossy, thin crust. |
| Light brown sugar | 100 g / 1/2 cup packed | Adds chew and moisture. |
| Large eggs | 3 | Use at room temperature to protect the chocolate emulsion. |
| Pure vanilla extract | 2 tsp | Rounds cocoa bitterness. |
| All-purpose flour | 95 g / 3/4 cup | Weigh carefully; excess flour makes the brownie cakey. |
| Fine sea salt | 3/4 tsp | Use less if finishing with flaky salt. |
| Baking powder | 1/4 tsp | A small amount prevents an excessively dense, greasy center. |
| Chocolate chunks | 100 g / 3 1/2 oz | Fold most into batter and scatter the remainder on top. |
| Flaky salt | 1/4 tsp, optional | Add after baking, not before, for controlled contrast. |
Measuring and substitution strategy
Read the entire table before shopping. The notes explain function as well as quantity, which matters when making substitutions. Replace like with like: preserve fat with fat, acidity with acidity, and structural dry ingredients with tested equivalents. Spoon measures are level US measures. When both mass and volume appear, use mass for the most repeatable result.
Prepare and measure every ingredient before heat begins. This keeps fast steps from stalling and prevents accidental double additions. If an ingredient has a variable intensity—such as chile paste, miso, coffee concentrate, or flavored liqueur—taste it alone and begin at the lower end of the suggested adjustment.
Instructions
-
1. Heat the oven and assess the skillet
Preheat to 350°F / 175°C with a rack in the center. Ensure the skillet is clean, dry, and well seasoned. If food commonly sticks to it, grease the sides lightly after melting the butter. Never use a skillet with a wooden, silicone, or otherwise non-oven-safe handle.
-
2. Melt butter gently
Place the skillet over low heat and melt the butter without browning. Rotate to coat the base and sides, then remove from the burner. A very hot skillet can seize chocolate and scramble eggs later, so low heat and brief cooling are deliberate parts of the method.
-
3. Melt the chocolate off heat
Add chopped dark chocolate to the warm butter and wait one minute. Stir until smooth, returning the pan to the lowest heat for only a few seconds if stubborn pieces remain. Whisk in cocoa and espresso powder until no dry pockets or lumps remain.
-
4. Dissolve the sugars
Whisk granulated and brown sugars into the warm chocolate mixture for one minute. It will look grainy rather than perfectly smooth, but the warmth begins dissolving crystals. Let the skillet cool five minutes; the base should feel warm, not scorching, when a hand is held above it.
-
5. Whisk in eggs for a crackly top
Add eggs one at a time, whisking vigorously for 30 seconds after each. Add vanilla and continue another 30 seconds until the mixture is glossy, thickened, and falls in broad ribbons. This aeration and partial sugar dissolution support the delicate shiny crust.
-
6. Fold the dry ingredients
Whisk flour, fine salt, and baking powder together in a cup, then scatter over the chocolate base. Fold with a spatula just until the last flour streak disappears. Scrape across the skillet bottom and corners, where dry flour can hide, but avoid continued mixing.
-
7. Add chocolate chunks
Fold in three-quarters of the chunks, then smooth the surface into an even depth and scatter the rest on top. Wipe batter from the upper skillet walls so stray smears do not burn. The center and edge should be equally deep before the pan enters the oven.
-
8. Bake to temperature, not dryness
Bake 22 to 27 minutes. The edge should look set and slightly raised, the surface should be crackled, and the center should no longer slosh when moved. A tester will carry moist crumbs and melted chocolate. For precision, remove around 190°F to 195°F / 88°C to 91°C at the center.
-
9. Stop carryover cooking
Set the hot skillet on a trivet. If your cast iron is exceptionally heavy and tends to overcook desserts, place the skillet on a cool damp towel for no more than 20 seconds, ensuring the surface is heat-safe. Otherwise simply cool uncovered; never add water to the pan.
-
10. Cool and portion safely
Wait at least 25 minutes for wedges or 10 minutes for a warm spoon dessert. Sprinkle optional flaky salt sparingly. Protect everyone from the hot handle by keeping an oven mitt over it. Cut with a plastic or silicone-safe utensil if preserving skillet seasoning matters.
Preparation Tips
- Chop chocolate finely so residual heat can melt it without prolonged burner contact.
- Let the chocolate base cool before eggs enter. Warm is useful; hot risks cooked egg strands and a broken emulsion.
- Weigh flour and cocoa. Their compact powders vary too much when scooped casually.
- Pull the brownie while moist crumbs remain. Cast iron continues cooking the perimeter and center during cooling.
- Cover the handle with an oven mitt after baking so nobody mistakes it for a cool stovetop handle.
Organization is part of the technique. Clear the work surface, keep ingredients that are ready to eat away from raw eggs or other raw proteins, and set a timer as a reminder rather than as the only doneness test. Appearance, aroma, texture, and temperature provide the final evidence.
Nutritional Information
Values are estimated per serving from the listed ingredients. Brands, absorbed oil, trimming, dilution, optional garnishes, and actual portion size change the result. This table is general information, not medical advice.
| Nutrient | Estimated amount per serving |
|---|---|
| Calories | 390 calories |
| Protein | 5 g |
| Carbohydrates | 48 g |
| Total fat | 22 g |
| Saturated fat | 13 g |
| Sodium | 225 mg |
| Dietary fiber | 3 g |
| Sugars | 35 g |
| Cholesterol | 95 mg |
For a medically prescribed diet, calculate with the exact products you use or consult a qualified clinician or registered dietitian. Sodium, sugar, caffeine, and alcohol are especially sensitive to brand and serving decisions.
Tips and Tricks
- Use residual heat: Melting chocolate off the burner limits scorching and keeps the skillet cool enough for eggs.
- Whisk eggs vigorously: This stage, rather than leavener, creates the paper-thin glossy crust.
- Read three cues: Set edge, non-liquid center movement, and internal temperature together are more reliable than a dry tester.
- Respect carryover: A heavy skillet stores enough heat to turn perfect fudgy crumbs cakey if the brownie is baked until fully firm.
Add-ons
Choose one variation at a time so the core balance remains clear.
- Toasted walnuts: Fold in 75 g and disclose the tree-nut allergen. Their bitterness and crunch offset the dense chocolate.
- Raspberry swirl: Dollop 60 g thick seedless raspberry preserves on top and swirl once; excess fruit makes wet pockets.
- Tahini finish: Swirl two tablespoons tahini over the surface before baking and reduce flaky salt.
- Mint chocolate: Add 1/4 teaspoon peppermint extract with vanilla; more can taste medicinal.
Side dishes
Pair the recipe with contrast rather than more of the same dominant flavor.
- Vanilla ice cream: A small scoop contrasts hot brownie and emphasizes the fudgy center.
- Fresh raspberries: Acidic fruit cuts sugar and adds a clean finish.
- Unsweetened whipped cream: Soft dairy lightens the dense texture without adding more sweetness.
- Espresso: A short bitter coffee balances chocolate and supports smaller portions.
Improvements
Use the finished result as evidence. Diagnose the specific issue before changing the next batch, and change one major variable at a time.
- The brownie is cakey: Too much flour, overbaking, or excessive mixing is likely. Weigh flour and remove at the recommended temperature.
- The center is liquid: The skillet may be too small or the oven cool. Return it for three-minute intervals and verify pan diameter.
- The chocolate seized: Water entered the pan or heat was too high. Melt off heat and ensure utensils are completely dry.
- The bottom tastes burned: The skillet remained too hot from stovetop melting or sat over a lower oven hot spot. Use low burner heat and the center rack.
Save and store
Cool the brownie completely before covering the skillet; trapped steam softens the glossy crust. Store wedges in an airtight container at room temperature for up to three days or refrigerate for up to five. Warm a portion in a 300°F / 150°C oven for five minutes or microwave briefly. Freeze individually wrapped wedges for up to two months and thaw covered at room temperature. Do not store acidic fruit toppings in bare cast iron for long periods because they can affect seasoning; transfer leftovers to a separate container.
Label stored components with the date and use clean, shallow containers where rapid cooling is needed. When handling history, time, temperature, or odor is uncertain, discard the food rather than relying on reheating to make it safe.
FAQ
Can I make this without cast iron?
Yes. Melt the ingredients in a saucepan, transfer batter to a greased 9-inch metal cake pan, and begin checking around 22 minutes. Carryover heat will be less intense.
Why does the recipe use both cocoa and chocolate?
Melted chocolate supplies cocoa butter and dense texture, while cocoa powder intensifies flavor without adding more sugar. Together they create depth and structure.
How can I tell melted chocolate from raw batter on the tester?
Melted chocolate looks glossy and dark; raw batter appears lighter, fluid, and floury. Temperature and center movement provide a clearer answer than the tester alone.
Can I double the recipe?
Do not double it in one skillet. Use two 10-inch pans or a tested rectangular-pan formula so the center depth and baking behavior remain predictable.
Can I prepare the batter ahead?
Bake it immediately. Holding batter changes dissolved sugar, aeration, and flour hydration. Bake ahead and rewarm portions instead.
Why is there so little baking powder?
Fudgy brownies need limited lift. More leavener makes a cakier crumb and can exaggerate rise and collapse in the center.
Conclusion
A one-pan skillet brownie succeeds when convenience does not replace control. Use gentle stovetop heat, melt chocolate with residual warmth, cool before adding eggs, whisk for the crackly top, and measure flour by weight. Most importantly, remove the skillet before the center looks completely dry because cast iron keeps working on the counter. Those choices create the contrast the format promises: chewy edge, thin shiny crust, and a dense center that is fudgy rather than raw.
References
References support trend, safety, or ingredient context. The recipe proportions, editorial explanations, troubleshooting, and serving guidance are original to Love With Recipes.